Talks ∋ Re-interpreting data ∋ RubyConf 2023
Who am I?

Hi,
I’m Murray, thanks for coming to my talk. I’m an Engineering Manager at Cleo. We’re based in the UK but our customers are in the US. We’re empowering people to build a life beyond a paycheck and we do that with an AI assistant that understands your banking information in order to give you personalised and relevant advice on your personal finances, and, for a fee, access to a range of services to actively help you improve your situation.
Buuut… I’m not talking about anything related to that, so if it sounds interesting, we are hiring and we can help with visas and relocation so, come and find me later. I have this face. You’ll find me.
What I am here to talk to you about is files and data and… well, let’s just get started.
A standard downloads folder

Here is a screenshot of a fairly standard downloads folder1. All these different types of files: pictures, movies, documents, audio. The file names include the title of the file and after the . what’s known as a file extension that tells you what kind of file it is.
In a modern graphical operating system, you don’t have to parse that extension yourself, your OS does it and gives you a handy icon to tell you what the file is, and maybe even give you a hint as to what application will be used to open the file if you double click it.
Renaming a file extension

Indeed, if you rename the file to change the extension, this will very likely change the icon and the application that will open it. Your OS might even warn you about that.
When I first started using computers, I thought this was all that was involved: rename the file and you’ll be able to use it. Of course it’s not. When I tried renaming a file from .doc to .txt (because I didn’t have Microsoft Word at the time) I couldn’t open the file to read it in notepad – it was just a stream of nonsense.
I did try the example in the screenshot – I hoped that if I renamed a PDF to a WAV it would magically be able to read all the words in the PDF out to me. Obviously, it didn’t, it just gave me an error.
So there’s more to it than just the file extension; what’s going on?
The file command and how it works
On unix systems there’s a command called file that if you give it a file, it will do its best to tell you what that file actually is.
Interestingly, one of the things it does is open the file and look at some of it to take a guess, it doesn’t just take the name of the file on blind faith and say that a .txt file is a text file, if it’s actually a zip file.
Why renaming files doesn’t work

Going back to my youthful attempts to open files without the relevant (usually expensive) software, this explains why it didn’t work. You can call your file whatever you want, and the OS may use that for some hints as to what application will open the file, but it’s what’s actually inside the file that really matters. Renaming a .doc to a .txt won’t let you get at the words in the doc, renaming a PDF file to a WAV file won’t let you listen to the contents of that PDF file. I’m wiser now and understand my youthful folly, but…
The WAV file specification

At some point in my early terminally online life I came across a website that described the data structure for WAV files.
WAV files, if you don’t know, are simple, uncompressed sound files, storing a digital representation of a recording of an actual sound. The 1s and 0s of the data are the numerical values that represent that sound wave – hence the name.
Exploring the WAV file format
And they are very simple.
Exploring the WAV file format: The data part
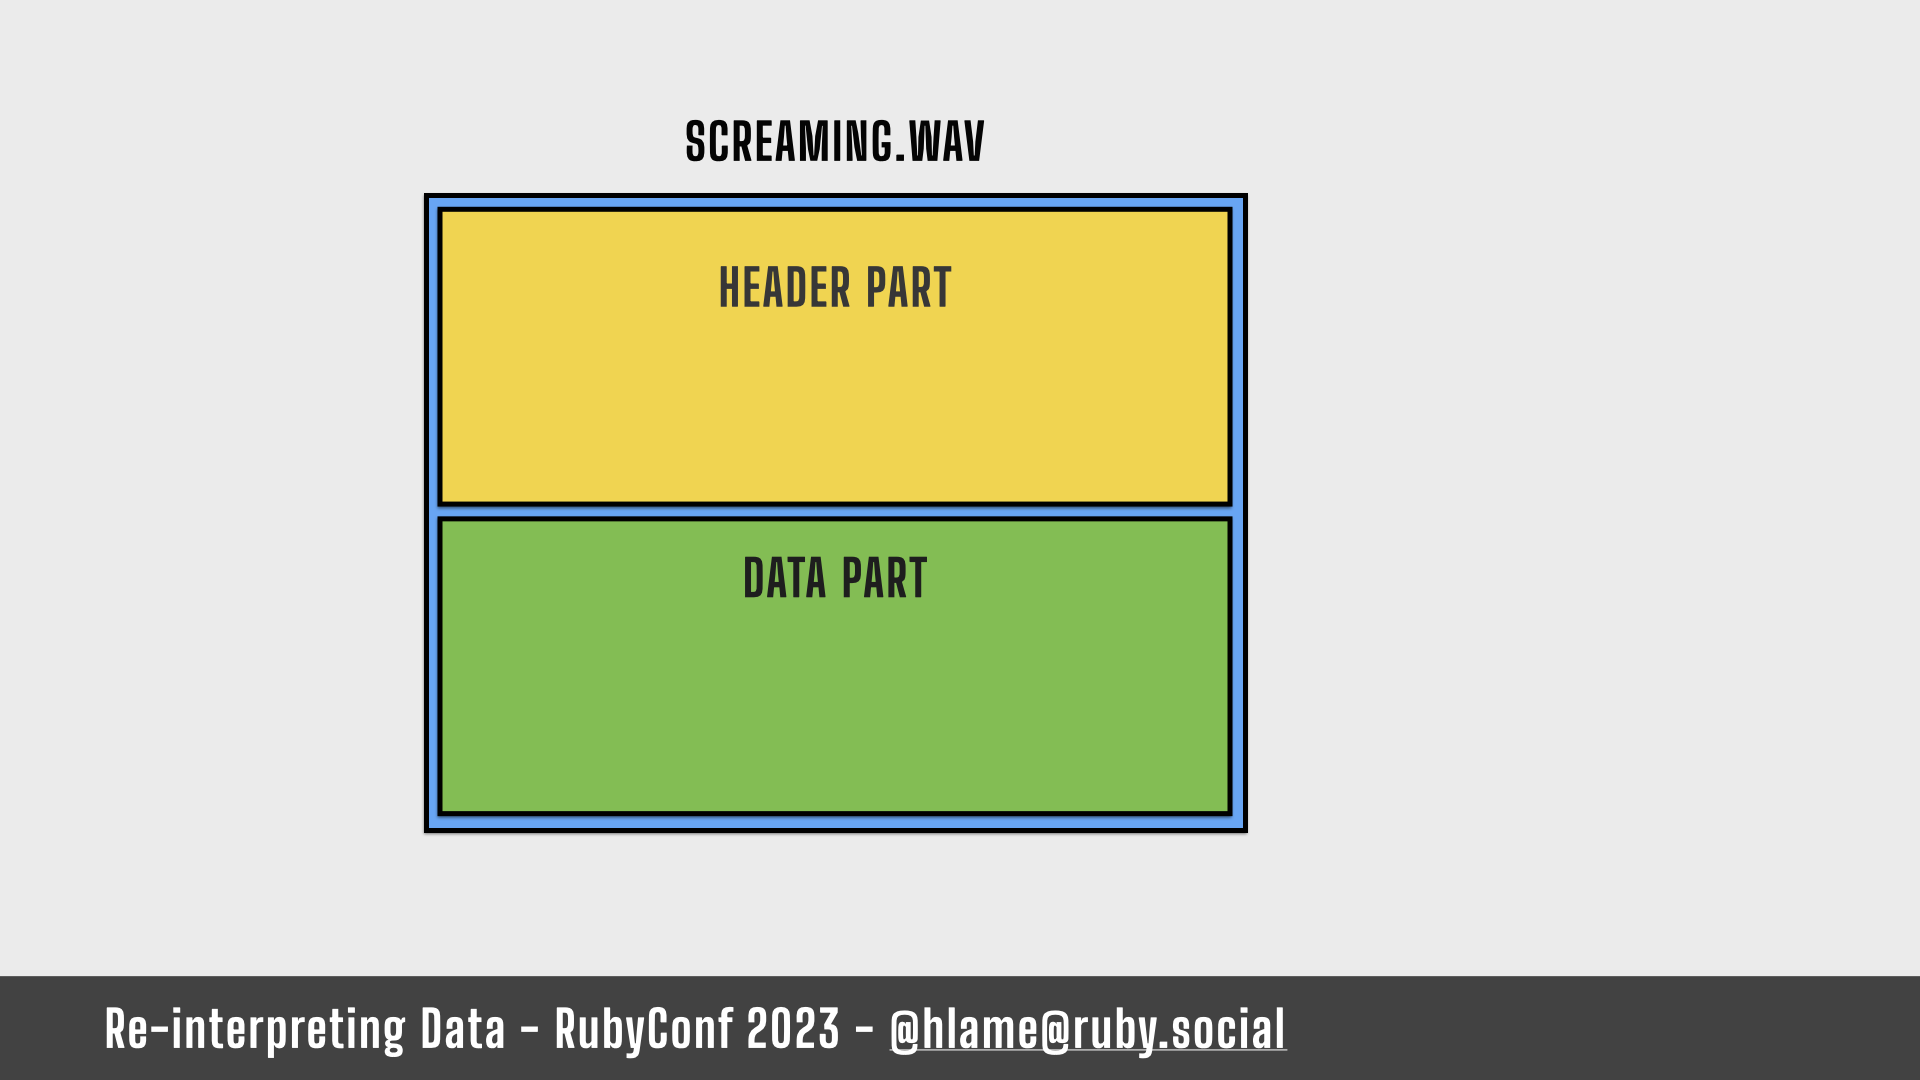
They’re made up of a header part, and a data part.
The data part is just that, raw bytes that represent the digital representation of the sound wave. Just a stream of numbers really. There’s lots of different ways to interpret those numbers, and that’s what the header part does. It tells us how to interpret the data.
Exploring the WAV file format: The header part
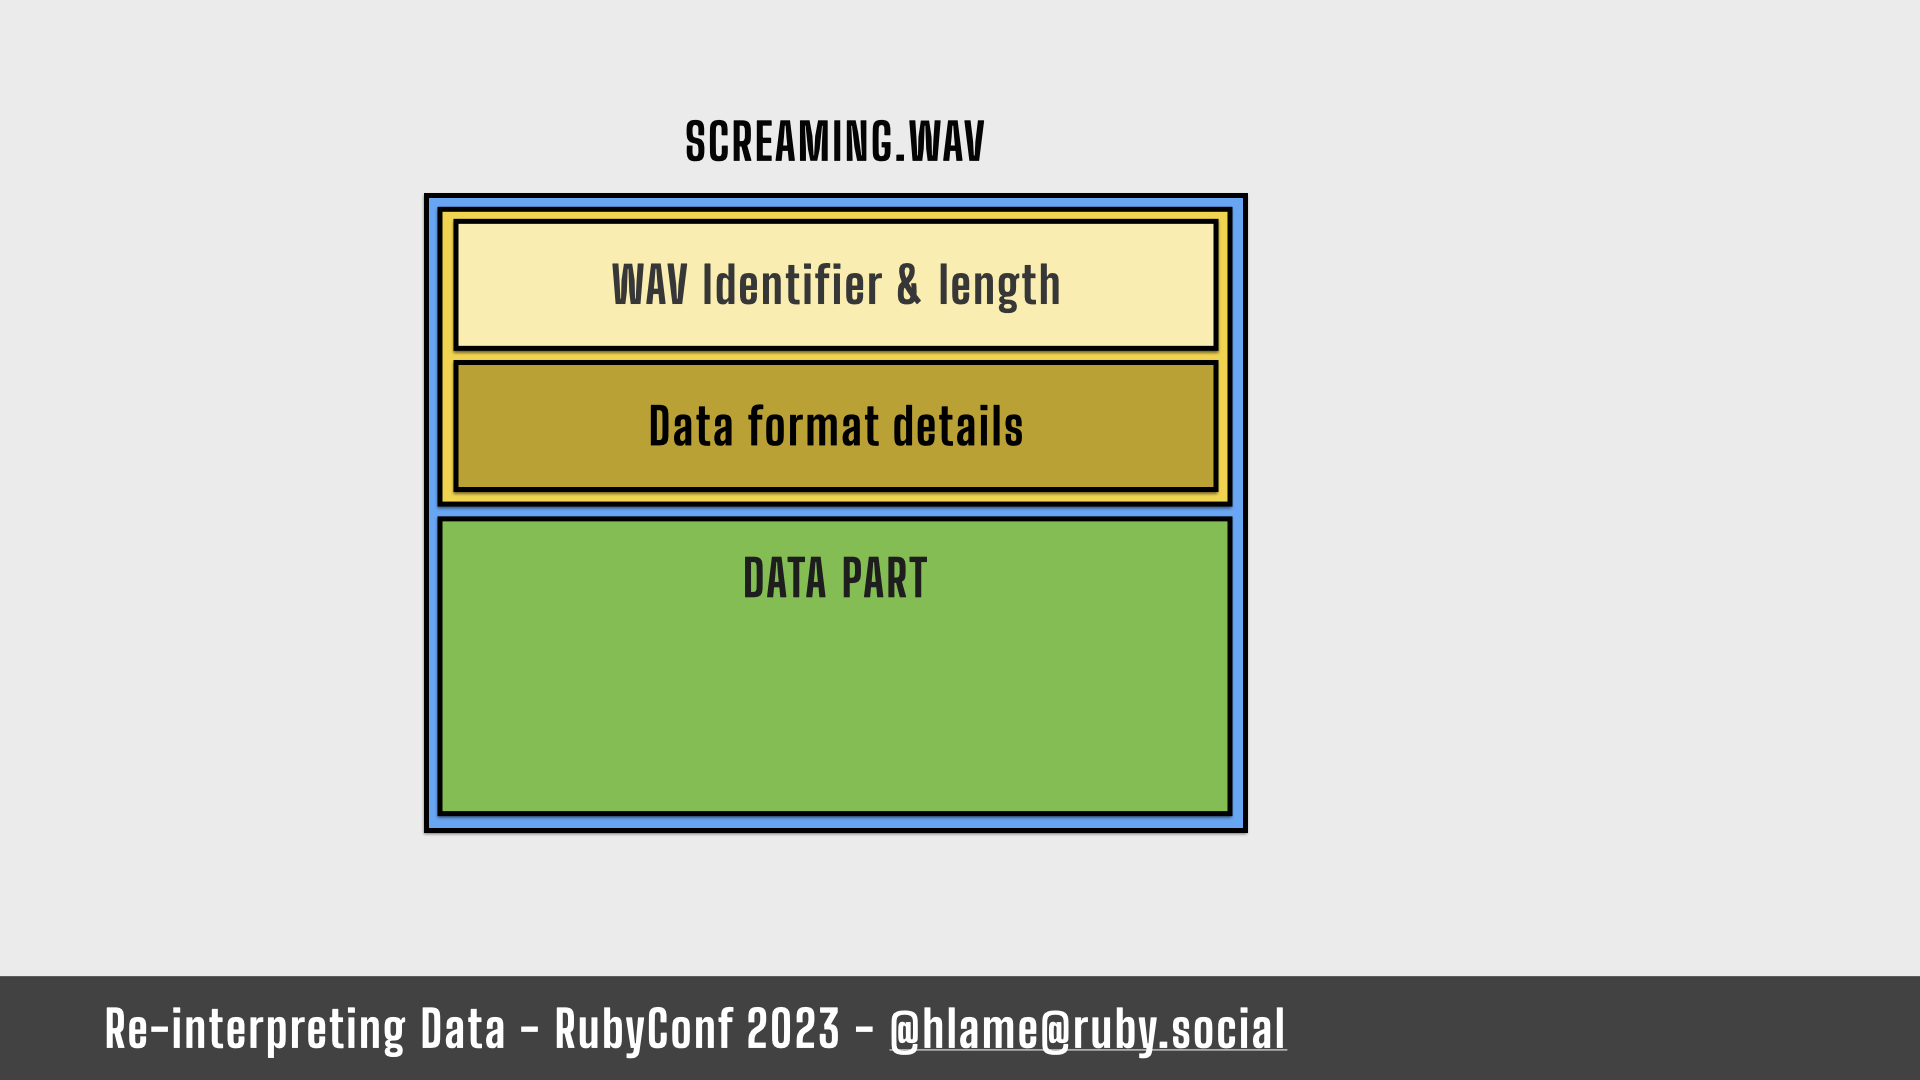
The header part is split in two.
- the first part tells the world “Hi, I’m a WAV file and I’m this long,” – it’s very short and it’s there basically, to tell other software “if you don’t know what a WAV file is, you can stop now”2
- the second part tells the audio software how to interpret the data that follows. It describes things like:
- how many channels the sound has (is it mono or stereo, etc),
- how many samples there are per second for the sound,
- how many bits there are per sample
How detailed this data is: more channels, more samples per second and more bits per sample means the sound is more accurate, but also means you need much more data to represent the same length of sound.
Could renaming work?

Ok. So. We can’t rename a file from tax return.pdf to tax return.wav and expect to be able to listen to it.
But, given how simple the WAV file format is, we could take a PDF file, and put a WAV file header on top of it and then we can listen to it.
How to convert PDF to WAV
How?
Well, a WAV file is header + data. The data part is easy, we just take the entire contents of the PDF and smoosh it onto the bottom of our WAV file.
The header is more complicated, but not by much. We can calculate what we need for the first part of the header just by looking at the size of our source file. By making some choices about the sample rate and bits per sample we can calculate the second half of the header.
Creating the WAV header in ruby
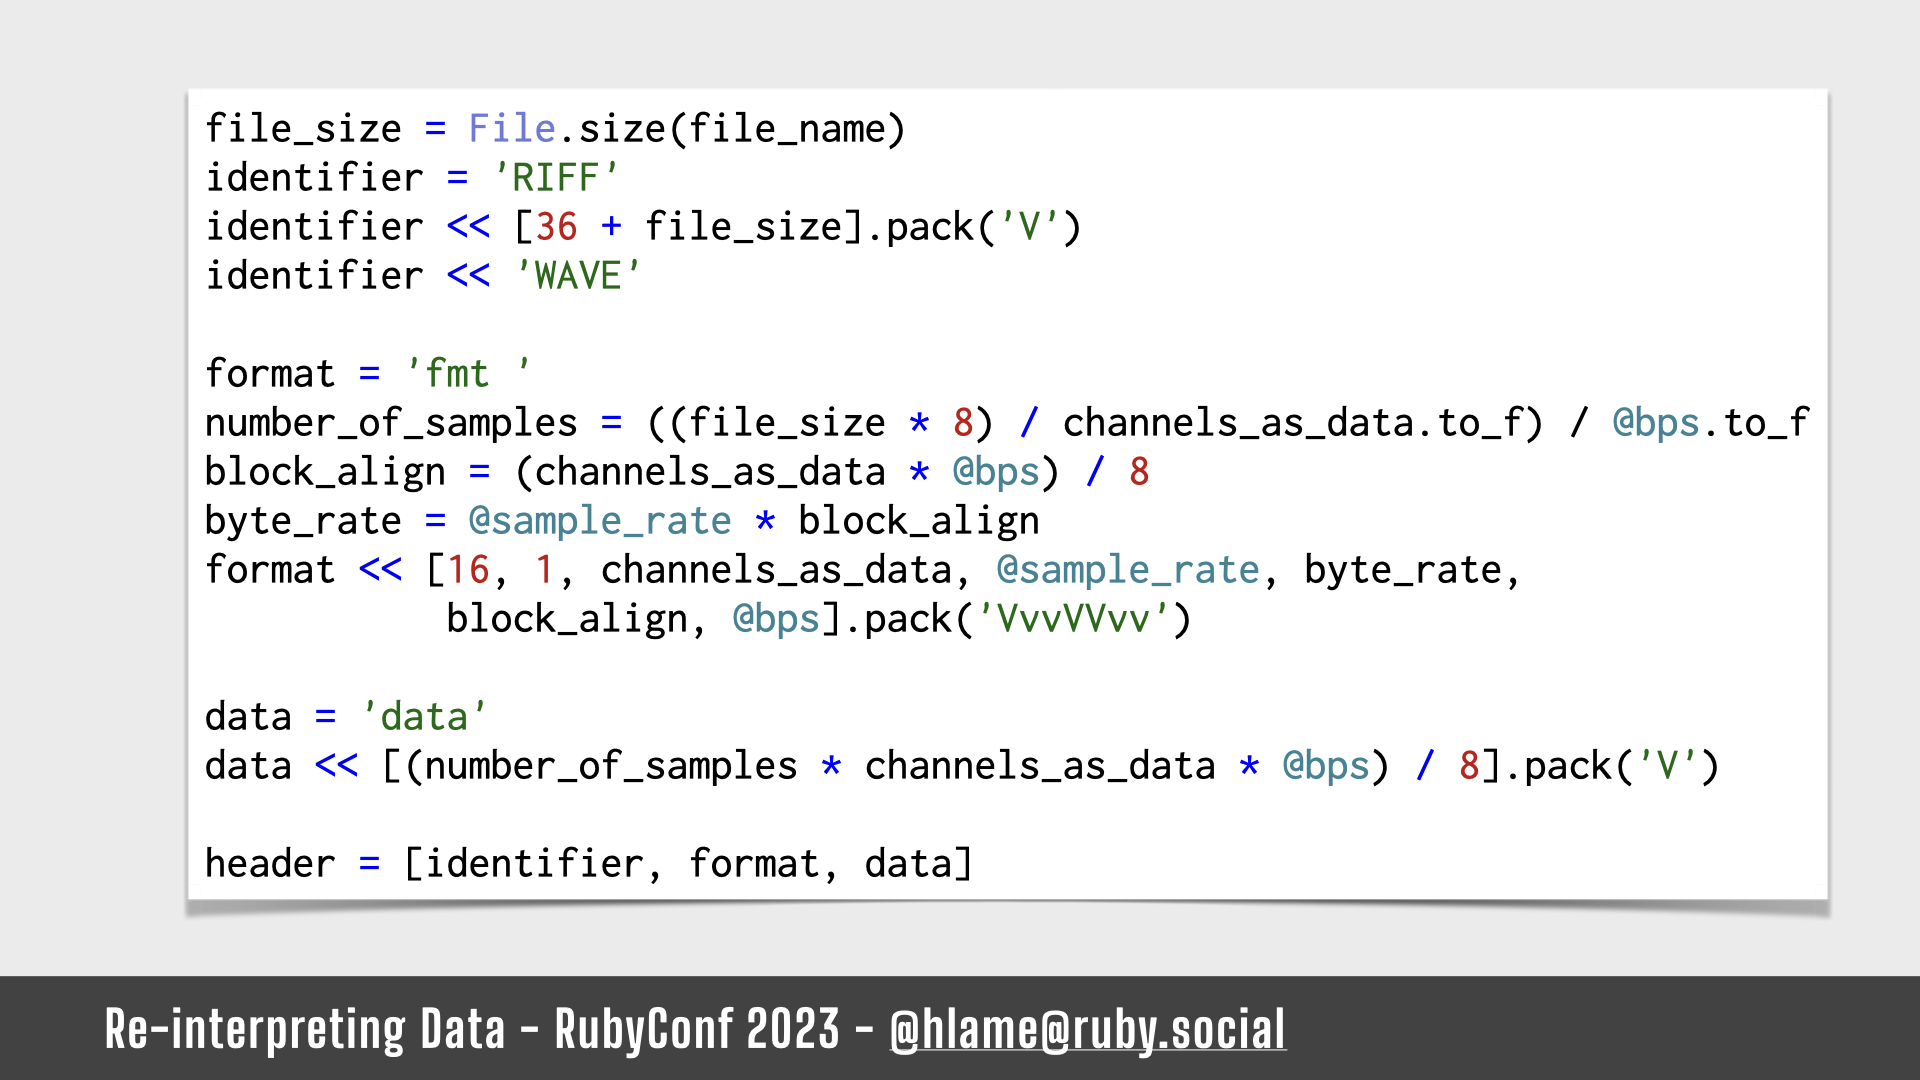
Here’s some ruby code that constructs the header. Let’s go through it.
Creating the WAV header in ruby: identifier & length
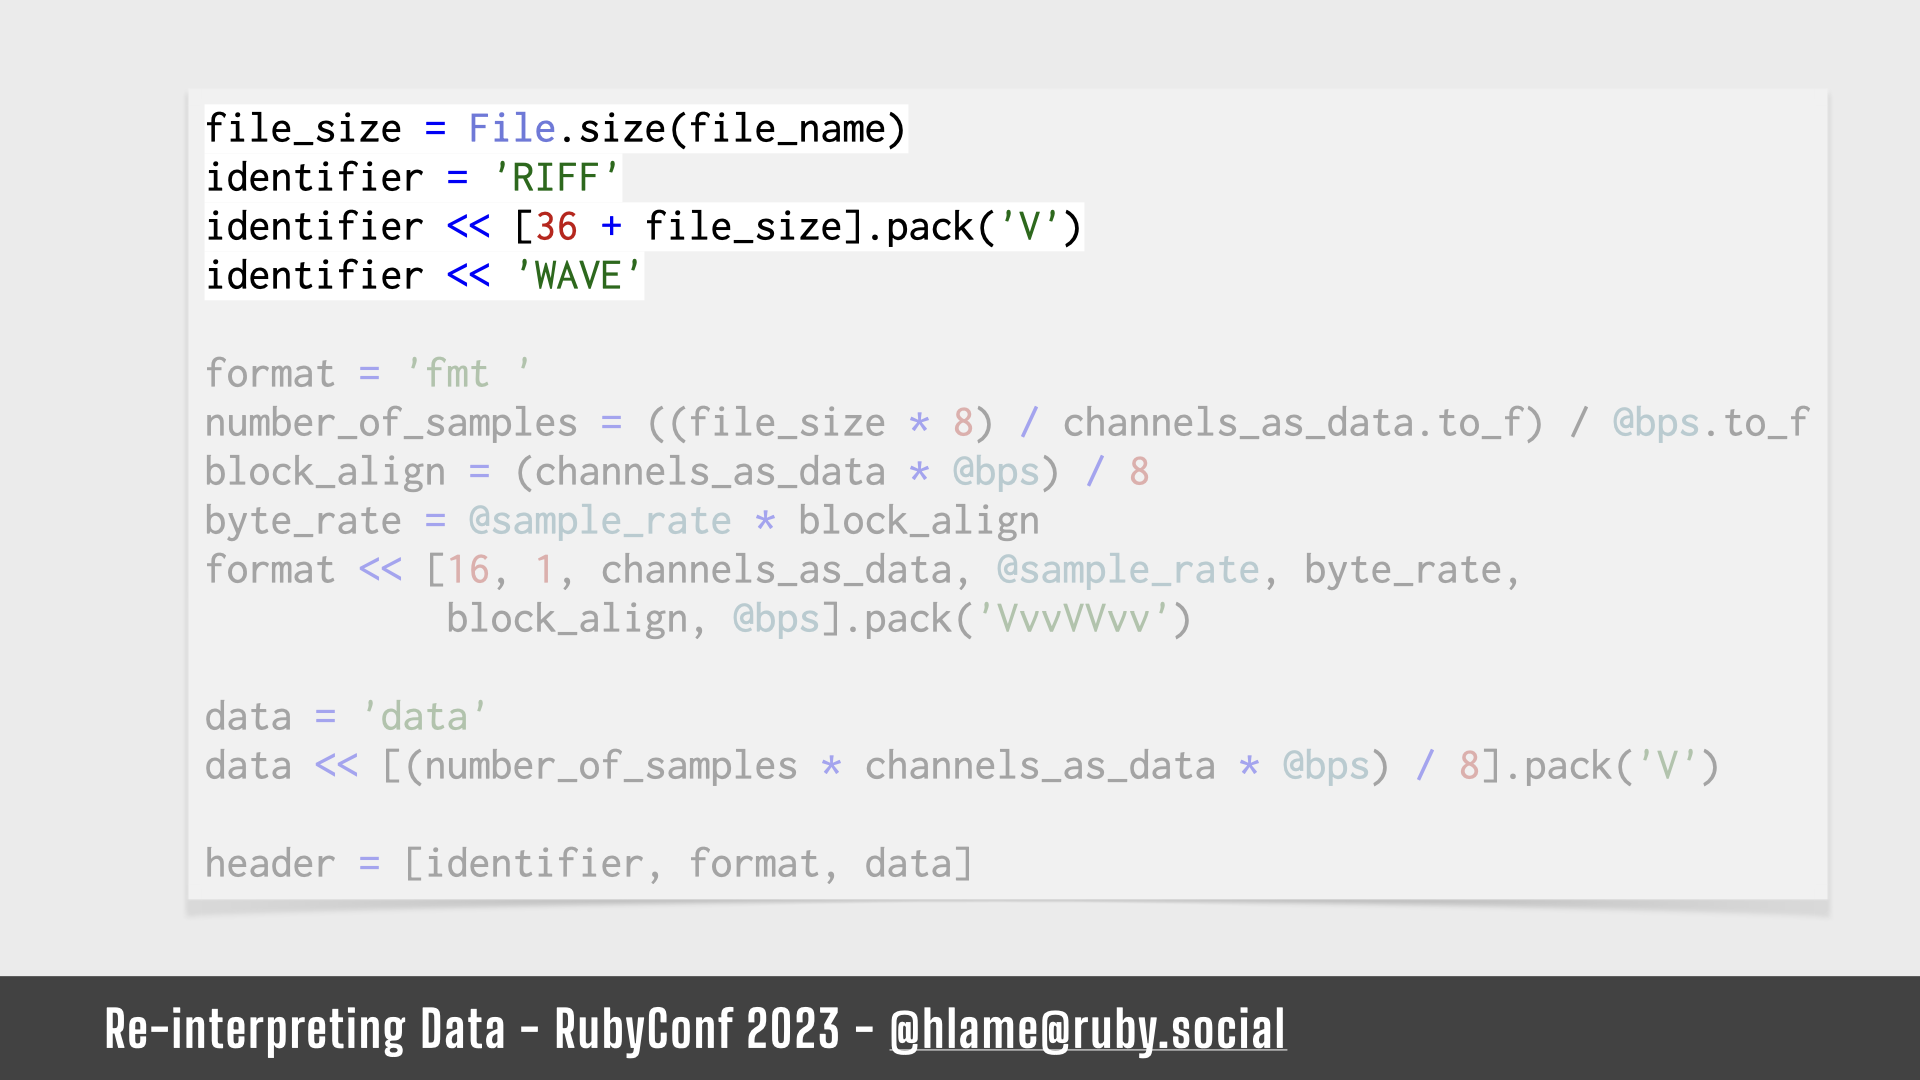
The 1st stanza builds whole of the identifier & length part of the header, e.g. “I’m a WAV file, and I’m this big, including the size of the header”. That’s the magic 36.
Creating the WAV header in ruby: data format details
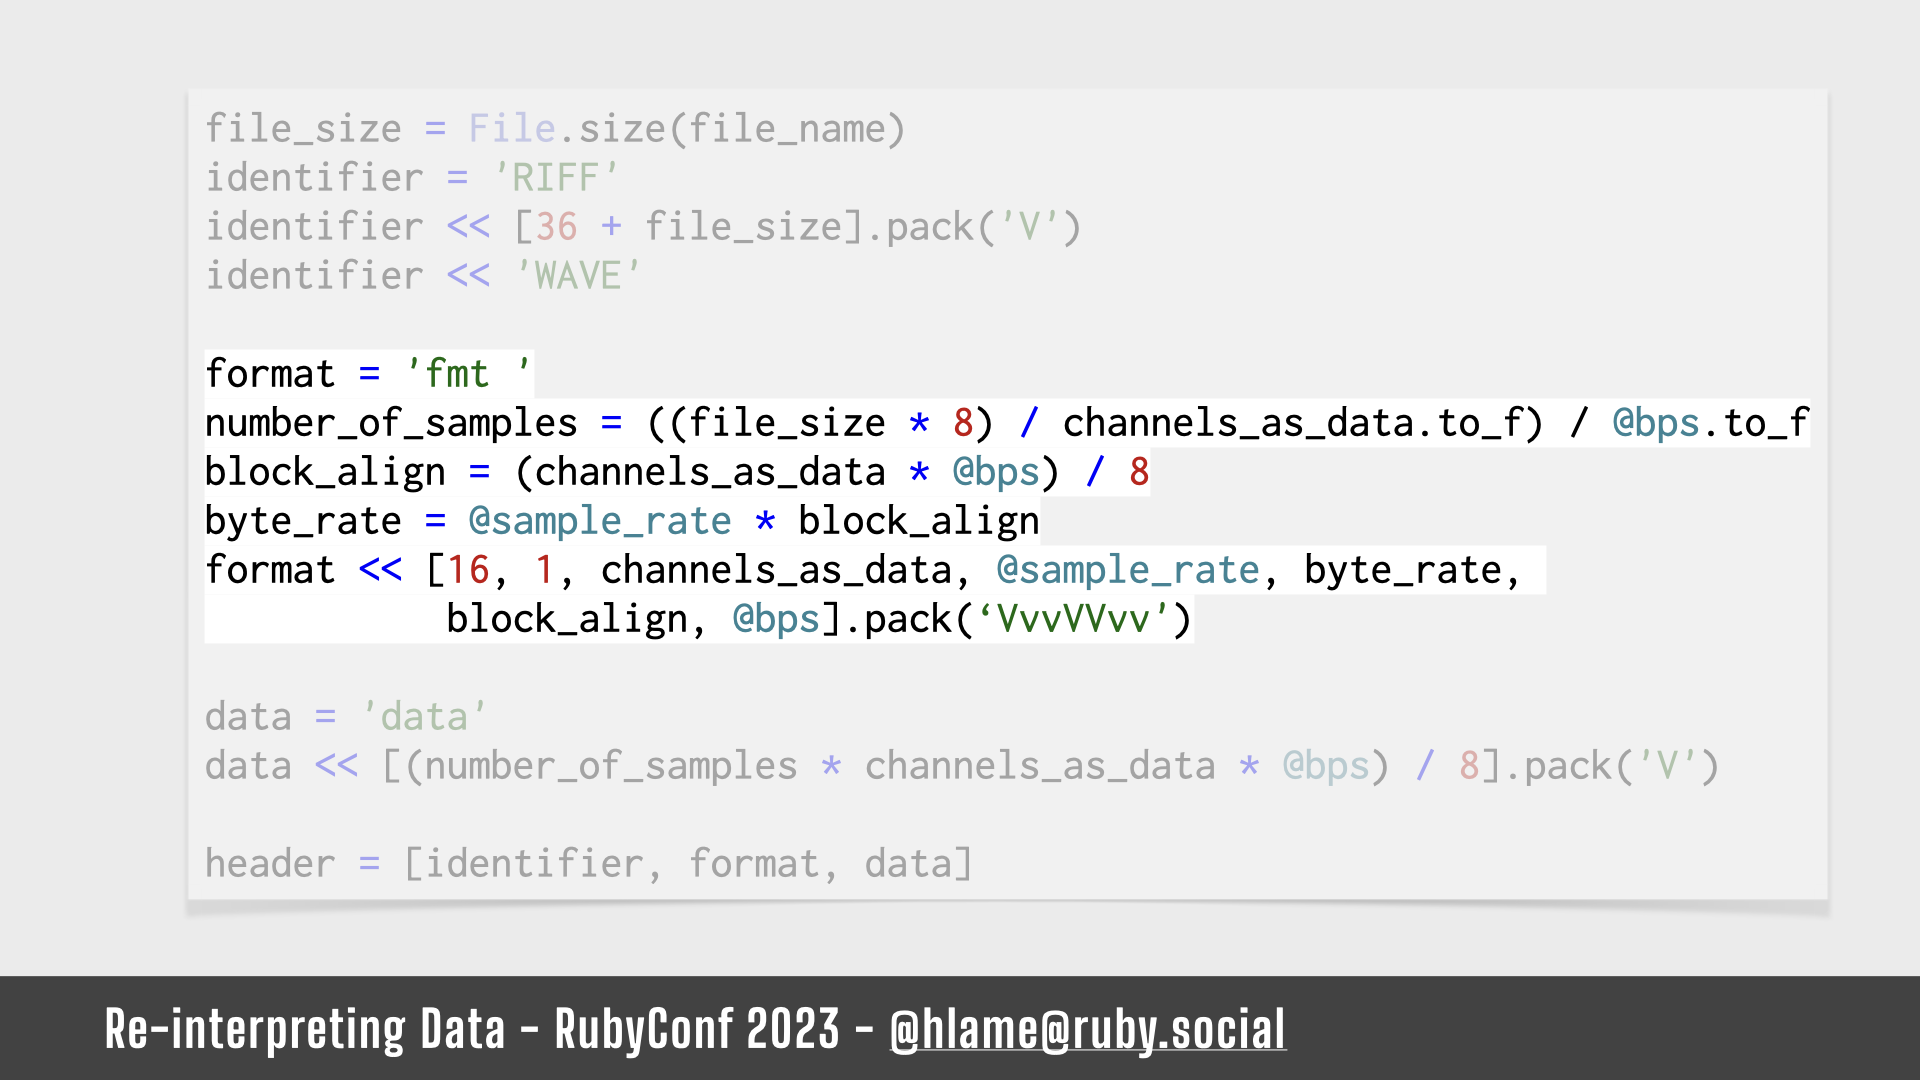
The 2nd stanza constructs the first part of the data format details header. Our arbitrary choices are in some instance variables (e.g. what the sample rate and bits per sample will be) and we combine those with the some calculations on file size to explain how to interpret our data. There are some magic numbers in here too – but trust me, while they’re important they’re also boring.
Creating the WAV header in ruby: final data size
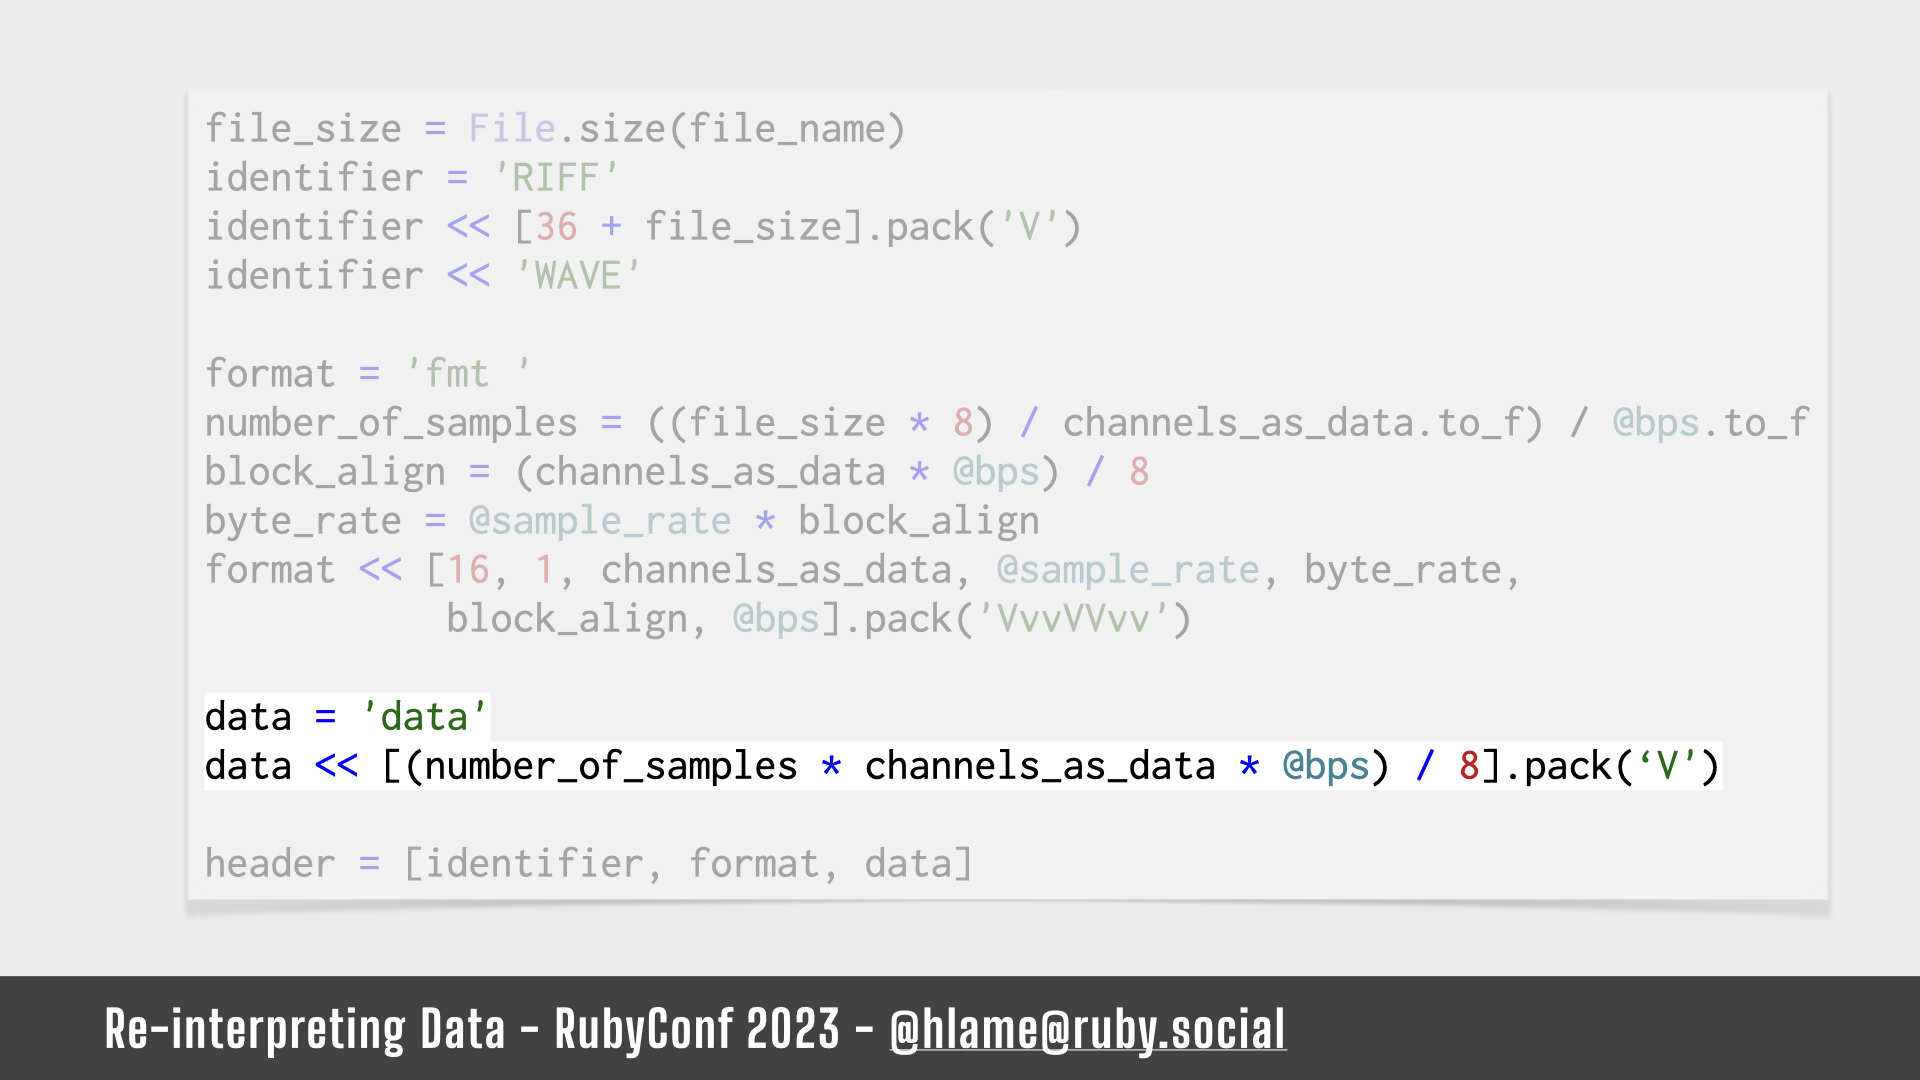
The 3rd stanza constructs the second part of the data format details header which again uses the file size to explain how much data there is.
As we saw, after this header we just have the raw bytes that make up the actual sound data.
What’s missing from this code snippet is how you actually copy the data around between files and write the header to a file. I’m sure you could all imagine that, so I’m not going to show it.
Using Array#pack

All that’s really interesting about this code is the pack method. I don’t know about you, but in my day-to-day coding life I’d never encountered it before, so here’s what it does:
Called on an array of numbers, and passed a format string, pack will convert those numbers into bytes. Why’s that interesting? Aren’t numbers bytes anyway? Well, as it turns out, there’s lots of different ways to represent a number in bytes and pack lets you control that. So you can say: represent this number as a 4 byte number, or a 2 byte big endian number, or a 2 byte signed integer. You don’t need to know what those words mean but trust me it’s important when you’re thinking about bytes.
What a WAV file cares about is that some of the header is a 4 byte number, some is a 2 byte number, etc…. That’s what the pack statements are doing. It’s a V for 4 byte little-endian and it’s a v for 2 byte little-endian3.
And, that’s basically all there is to it.
An aside on rubocop-magic_numbers

As an aside: that code had a lot of magic numbers in it. At work, we’ve got a custom rubocop rule (published as a gem) that shouts at us if we have any magic numbers in our code and says to define named constants for them. But this code is personal and for fun, so best practices be damn’d, right?
That said… coming back to this code I did wonder what that 16 was for. Is the 16 special because we’re talking about bytes and it’s a multiple of 8, or is it something about the WAV file format? I do not remember, sorry! If only I’d given it a name maybe I would. So, maybe, best practices are good, actually?4
WAV Demo

Anyway, we’ve seen all the code, so when don’t we try it out!
Demo time: WAV (pt. 1)
First we require the library,
It’s called stegosaurus because I thought this code might be a steganography tool (for hiding data in other data) and, also, dinosaurs are cool!
We’ve got a library called stegosaurus and we can grab an object from it. It’s a waves object because we’re building WAV files.
Then we call make_from to make a WAV from a file…
Oh, we’ll need a file. I have a README in the repo that’s 1,000 bytes or so and that should give us something interesting. Let’s use that.
That gives us the filename for our new WAV file which I’ll open in VLC with a convenient little helper method.
The stegosaurus README as a WAV file.5
Okay, it’s very short. As I said the WAV format needs a lot of data to let you hear something, so we’re going to need a bigger file.
Demo time: WAV (pt. 2)
There are probably bigger files lying around, but the big file I know that I definitely have is the ruby interpreter itself.
Ruby comes with a nice little module called RbConfig that gives us lots of details about how ruby was built. The important method that I care about is RbConfig.ruby which gives you the path to the currently running ruby interpreter!6
If we stick that into our library we’ll be able to hear the ruby interpreter itself as a WAV file.
I hope you’re ready for this!
The ruby 3.2.2 interpreter as a WAV file.7
It’s basically unlistenable white noise, right? Fair, I mean, what did we expect? Although… if you’re old and Dusty like me, you can thank me later for the nostalgia trip you just had about loading software from tapes or connecting to the internet over dialup.
What is kind of interesting is that as we skip through it there’s some structure: different parts of the file sound different. You definitely don’t want to listen to it, but it’s interesting that there is some structure to it.
Are WAVs the only way?

We explored the WAV file a bit and there’s some structure, that’s interesting right?
I’m not listening to all that white noise to get attuned to the differences though. What if there was another way to explore the structure of the file?
A visual way maybe?
If we can listen to our files as WAVs, is there a similar shaped file format to let us look at them too?
The BMP file specification

Yes! There’s the BMP image format (Bitmap). It’s got a header and then pixel data, so we should be able to do basically the same as we did with WAV files: calculate the header and write out our source file as the pixel data.
Exploring the BMP file format
Lets look at BMPs like we did WAVs
Exploring the BMP file format – the data part
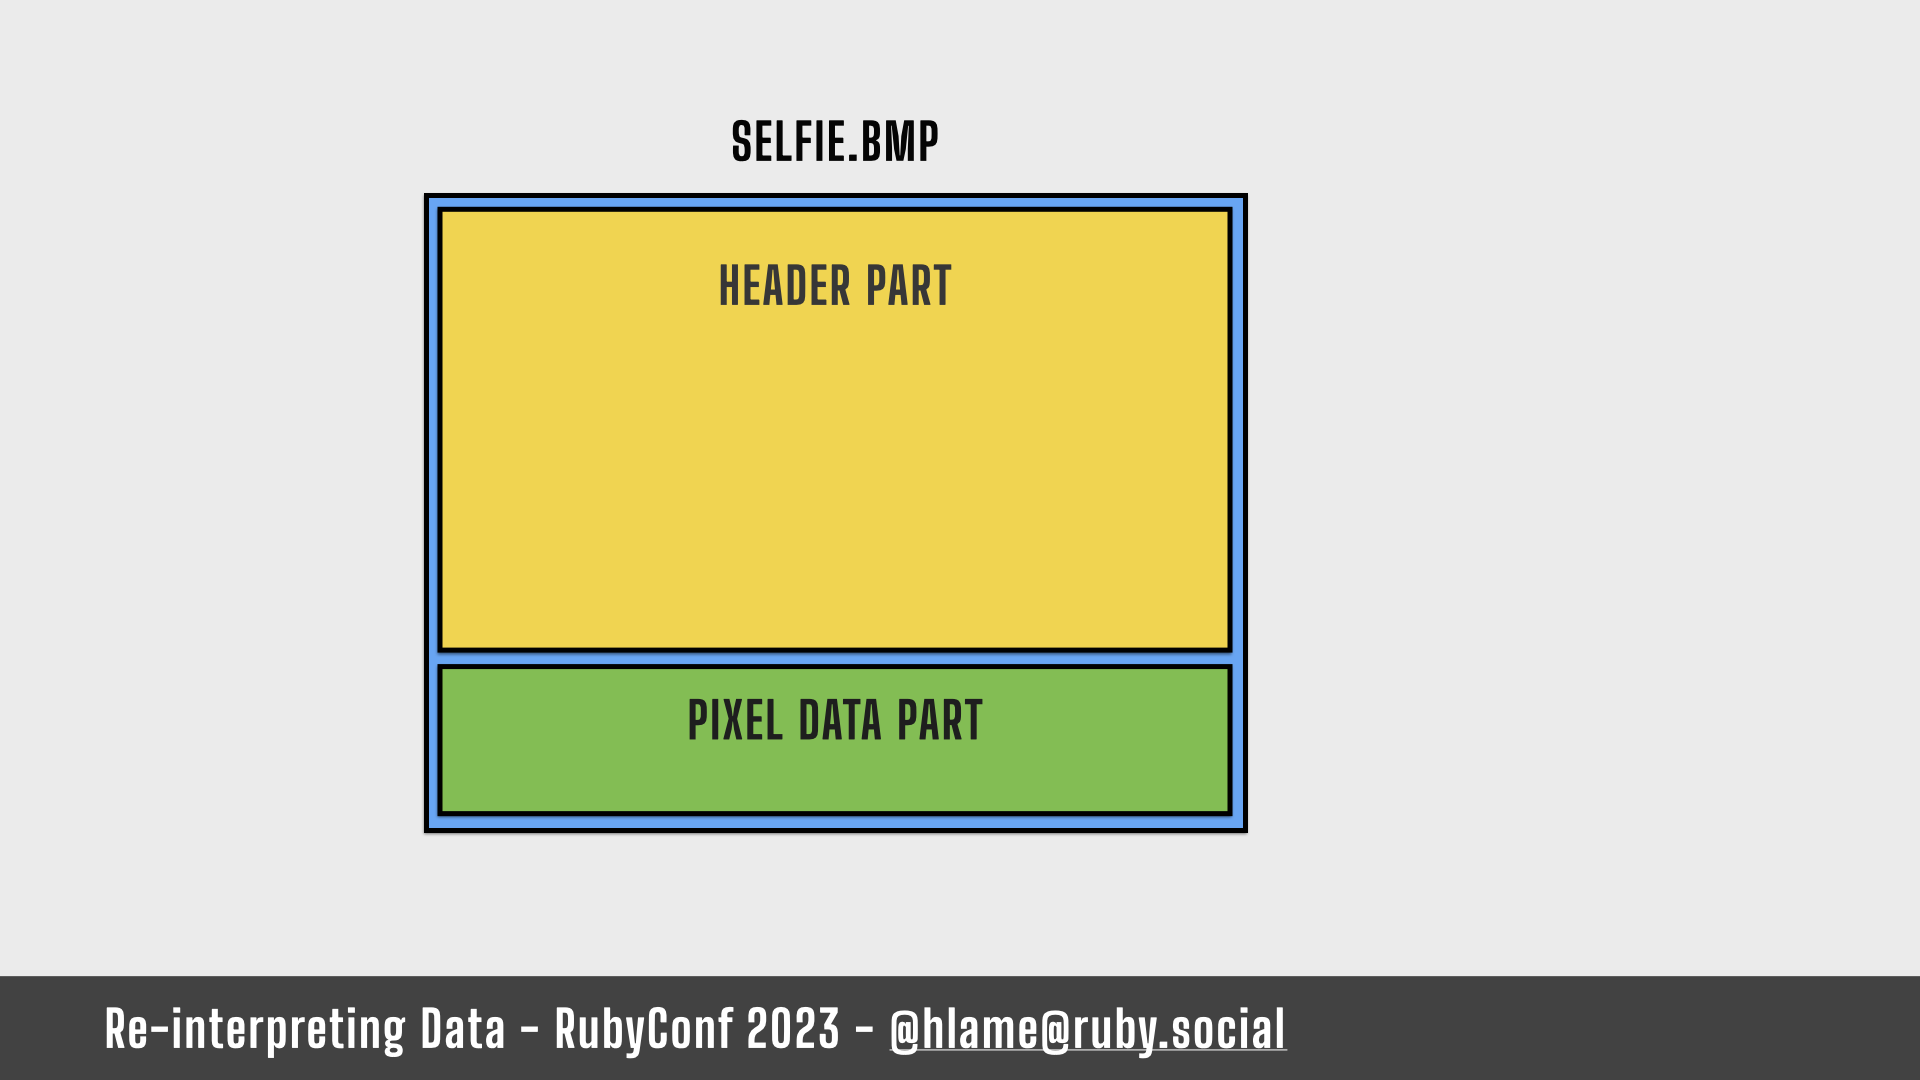
They’re made of a header and data.
The data, as you might expect, is the pixel data. It’s colour values for each pixel in the image.
Exploring the BMP file format – the header part
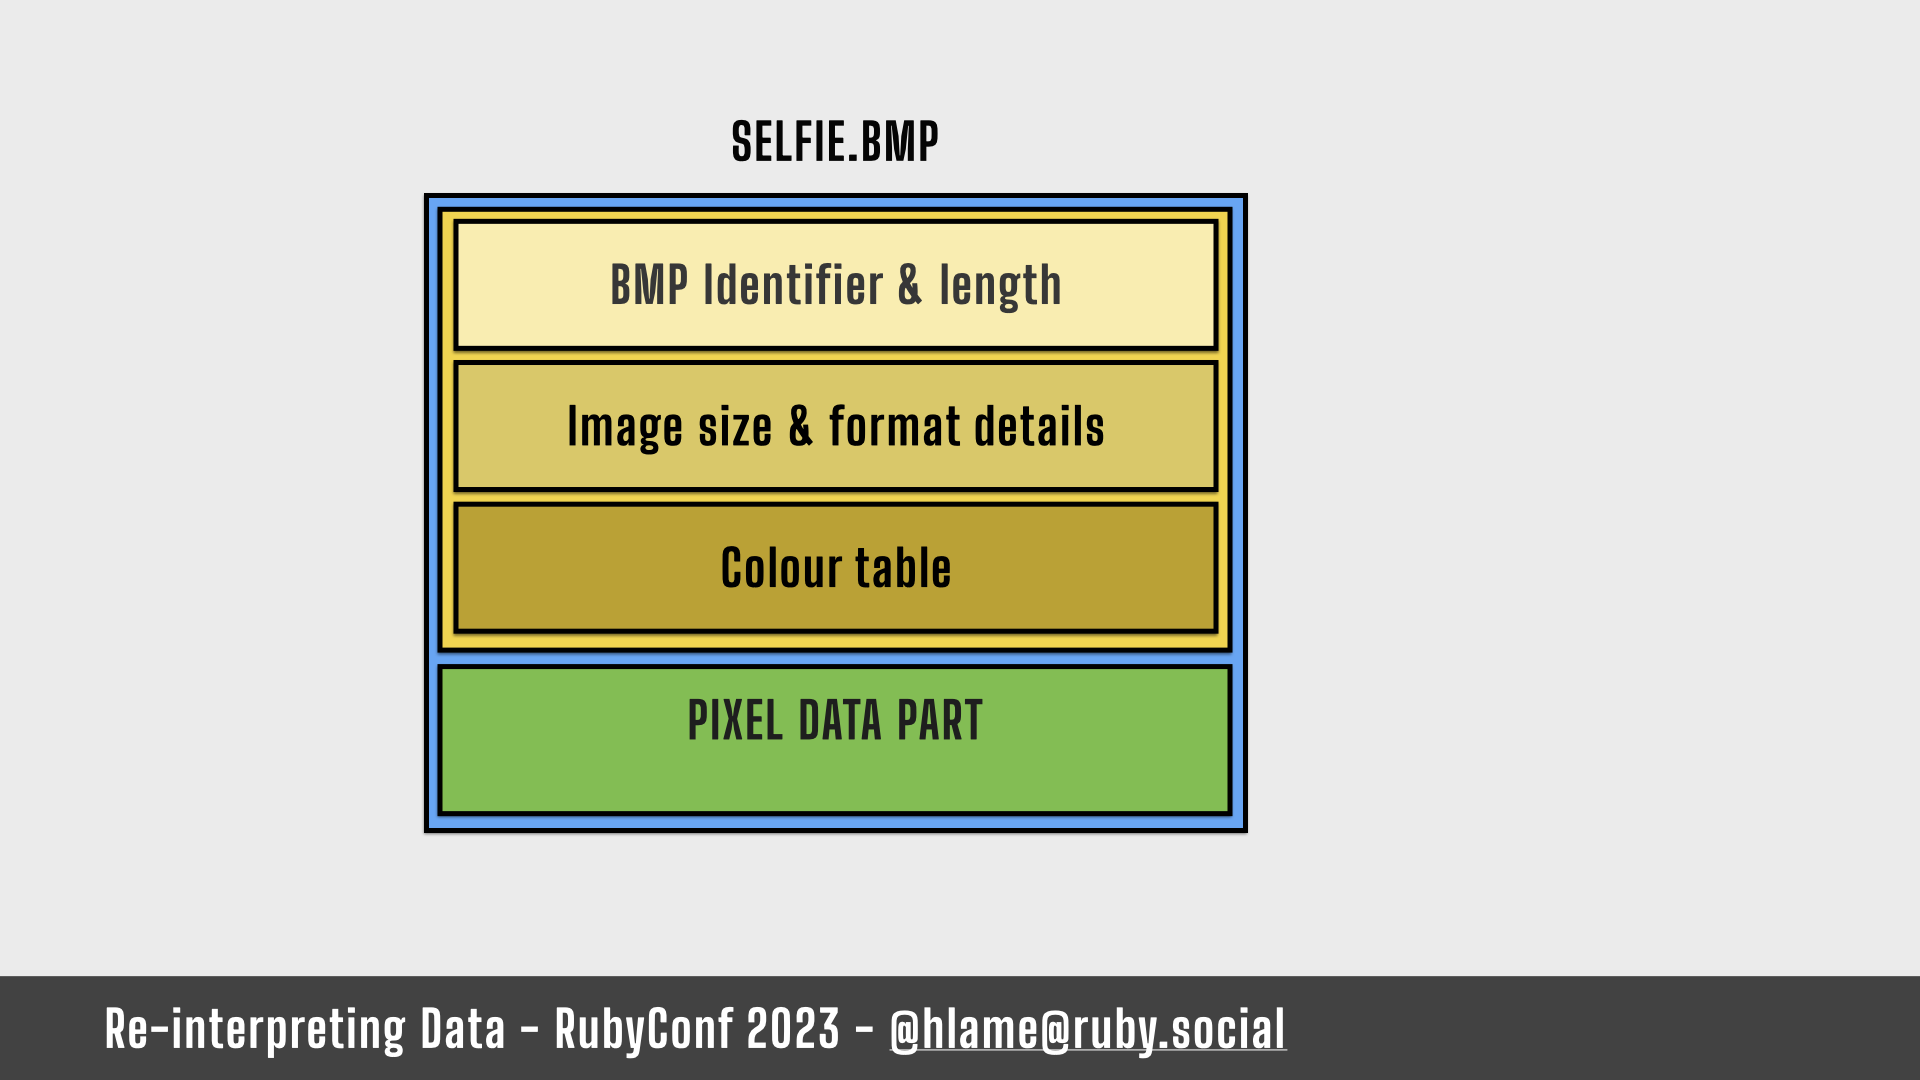
The header can be split into 3 parts:
- An opening segment with the BMP identifier and the length of the file
- A second segment with information about the image: width, height, colour depth, DPI resolution (e.g. if you want to print the bitmap out this scales pixels to inches), etc…
- A final segment that describes the colours used in the image. BMP is an indexed colour format; the pixels are not red, green, blue values they’re a number that points to an entry in the colour table.
It’s nothing we’ve not done before with WAV files. Except the pixel data part is a little more complex. We can’t just throw all the data at the end of the header and expect it to work. There’s 3 problems we have to solve.
BMP pixel data problems: 1. Colour Depths – 1-bit

The first is colour depth (e.g. how many colours the image has). One of the arbitrary choices we make is to choose a colour depth for our image and this has an impact on the amount of data we need. If we want a monochrome image we choose 1-bit colour depth and each byte of our file is equal to 8 whole pixels.
So a 25 byte file becomes a 200 pixel image. Nice.
BMP pixel data problems: 1. Colour Depths – 8-bit

If we want more colour (256 to be exact – shout out to VGA) we can choose 8-bit colour where 1 byte = 1 pixel.
Our 25 byte file is a 25 pixel image.
BMP pixel data problems: 1. Colour Depths – 24-bit

What if we want even more colours? We could choose 24-bit colour (AKA: true colour – 16 million colours, your eyes will not be able to cope with that!). Our 25 byte file is now a glorious 8 and ⅓ pixels. If we don’t have a complete pixel, a BMP renderer is just not going to show the image 😞
Oh, what do we do?
BMP pixel data problems: 1. Colour Depths – null to the rescue!

Pretty easy – unlike almost any other programming problem, it’s null to the rescue! We just add null bytes to the end of the data!
We can work out how many whole pixels the data would create and how many padding bytes we need to complete the last pixel – it’s a function of file size and colour depth.
Problem solved!
BMP pixel data problems: 2. Width x Height – simple squares

Our second problem is one of rectangles – width and height. Images have to be rectangles, so we need to arrange our pixels into rectangles.
Our padding example is really simple. We’ve got a 25 byte file which we pad to 9 pixels.
9 pixels is a lovely 3x3 square. Easy.
BMP pixel data problems: 2. Width x Height – annoying rectangles
It’s not always that simple. What if it was a 28 byte file? That gives us 10 pixels.
Yes…
…you can re-arrange that into a 5x2 rectangle.
Buuut. Factoring huge file sizes to find convenient rectangles, that will also be reasonable to look at on a screen might be painful. We don’t want wide and short or tall and skinny images. Simplest thing is just to work with squares.
BMP pixel data problems: 2. Width x Height – null to the rescue!

So it is null to the rescue again. Hurrah!
We have a simple “algorithm” for calculating the smallest square that can contain all our pixels.
- Get the number of pixels – 10
- Take the square root – 3.something
- Round that up – 4
- Square it – 16
- Subtract the number of pixels you have – 16 minus 10 = 6
Now we know how many padding pixels to stick onto the bottom of our image to make a square.
It might be inefficient in terms of extra bytes, but it is simple as it only uses two or three methods from Math.
BMP pixel data problems: 3. Scan lines – a valid pixel per row count

Our 3rd problem is scan lines. You could probably have anticipated the first two if you thought about it, but scan lines are a quirk of the BMP format.
A scan line is a single row of pixels from our image. Our 28 byte file is a 16 pixel image which is 4 by 4 – so it has 4 scan lines containing 4 pixels each.
For reasons the BMP spec says a scan line must be a multiple of 4 bytes
This is fine for our 28 byte file, because our rows are 4 pixels long, each pixel is 3 bytes, and that adds up to 12 which is a multiple of 4.
BMP pixel data problems: 3. Scan lines – an invalid pixel per row count
But, if we go back to our 25 byte file, that’s 9 pixels, a 3x3 square, which is 9 bytes per scan line…
…which is not a multiple of 4.
BMP pixel data problems: 3. Scan lines – null to the rescue!
So, happily, it is also null to the rescue again.
We could rearrange the pixel data to make scan lines that are multiples of 4 bytes long and then pad the end of the file with null bytes to complete the square. This’ll work.
We will get valid scan lines.
BMP pixel data problems: 3. Scan lines – null to the rescue?
However, I kinda think we’ve wasted some of our data.
If we look at it as bytes and pixels you’ll see what I mean.
When I rearranged the pixels into valid scan lines some of those “pixels” aren’t pixels anymore. They’re not visible – they’re just there to appease the scan line rule. We can’t see those pixels.
If I apply a “visible” overlay it’ll be clearer.
It annoys me that 6 whole bytes of my file are stuck at the end of scan lines where I can’t see them and they’re not showing me the structure of the file.
An important rule

I gave myself a self-imposed rule: I didn’t want to waste any source file bytes. It’s my project, and I can do what I want, even if it creates problems to solve. Which, I guess, that’s why we’re all here: to solve problems with programming even if they’re self-imposed and silly. I want to use as much data from my file as possible to make my image so we’re going to have to rethink.
BMP pixel data problems: 3. Scan lines – null to the rescue!
Instead of adding null bytes to the end of the file, what if we add null bytes to the end of each scan line?
This gives me valid scan lines of 12 bytes, which is good.
And without wasting any source data, which is also good.
That’s that problem solved too.
BMP pixel data problems: Total padding – pt. 1
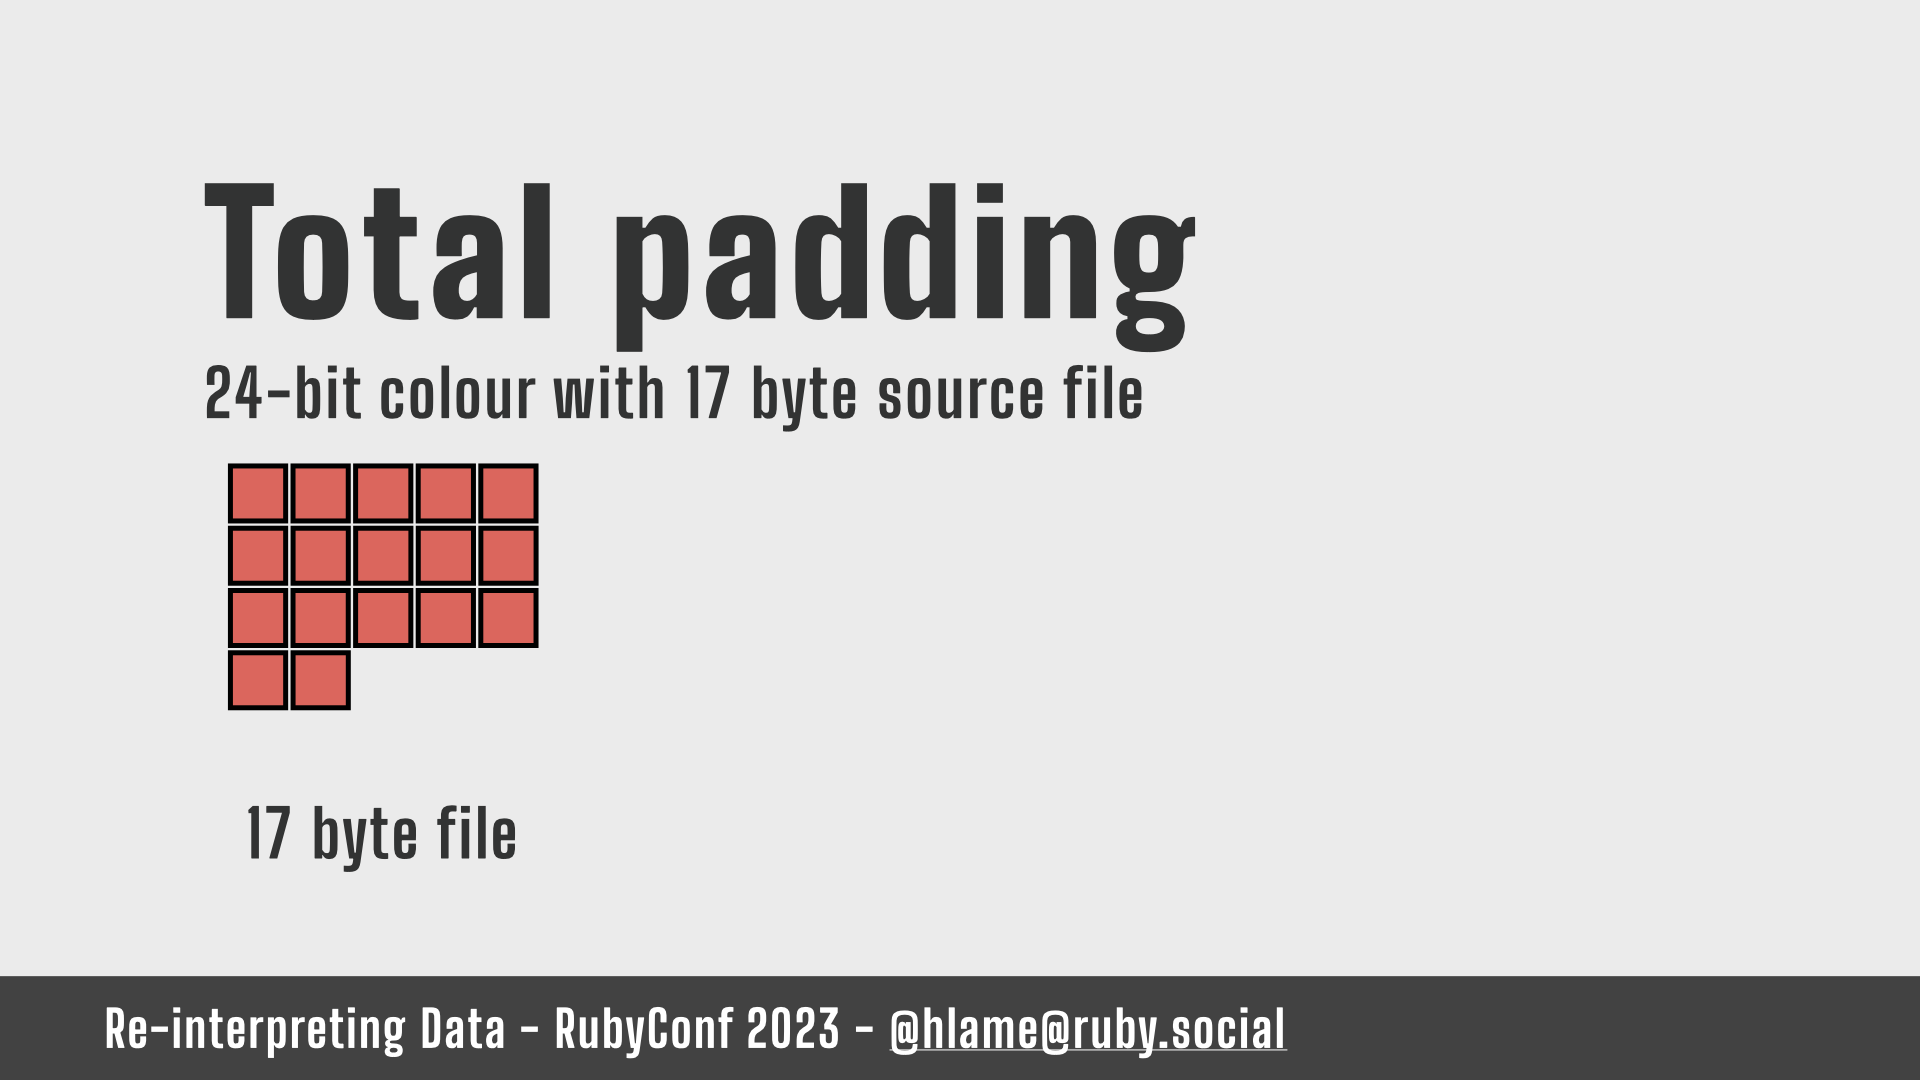
To recap here’s all the padding we need for a single file.
24 bit colour, so that’s 3 bytes per pixel.
Let’s say we have a 17 byte file…
BMP pixel data problems: Total padding – pt. 2
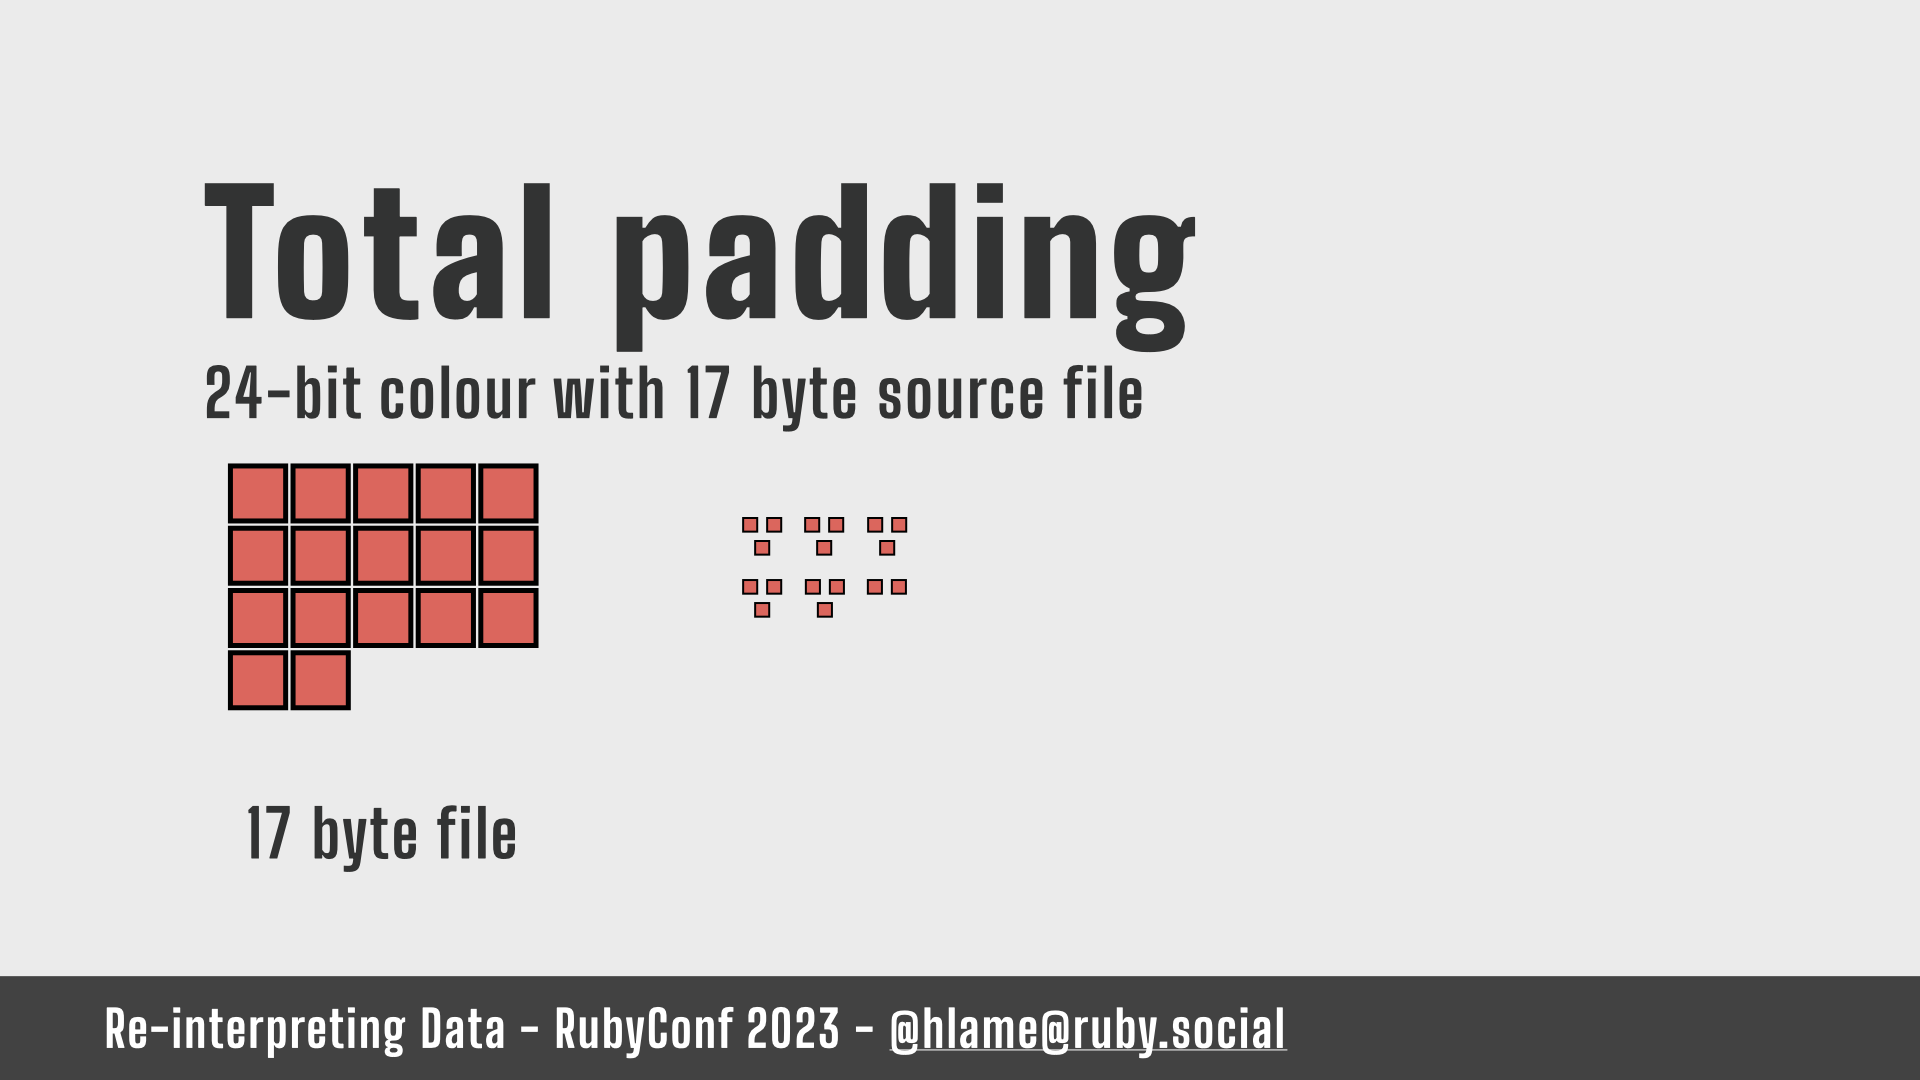
…arranged as groups of 3 bytes…
BMP pixel data problems: Total padding – pt. 3
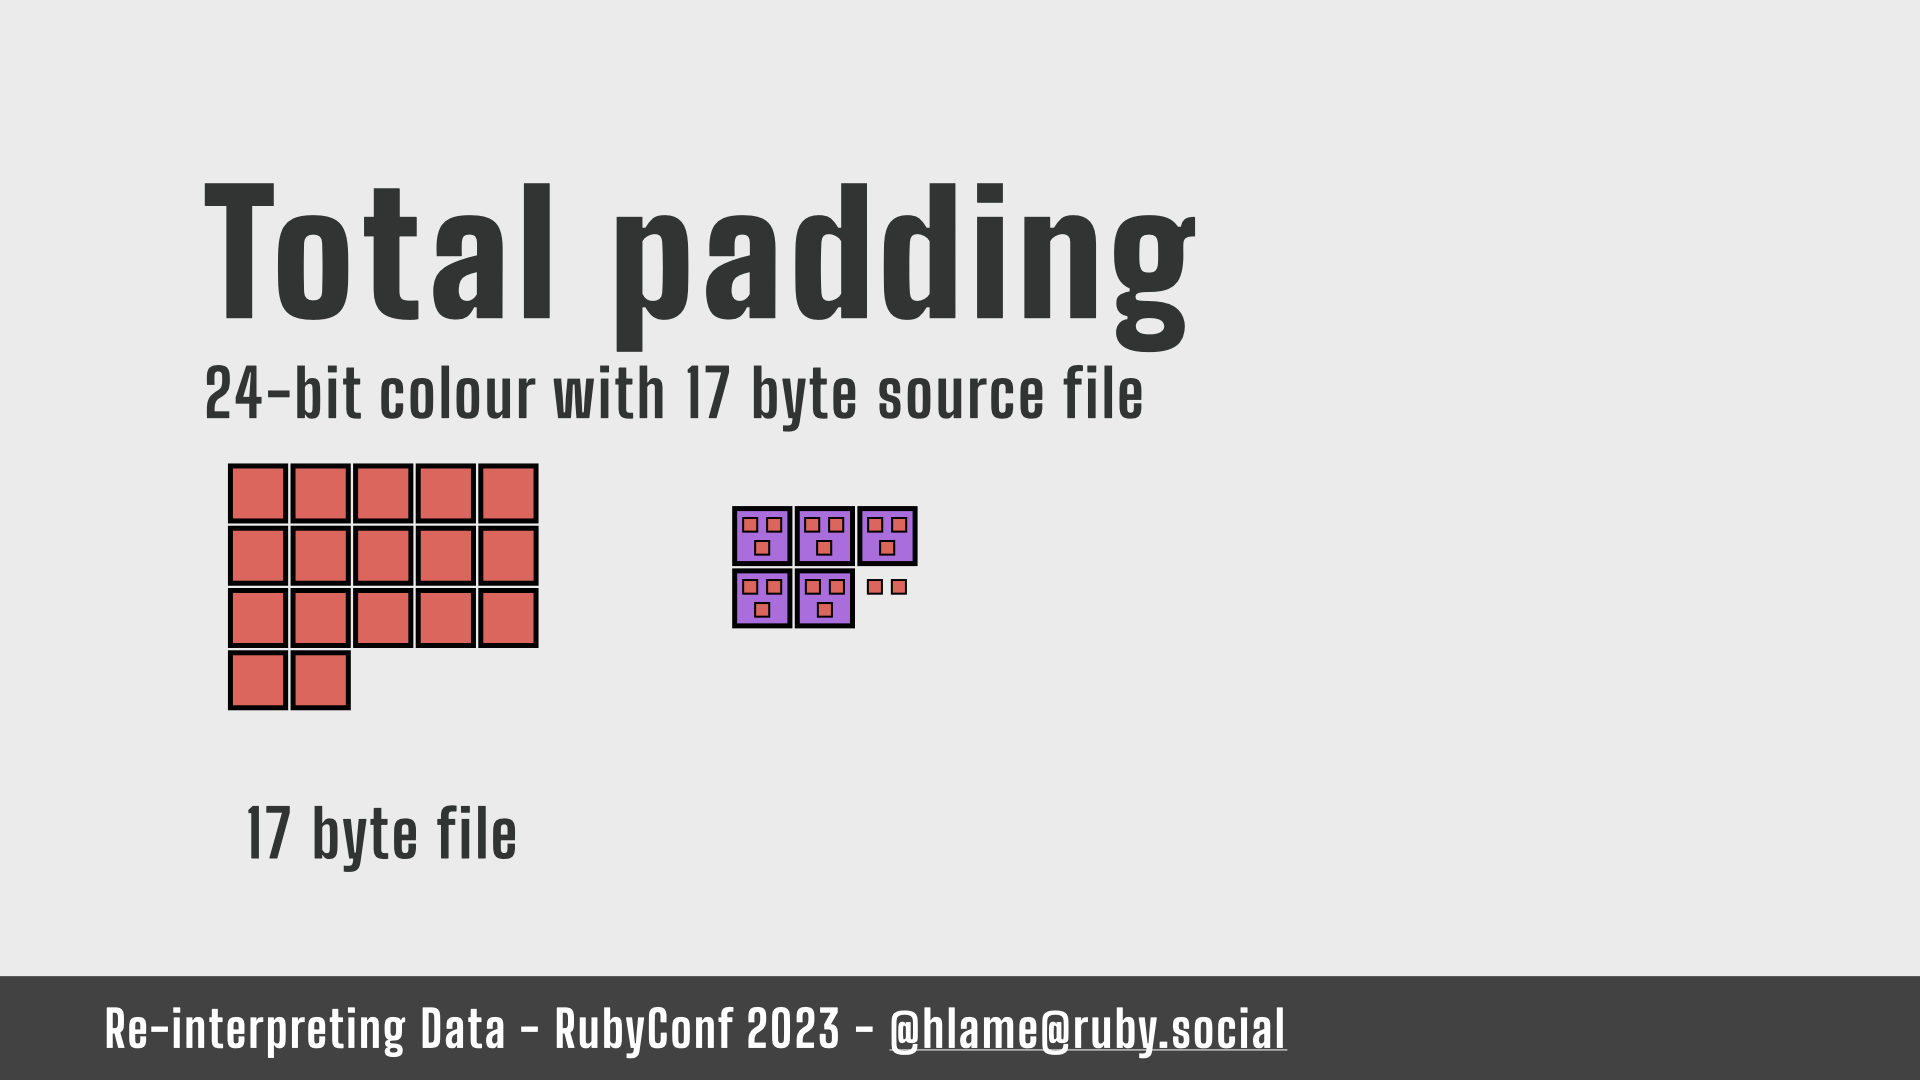
…this gives us 5 complete pixels and 2 bytes left over.
BMP pixel data problems: Total padding – pt. 4
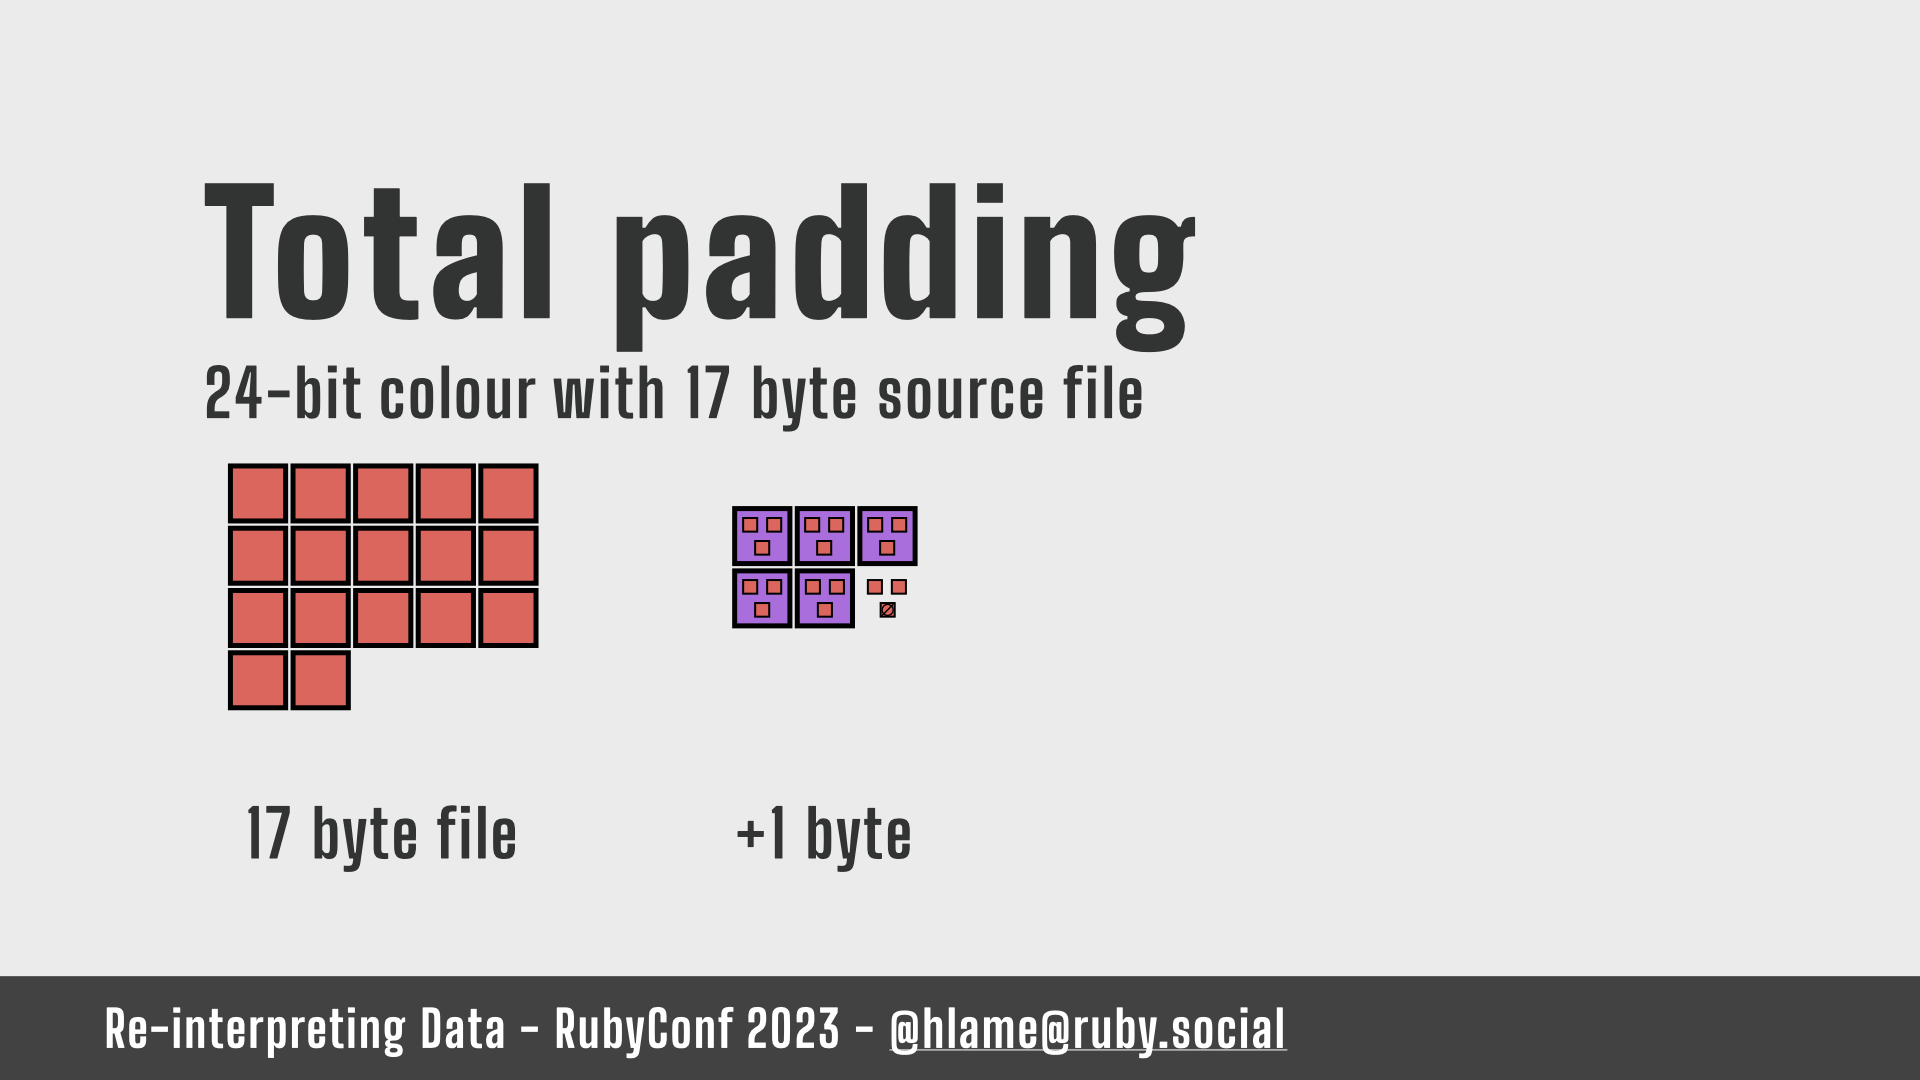
So we add 1 null byte to complete the last pixel…
BMP pixel data problems: Total padding – pt. 5
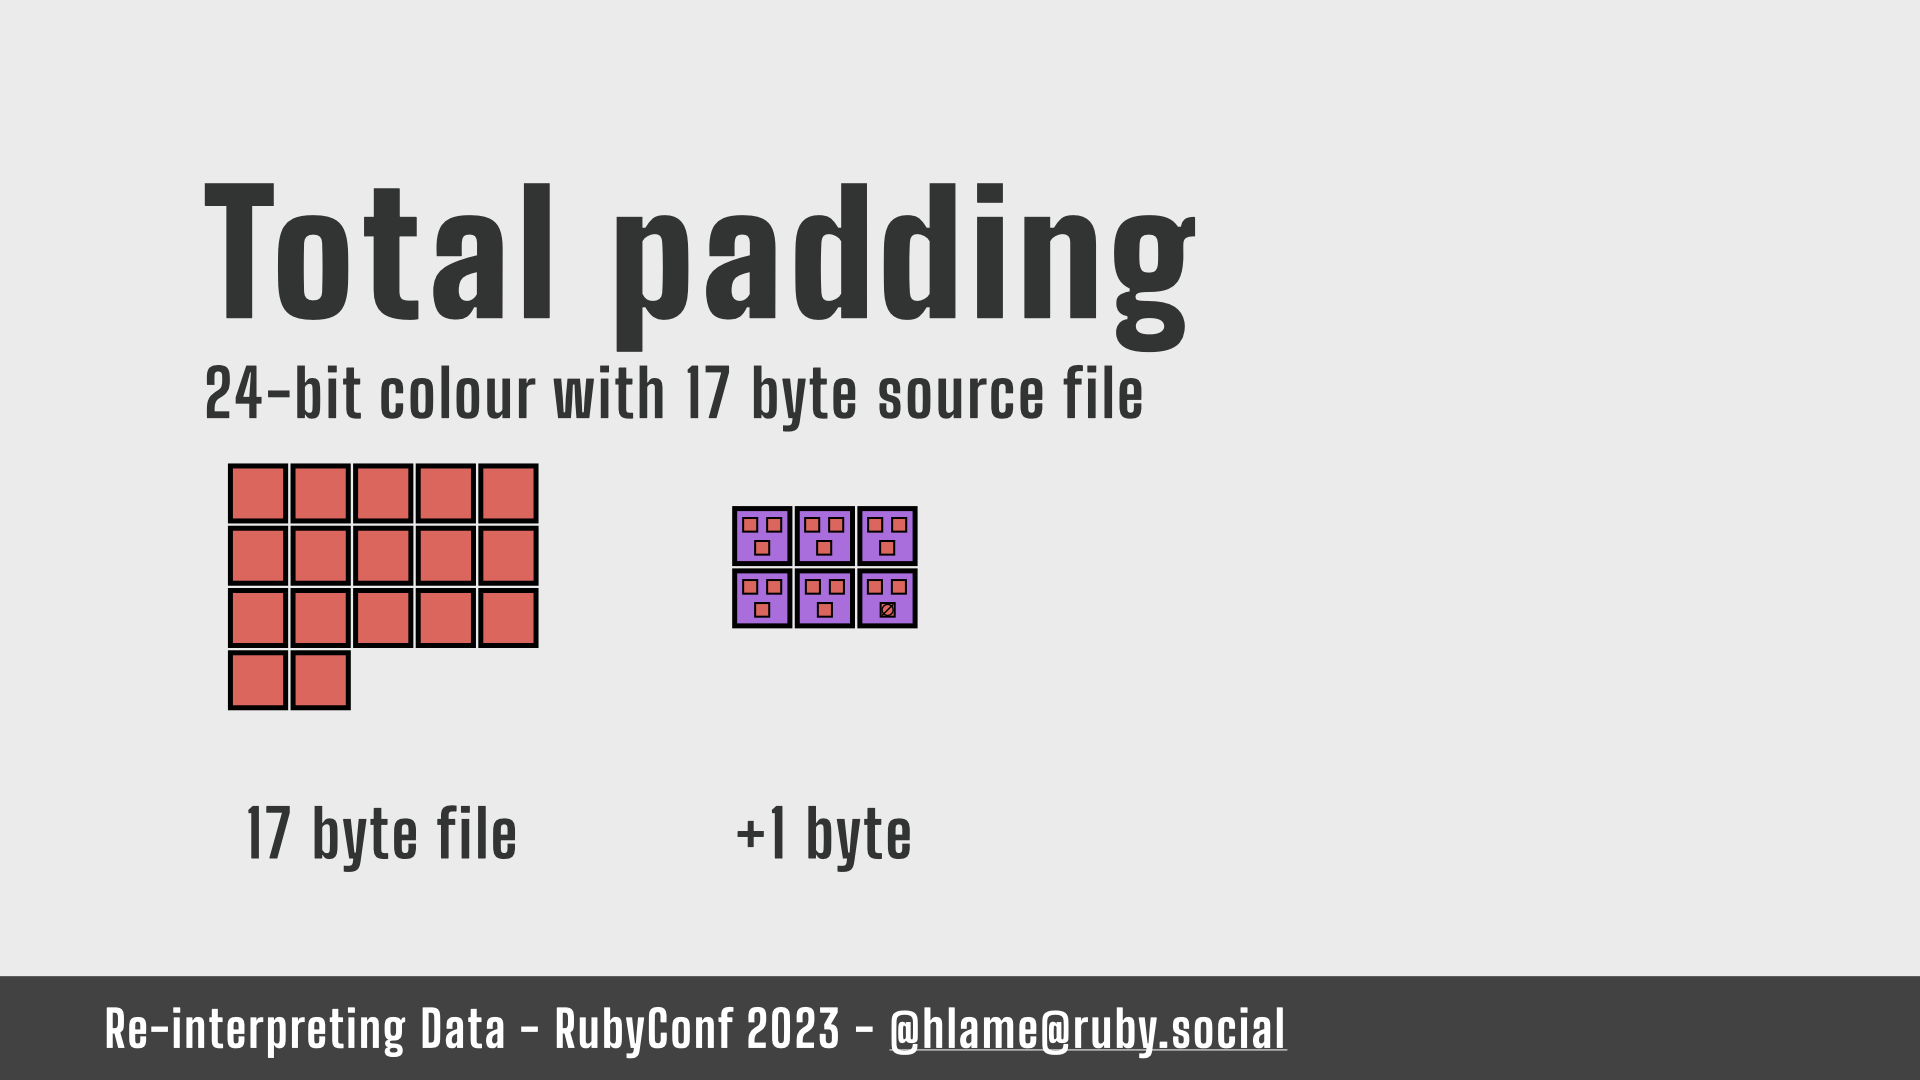
…giving us 6 pixels.
BMP pixel data problems: Total padding – pt. 6
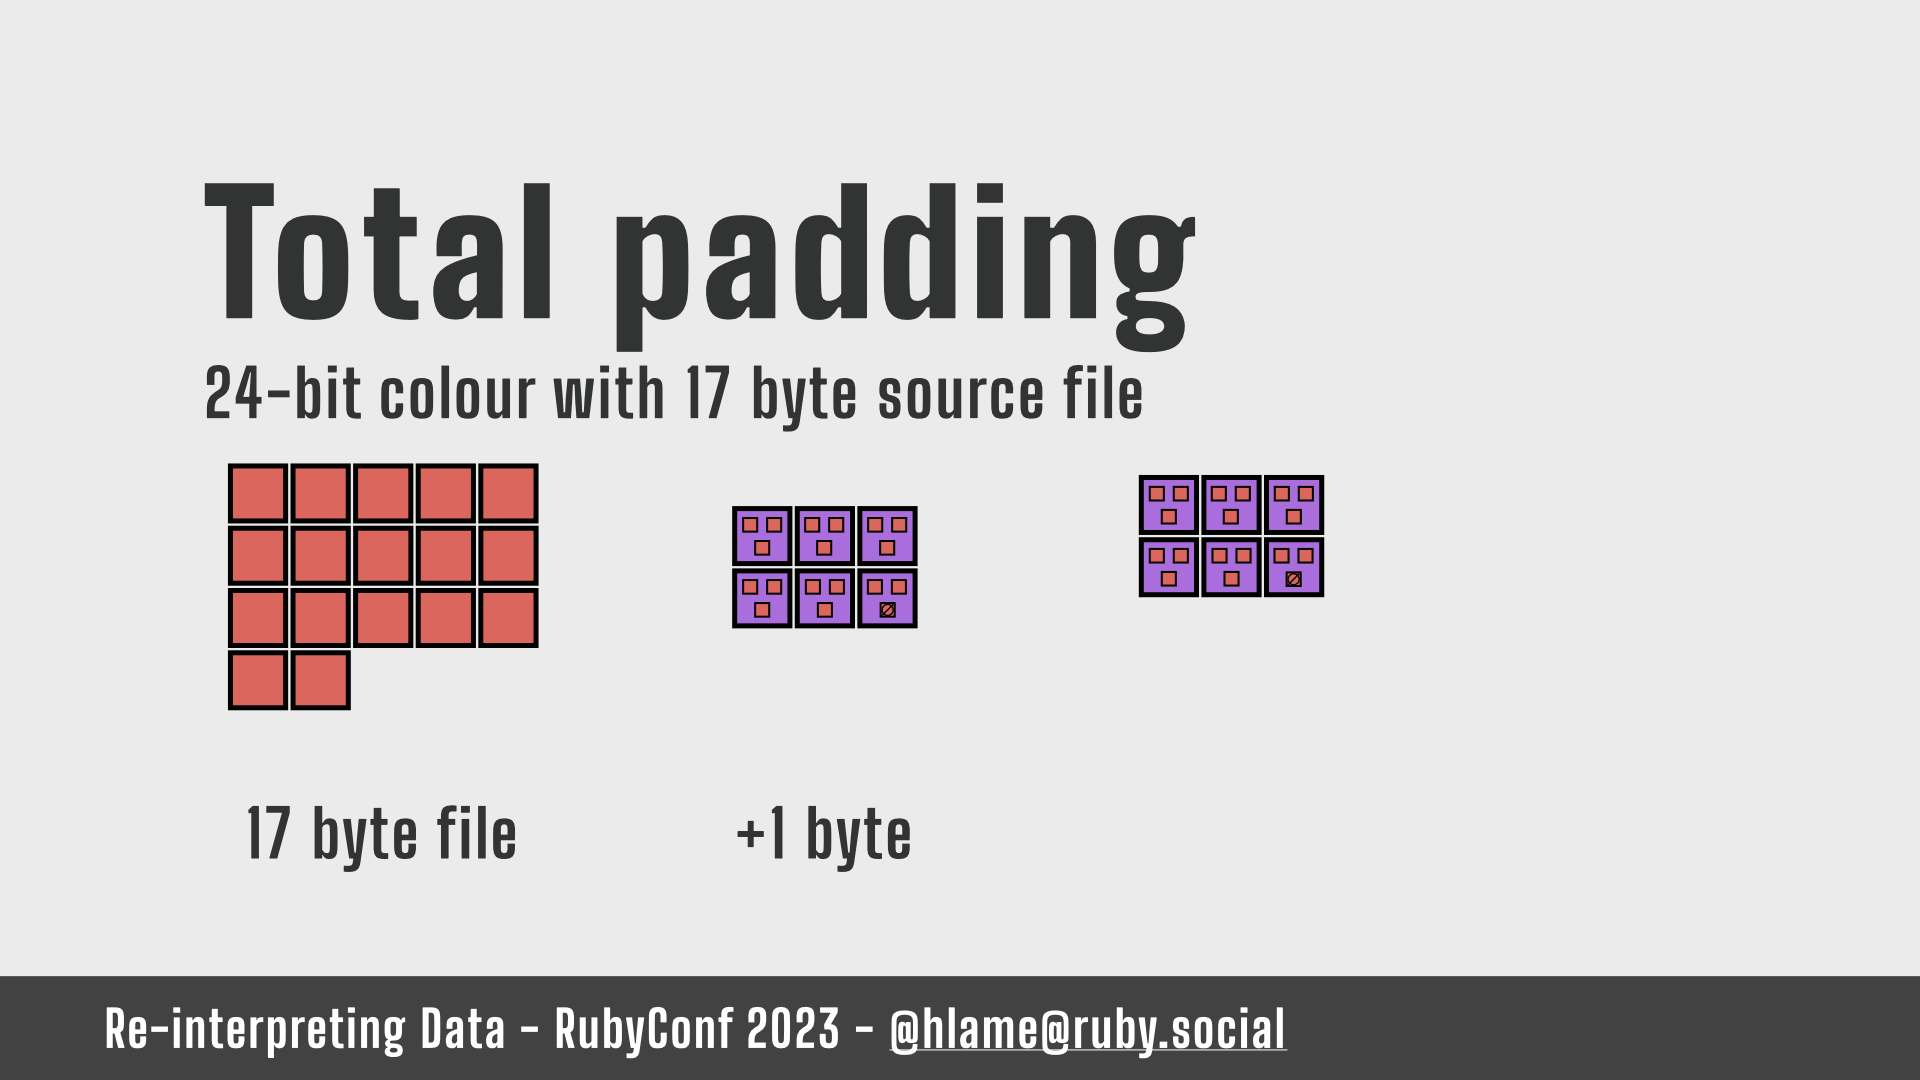
That’s not a square, annoyingly…
BMP pixel data problems: Total padding – pt. 7
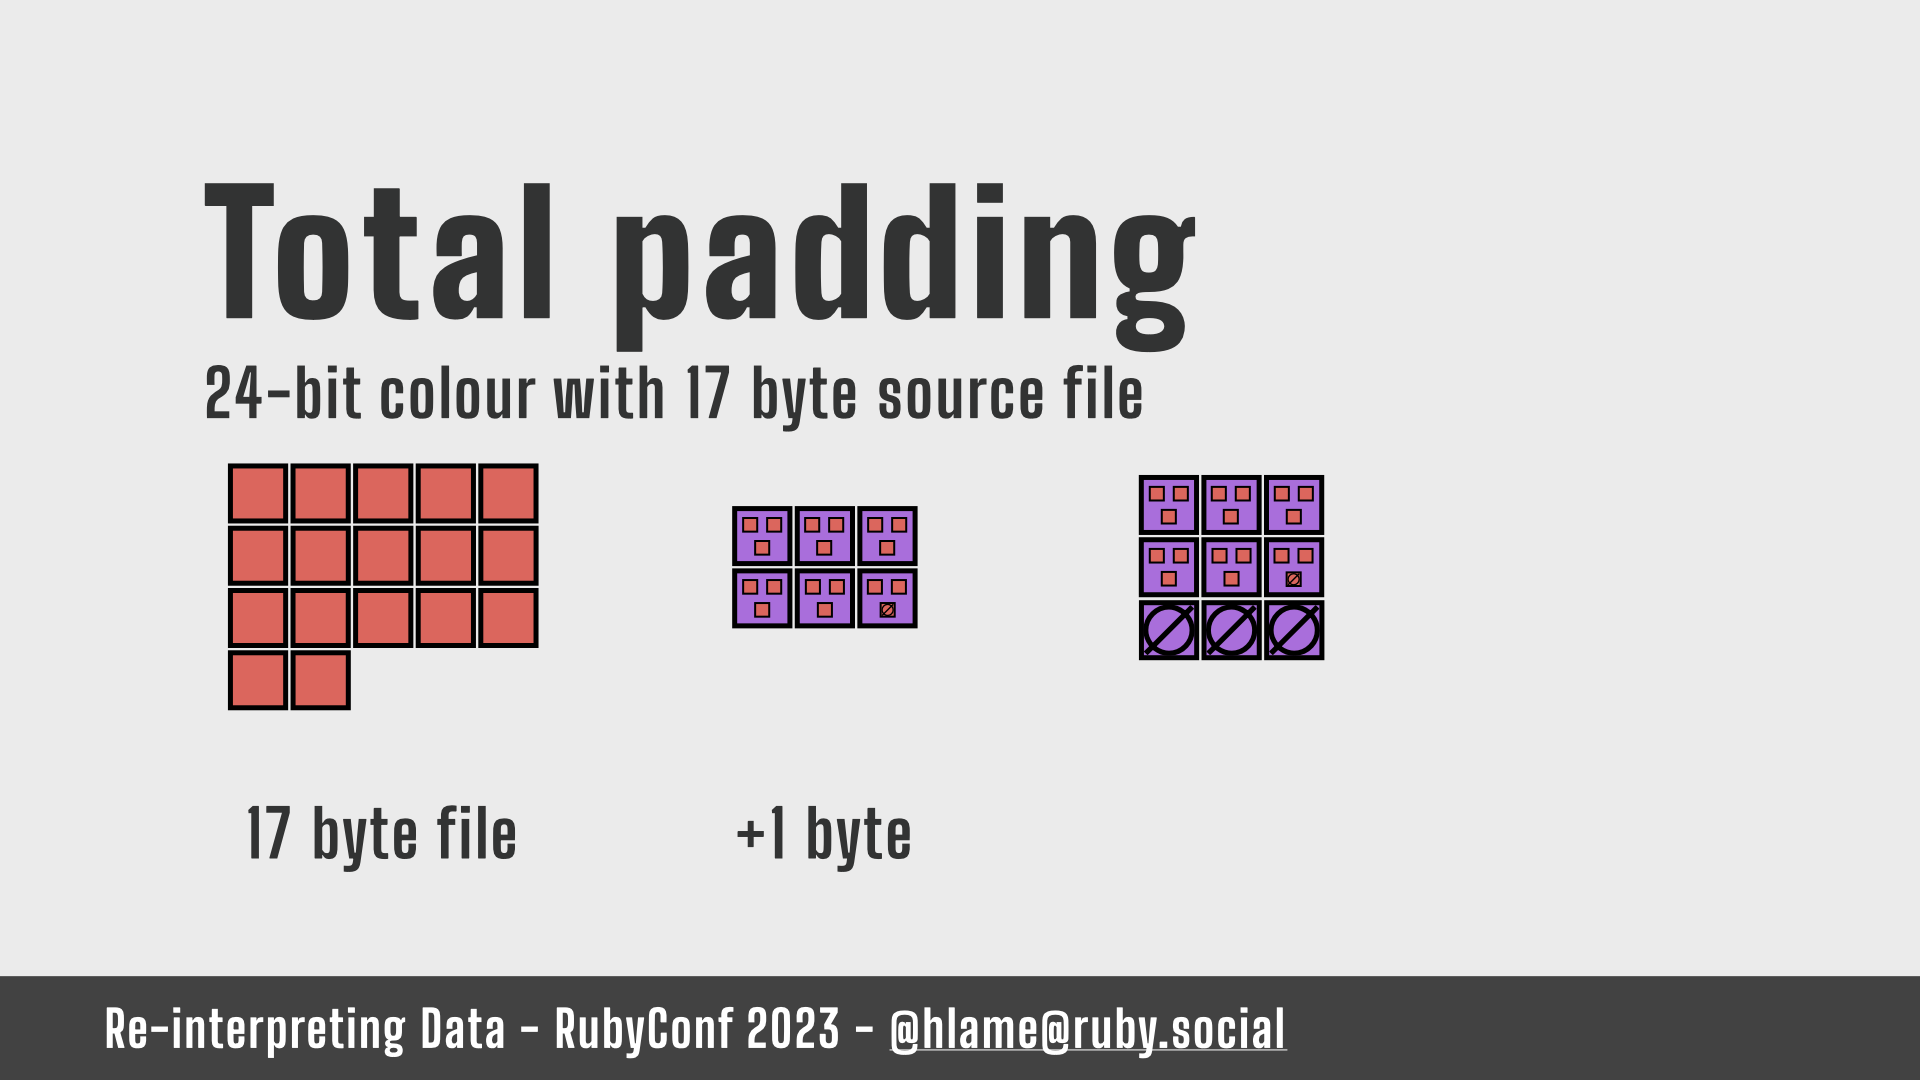
…so we add 3 null pixels to get a 9 pixel square.
BMP pixel data problems: Total padding – pt. 8
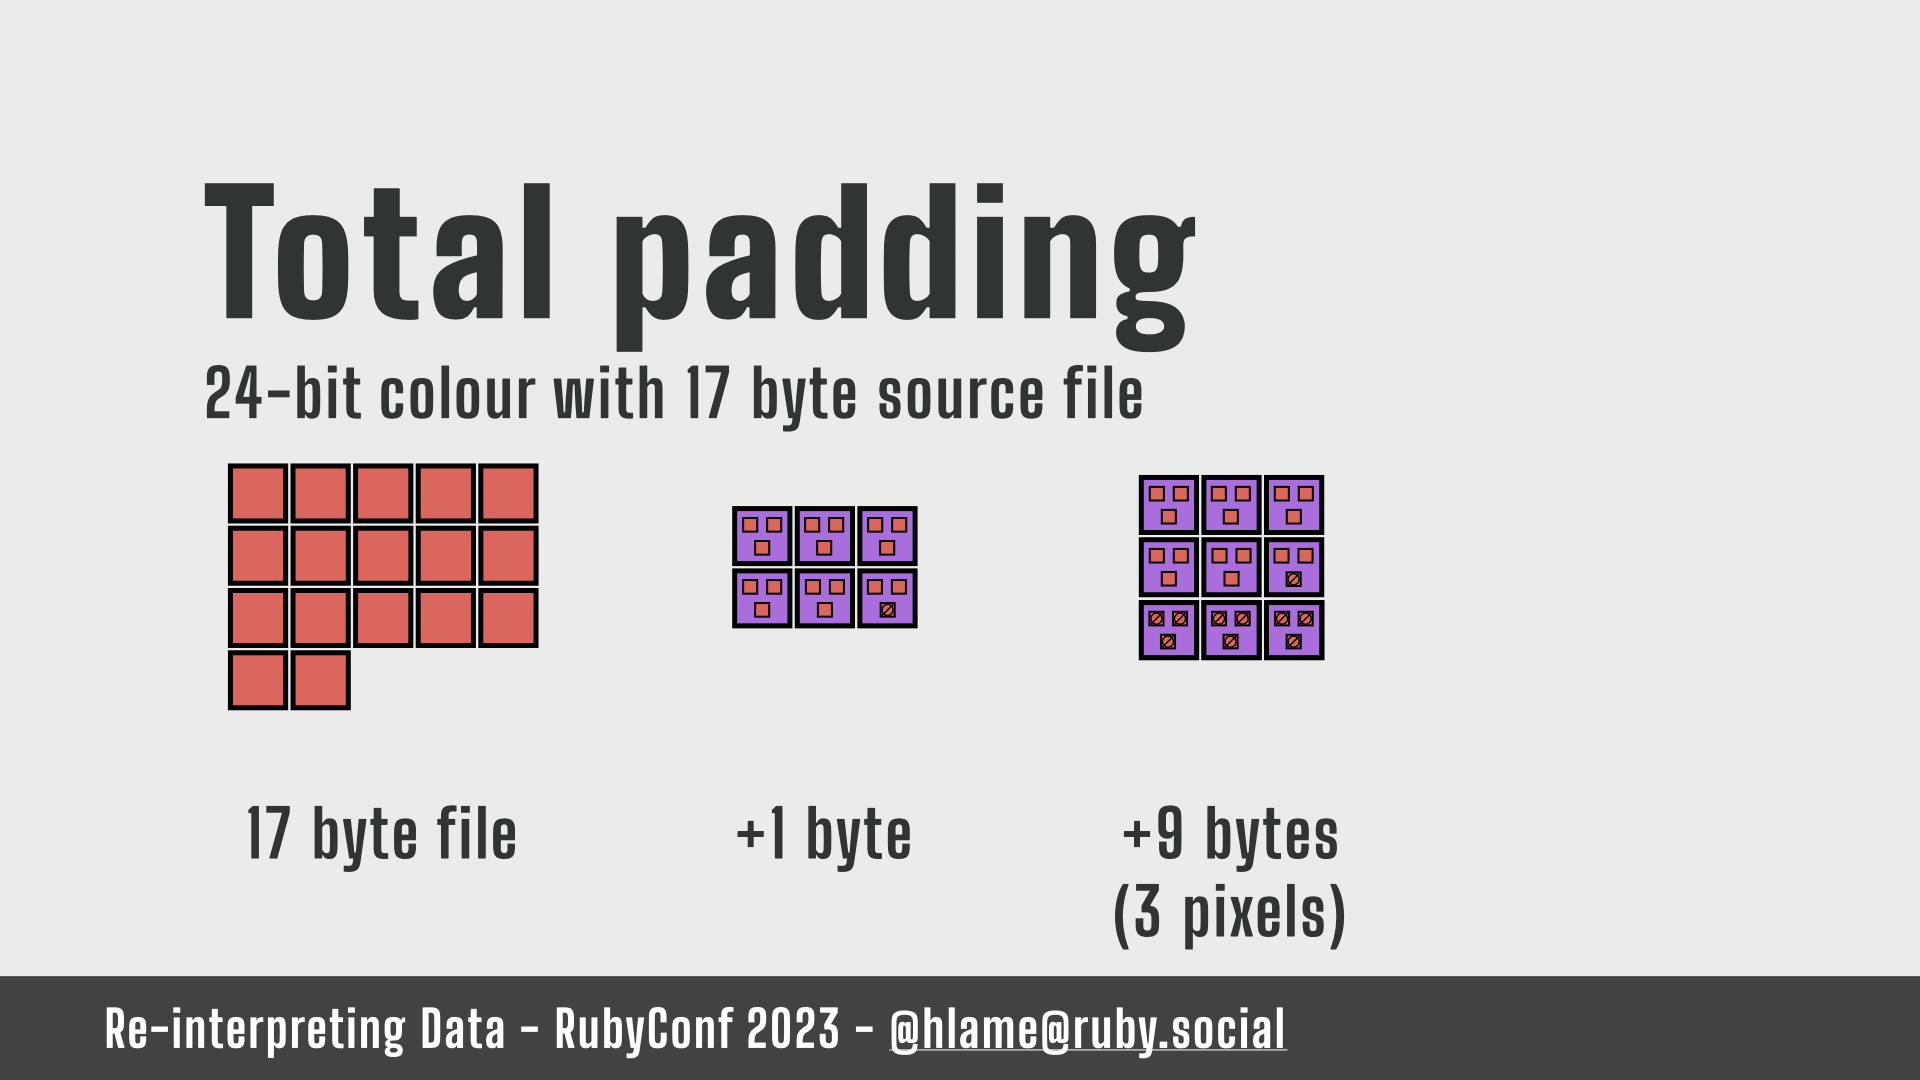
These new pixels are made up of 3 null bytes each, so we’re adding another 9 bytes.
BMP pixel data problems: Total padding – pt. 9
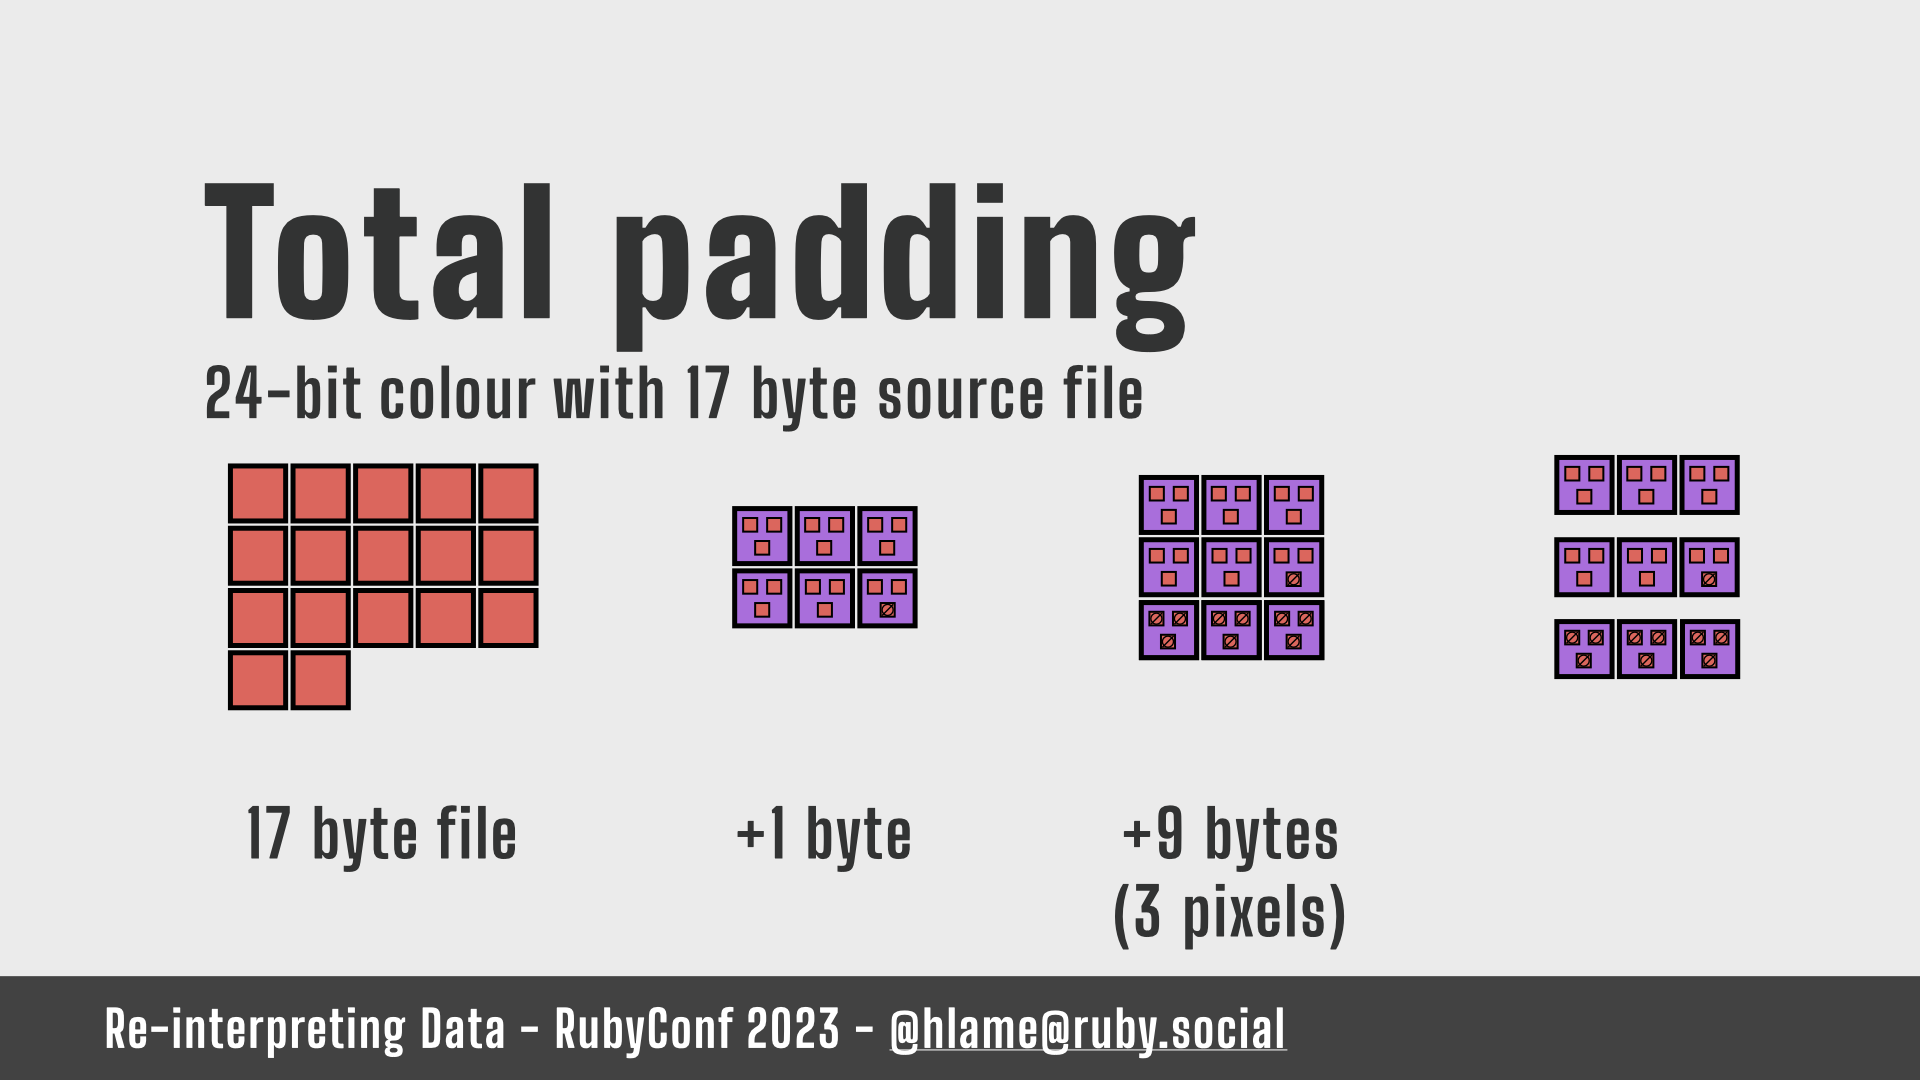
Our 9 pixel square image means we have 3 rows of 3 pixels each, which is 9 bytes…
BMP pixel data problems: Total padding – pt. 10
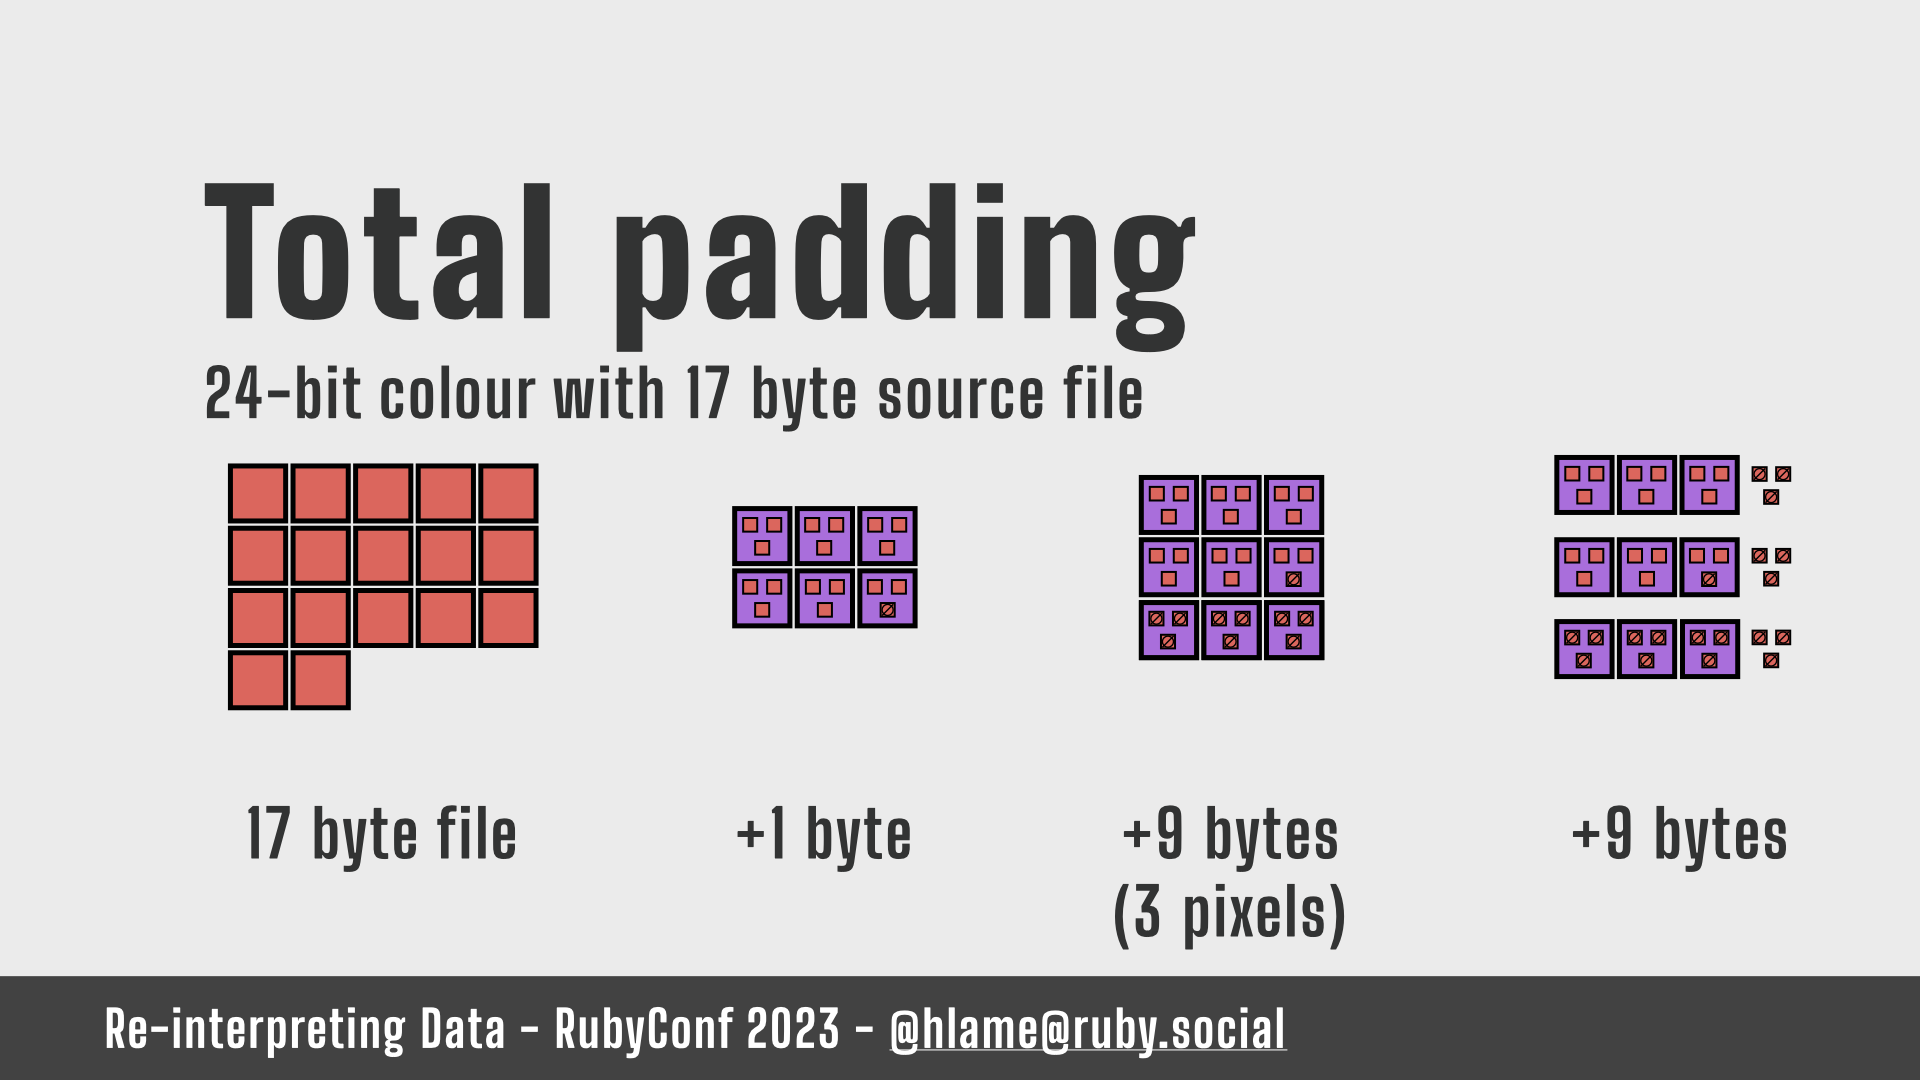
…so we add 3 bytes per line to get to our multiple of 4.
BMP pixel data problems: Total padding – pt. 11
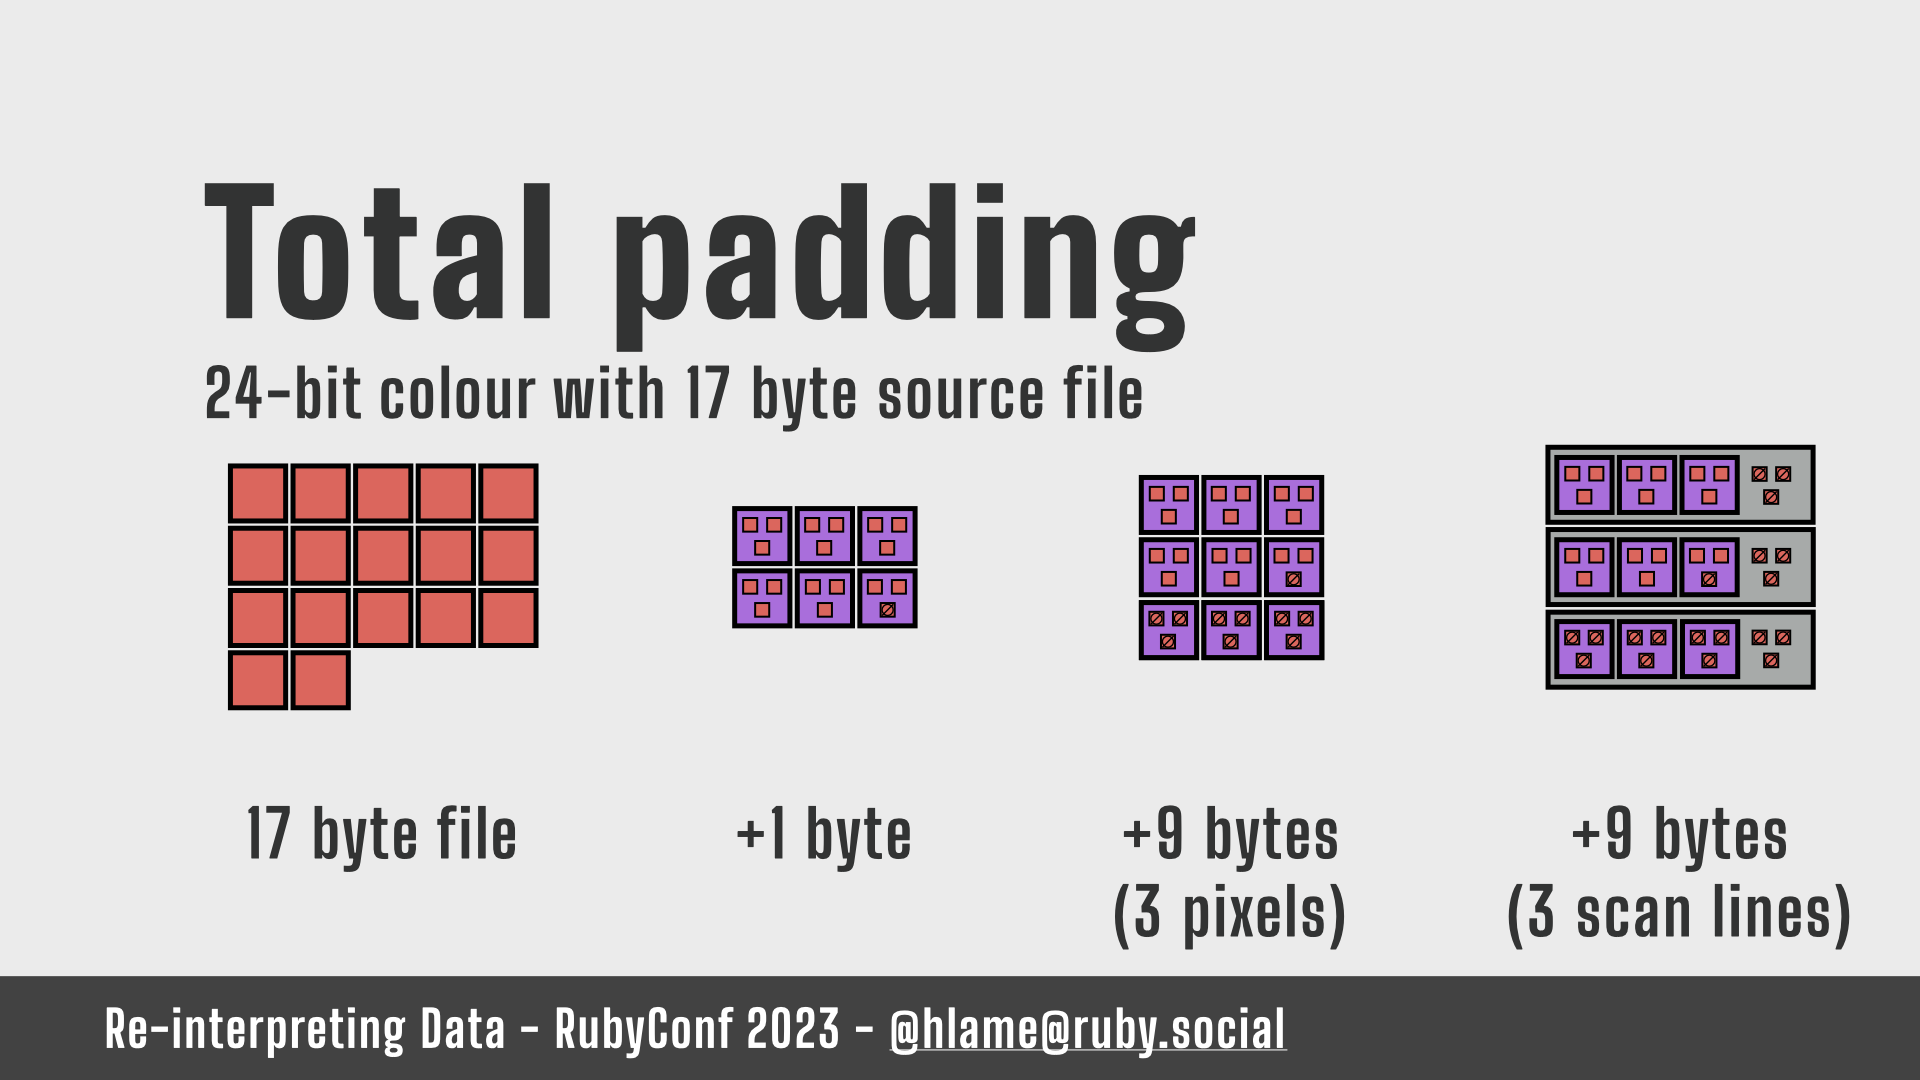
This completes our scan lines.
Total padding – 19 bytes. Yes, this is more than the original source file which is inefficient, but this is an extreme example given the small input file size. You probably don’t have any 17 byte files on your computer these days – they’re all huge, right?
What’s interesting about this is we can see that pixel + rectangle padding just go onto the end of the source file data, but line padding has to go inside the source file data at the end of each line. It’s interleaved with the source file data.
Writing BMP source data as pixels

I said the code for WAV for writing the source data was uninteresting, but it’s not for BMP! Here’s a snippet of it.
We pull bytes from the source file based on how wide the image will be in pixels and we write them to the target file, and then we add the scan line padding bytes. And we repeat this until we’ve exhausted the source file.
Using Array#pack to get null bytes

What’s most interesting here is the top line where we construct the scan line padding.
Our friend pack is back, but we’re packing from an empty array? What’s that going on there?
Well, it turns out, if you want null bytes you can create an array of the right number of 0s and pack with the appropriate format string depending on how many bytes you want a 0 to take up, or you can use an x in your format string. If you follow that x with a number, pack will generate that many null bytes. Neither an x nor an x<somenumber> in your format string will use up any of the numbers in your array.
Here we only want null bytes so we call pack on an empty array. We’re getting something from nothing, that’s neat!
An aside on pack and Idiosyncratic Ruby

As another aside: there’s a whole lot more that pack can do, but spoilers this was our last outing in this talk. To learn more I recommend this post on Jan Lelis’ Idiosyncratic Ruby blog. The whole blog is great though and you should go read it all.
I don’t think you’re in the room, but thanks Jan!
All the BMP generator code
Source for code in slide‡ not that you were really meant to read all that code
So, there’s lots more code in this one – but mostly it’s uninteresting.
As you can imagine, the code for dealing with all the other padding we calculated is a lot of maths, but you can probably imagine it. There’s also code to generate a colour table as 4-byte rgb(a) tuples8.
Although, a critical reading of this code would be interesting:
- Why have I used so many while loops?
- Why isn’t
bytes_frommore idiomatic and iterator based?
I don’t know… sigh …and we’re not going to find out.
BMP Demo

To save me from critical self reflection on that code – let’s have a demo and see what our data looks like!
Demo time: BMP (pt. 1)
So, as before, we going to grab a generator object, this time called bumps.
We will do the same thing again and generate something from the README, and I’ll open that in an image editing app with another convenience method.

The stegosaurus README as a BMP, albeit scaled up somewhat.9
It’s tiny, but let’s look inside. The interesting thing you can see here is at the top, the colour stops halfway through. Those are our null bytes, they’re all at the top because… BMP files are upside down? That’s wild! Thanks BMP people!10
But, like WAV, you don’t get much from a short README file. Or do you?
Demo time: BMP (pt. 2)
One of the arbitrary choices we can make is the bit count for the colour depth. Why don’t we generate a 1-bit version? That is maybe more interesting:

The stegosaurus README as a 1-bit BMP.11
If we zoom in on it you can see there’s a bit more structure here. You could probably learn to read this, just like that person in the first Matrix movie and then this could be how you operate computers. That would be fun!
Demo time: BMP (pt. 3)
For completeness though, let’s see what Ruby looks like as a BMP and if we can learn anything about the structure of the interpreter from the visuals.12
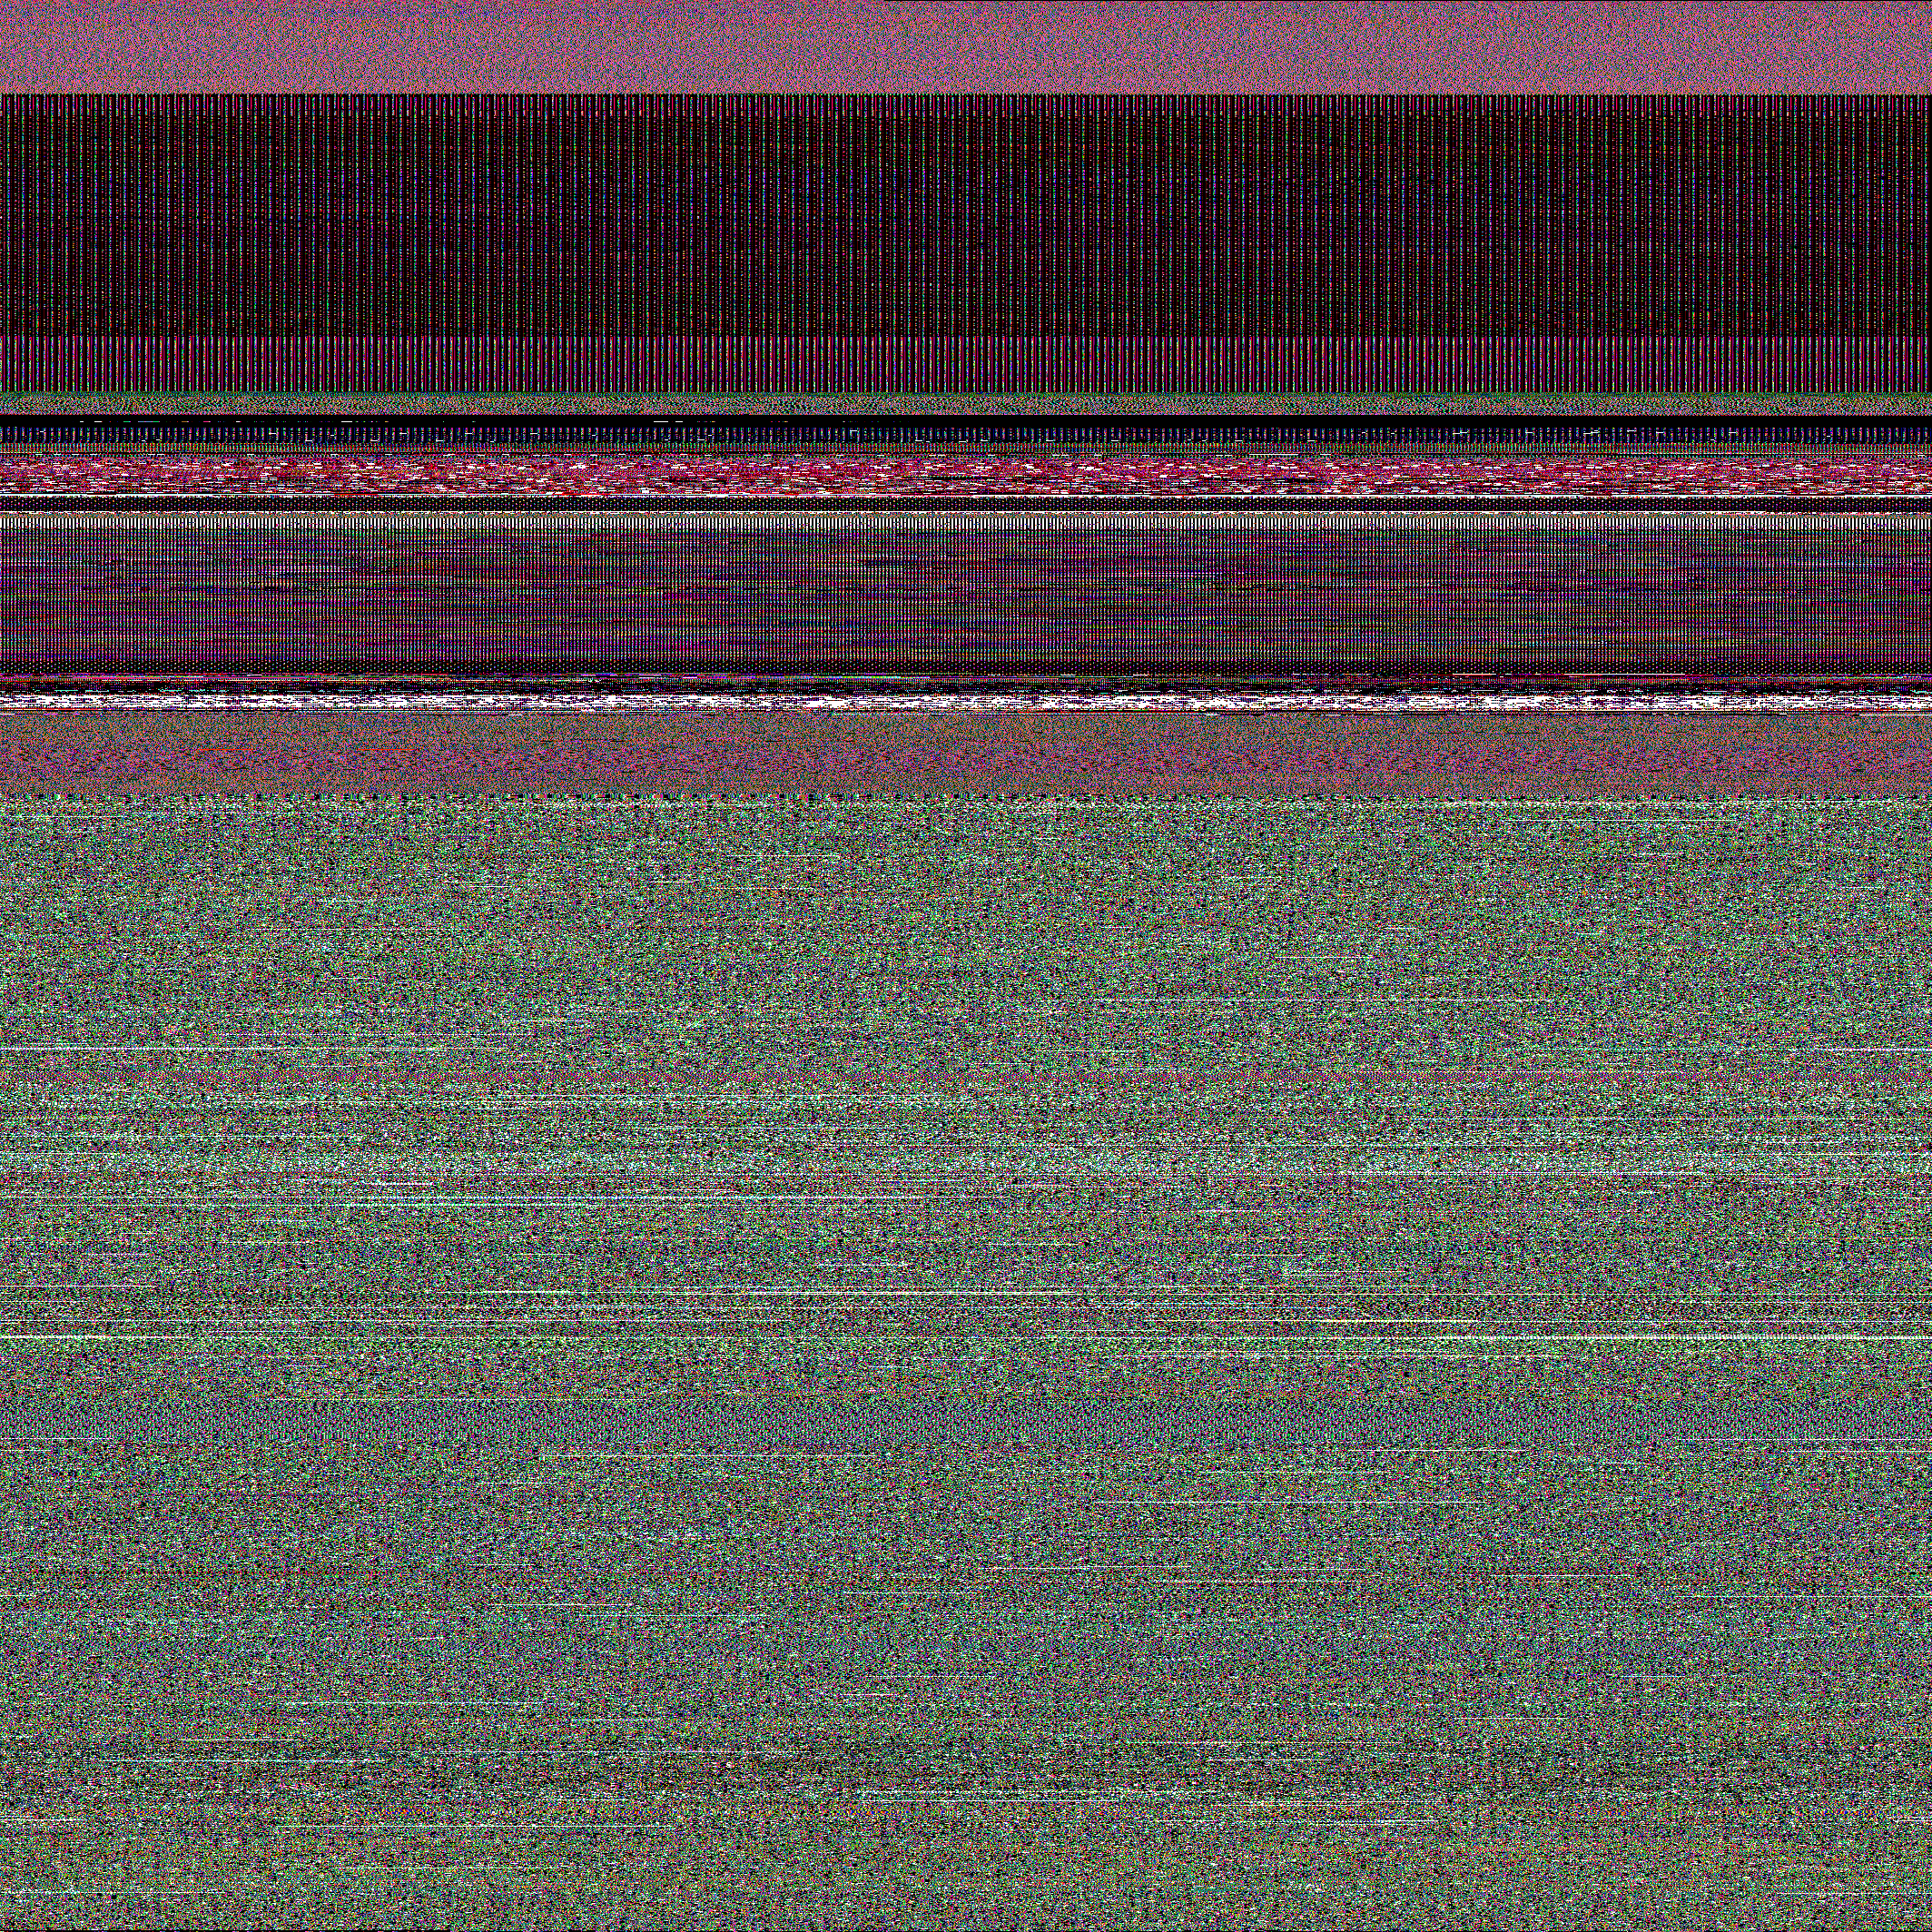
The ruby 3.2.2 interpreter as a BMP, albeit scaled down somewhat13.
Here’s ruby the BMP – what can we learn from this?
Well, um, parts of it are a pinkish hue, which is cool because it’s ruby, so that’s good. A surprising amount of it is this iridescent green which, as we all know there was some Perl influence on Ruby as Matz shared this morning, so that’s probably what that is. Then there’s this sort of scary dark bit in the top third, and I guess that’s maybe where the exceptions live.
I mean, okay, I can’t interpret this, but we can look at this and we can make up stories to explain what we don’t understand, just like our ancestors! That’s fun!
Are WAVs and BMPs the only way?

We’ve now looked at some BMPs and seen some things, but the thing about that is it was sort of a diversion from my original plan: I wanted to hear files. While WAVs worked, even the most hardened glitchcore music fan probably wouldn’t enjoy listening to them for less than a second.
Luckily, there’s another file format to play around with…
The MIDI file specification

MIDI!
MIDI stands for Musical Instrument Digital Interface and the file format is part of a standard for communicating with actual hardware instruments like synthesisers and such like. The part that’s interesting to me is that as a file format instead of storing the actual recorded sound data like WAV, it’s more akin to sheet music, and, as a format it’s header + data based so we can work our magic with it, too.
Exploring the MIDI file format
So, what does a MIDI file look like?
Exploring the MIDI file format – header & data
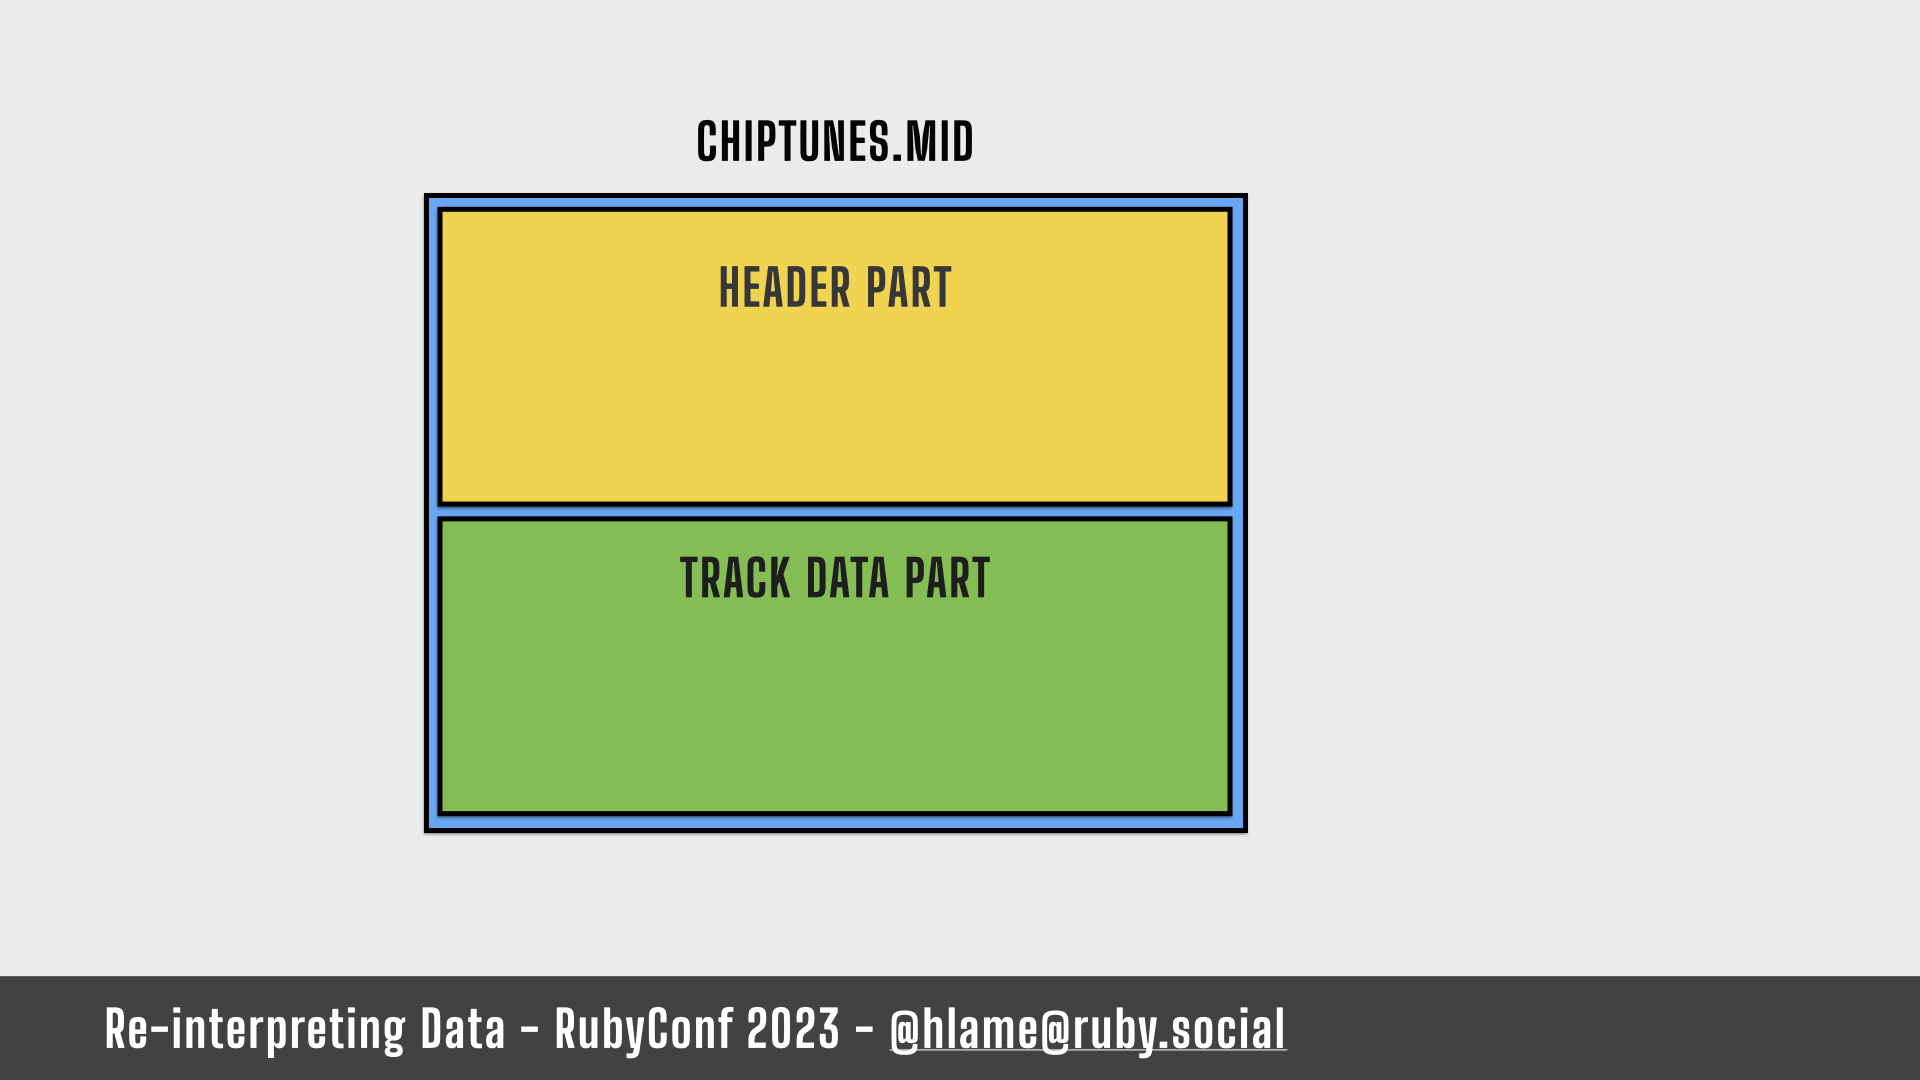
It’s the header and data we know and love.
Exploring the MIDI file format – the header part
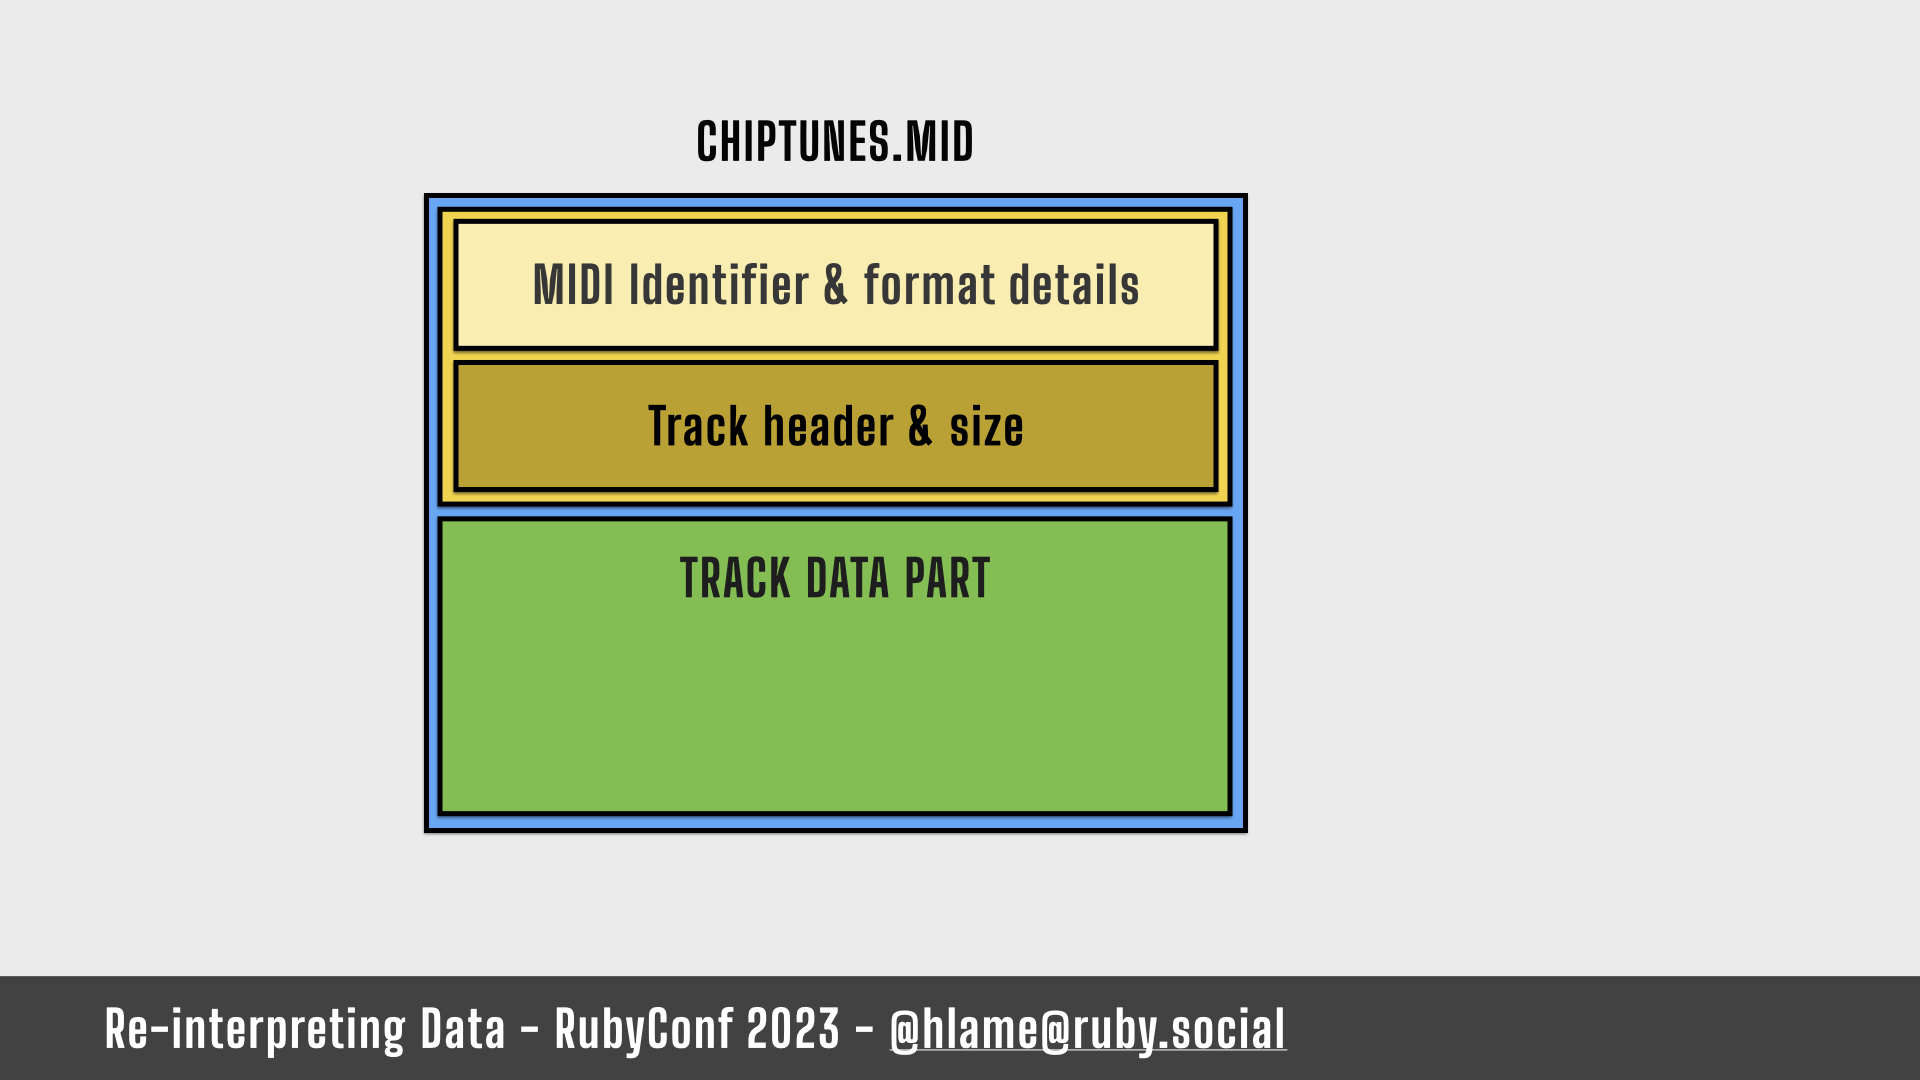
The header contains two parts:
- an identifier that says “I’m a MIDI file” and explains some details about what type of MIDI file it is. Things like things about time signatures, etc…
- a track header that explains the size of the track data to come.
The track data however isn’t like WAV, we can’t just smoosh the source file under the header and we’re done.
Nor is it like BMP where we have to interpret and interleave some padding.
It’s much more structured and is made up of a stream of MIDI Events.
Exploring the MIDI file format – a MIDI event
A MIDI event is structured…
Exploring the MIDI file format – a MIDI event – time & data
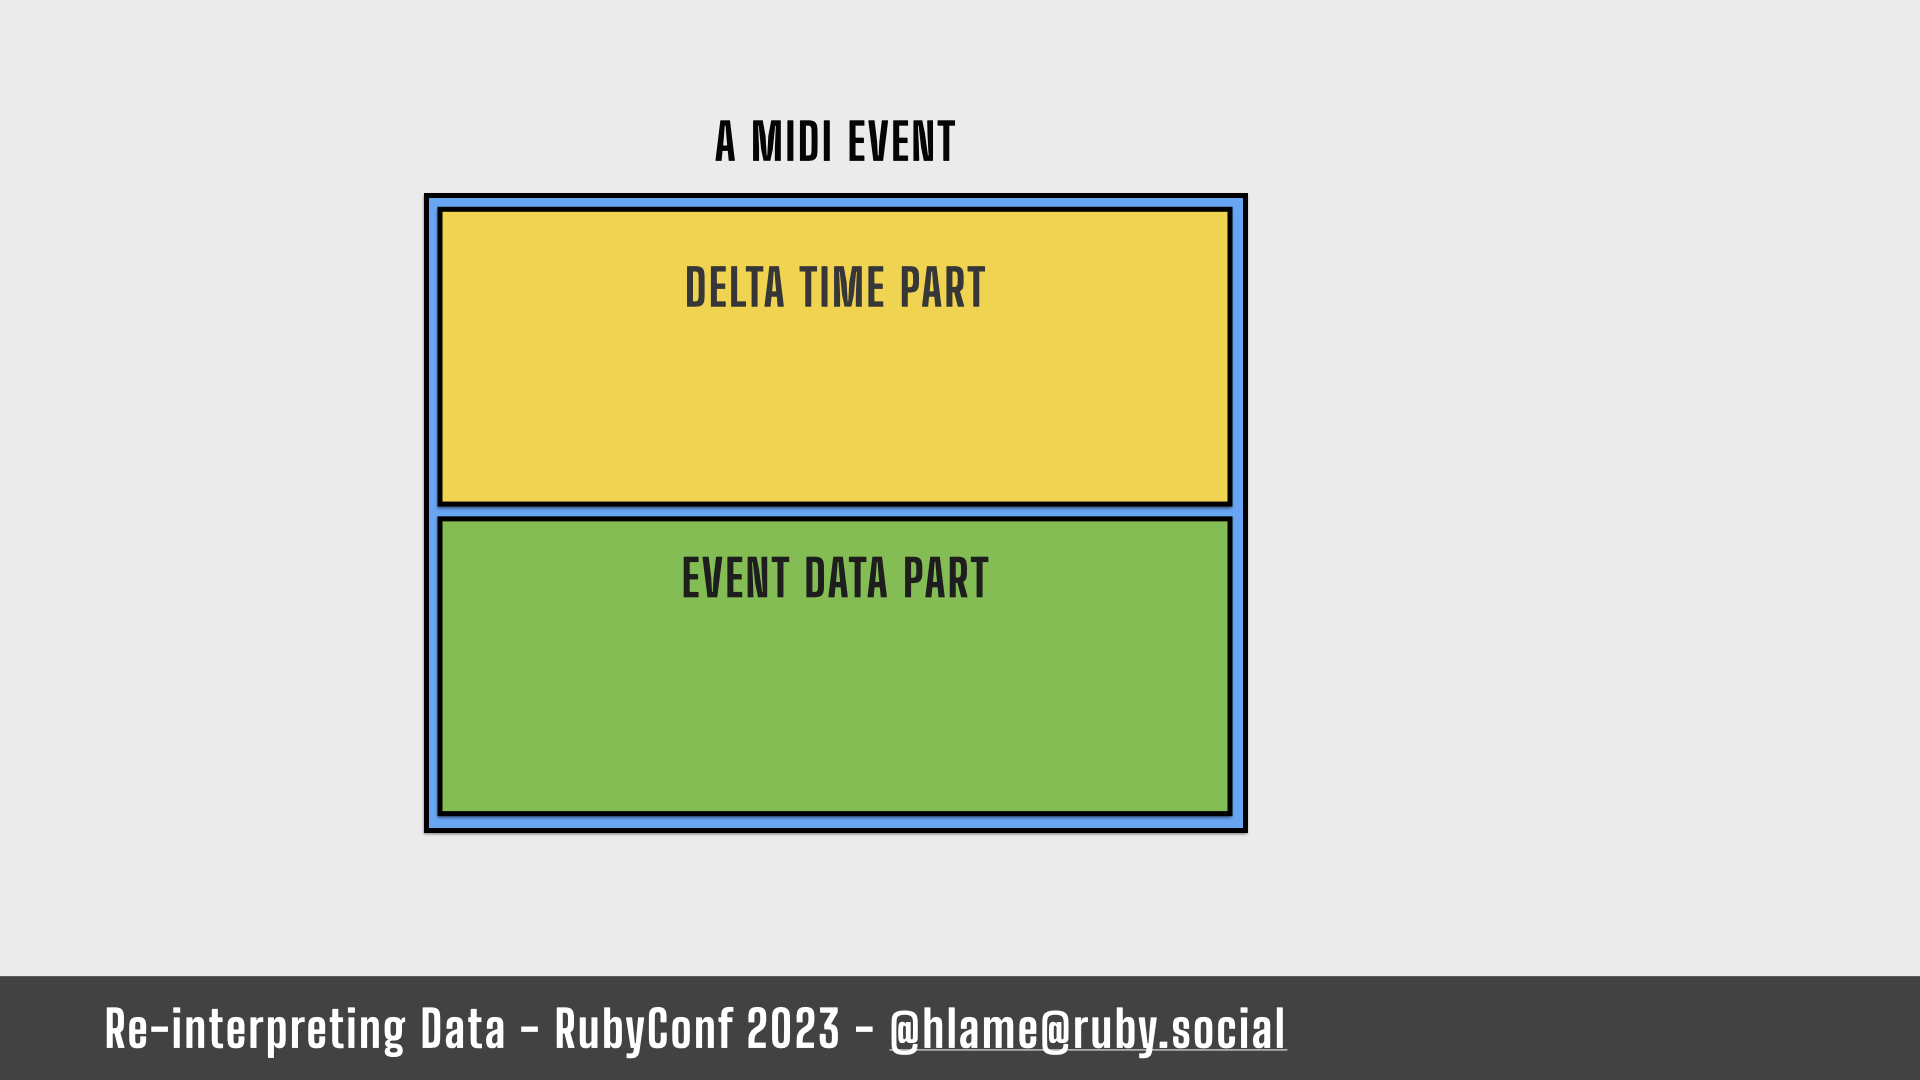
It’s made up of a time and some data:
- delta time – this says when the event should occur. It’s known as the delta-time because it’s the time since the previous event rather than a fixed “at this point in the song” value. This can be between 1 and 4 bytes.
- Event data part – this says what the event actually is and can also be broken into two parts.
Exploring the MIDI file format – a MIDI event – event type & data
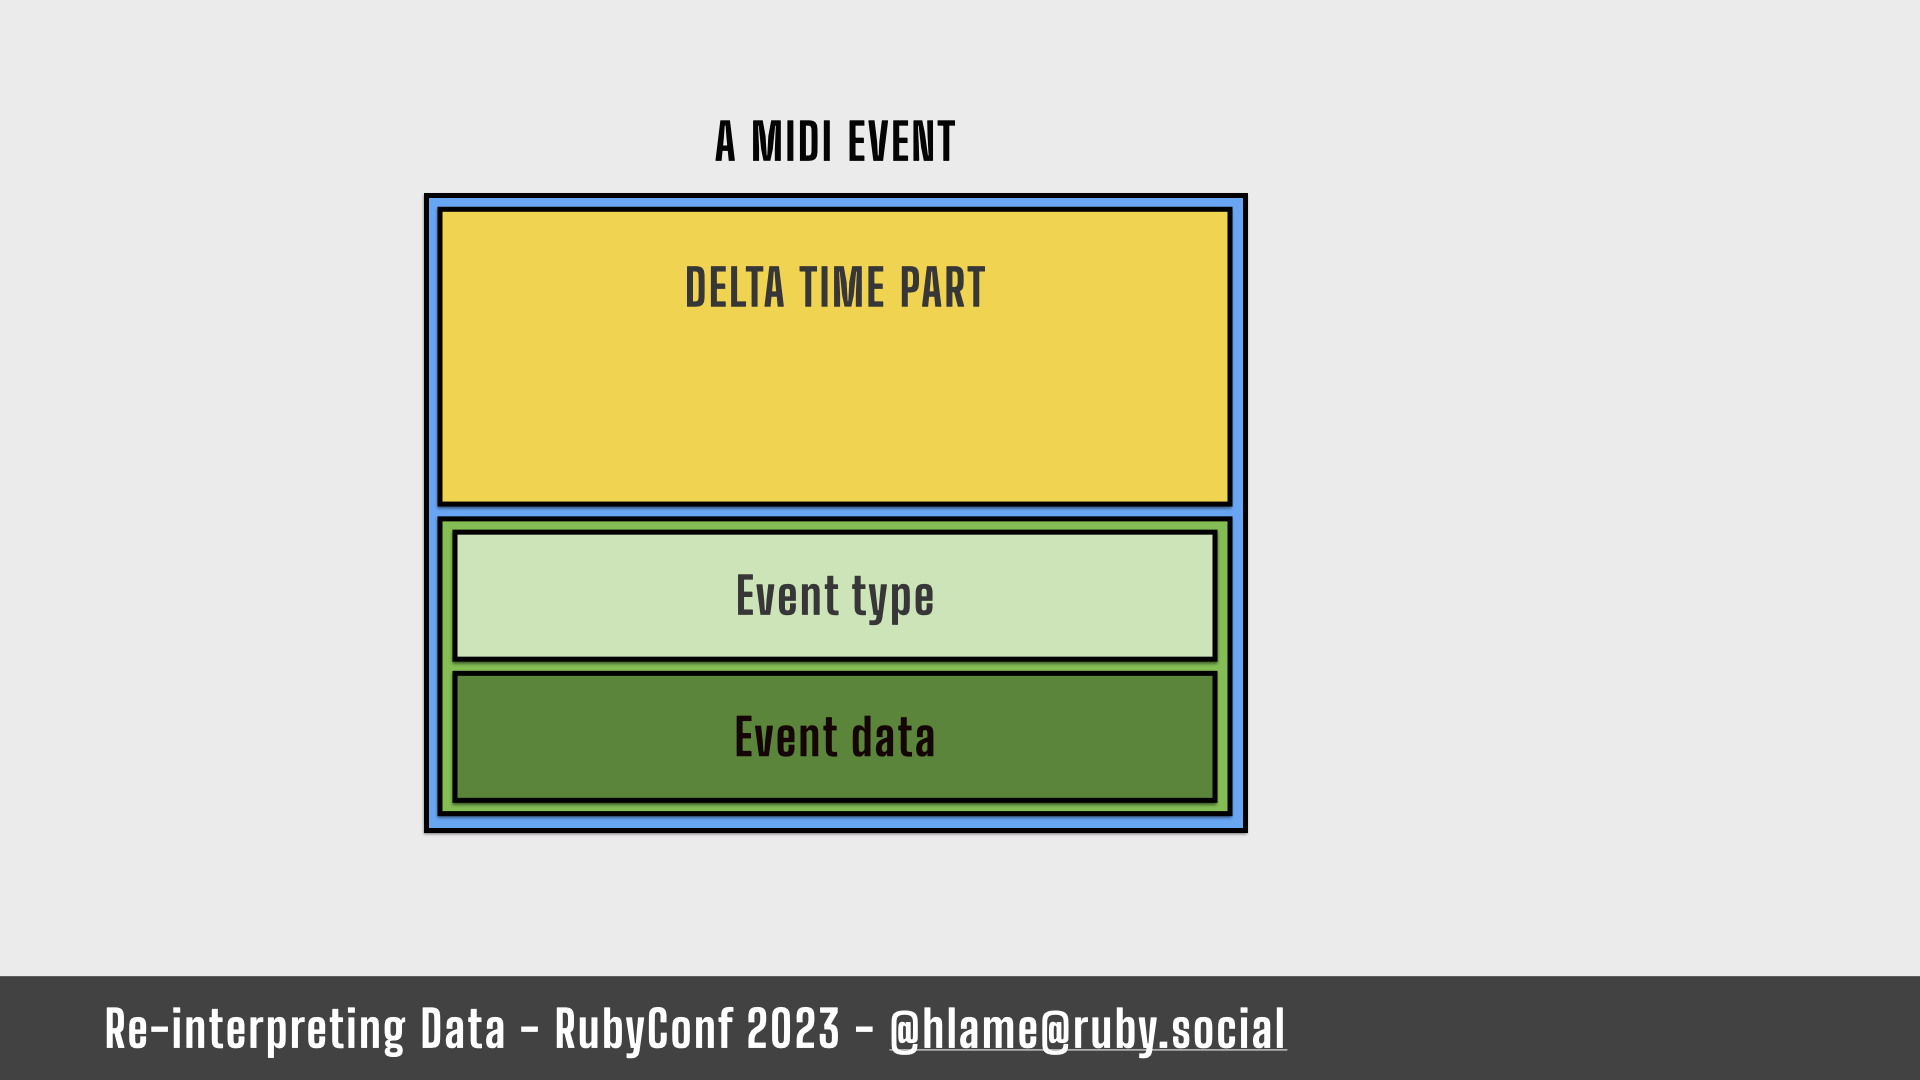
- Type – there’s a list of event types, for example play a note, set the tempo, do something to the hardware, etc…. This is always 1 byte.
- Data – this contains extra data depending on the event type. For example, a “play a note” event needs data on which note to play. This is 1 or 2 bytes depending on the type of the event.
Let’s look at these 3 parts in more detail.
MIDI Event structure: 1. Delta time
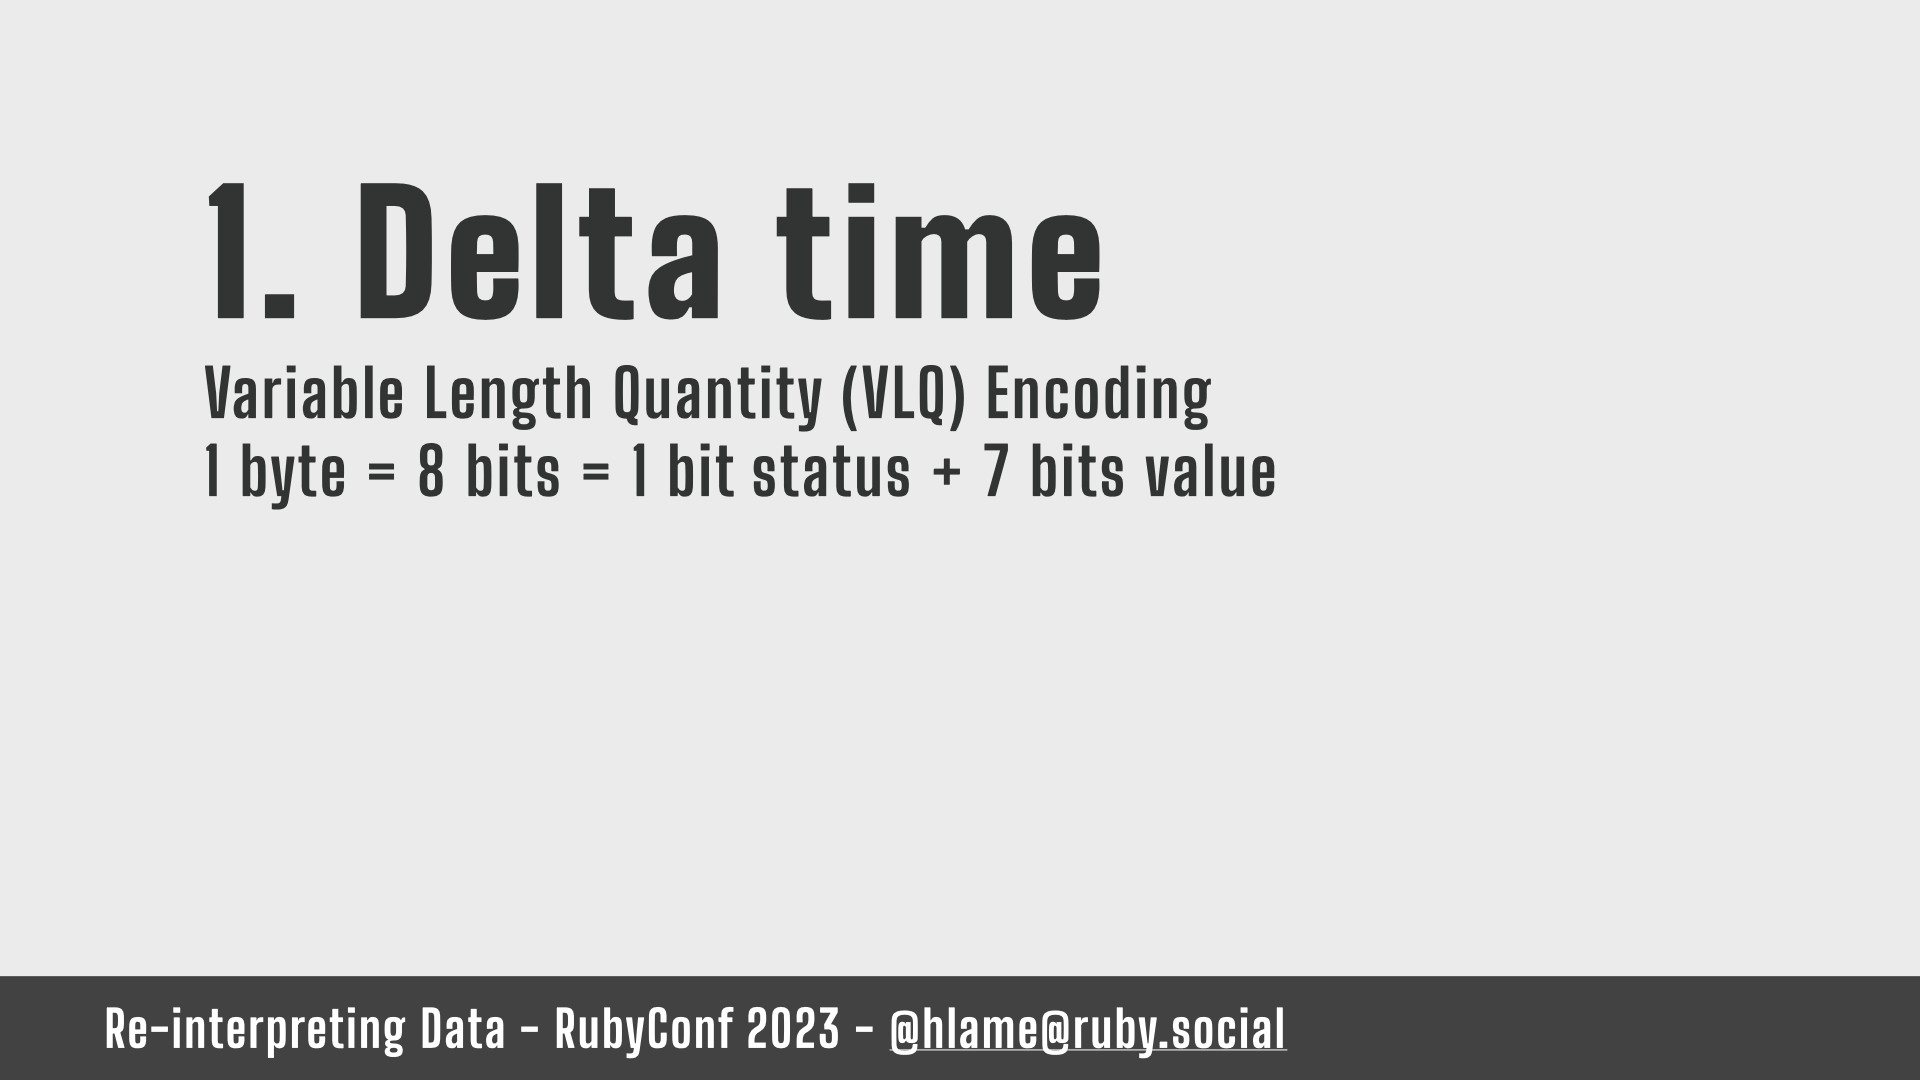
Delta time is stored as a variable length value of between 1 and 4 bytes. It’s a space saving technique. A piece of music could have, oh I don’t know, as many as 200 notes in it? If you are always storing 4 bytes for the time that’d be 800 bytes. Ostentatious! For most notes you probably don’t need a 4 byte value to say “play this note really soon after the last one”, so if you could store that value in 1 byte numbers, you could save 600 bytes! That’s useful!
How this is implemented is that a single byte is split into two parts: 7 bits are used to store the value, and the remaining 1 bit is used to say if the next byte contains more data for the value or not.
- 0 means no more data, you’ve got all the information you need
- 1 means read the next byte and find out if you need more
Values less than 128 can be stored in 1 byte, values more than 128 are stored in multiple bytes. In theory this allows for infinitely large values – we can keep setting the “more” bit to 1, but in practice, the MIDI spec says 4 bytes is the maximum. This gives us 28 bits to store a value, allowing us to store values from 0 to 268,435,456. This should be enough for even the longest of long songs.
MIDI Event structure: 1. Delta time – 127
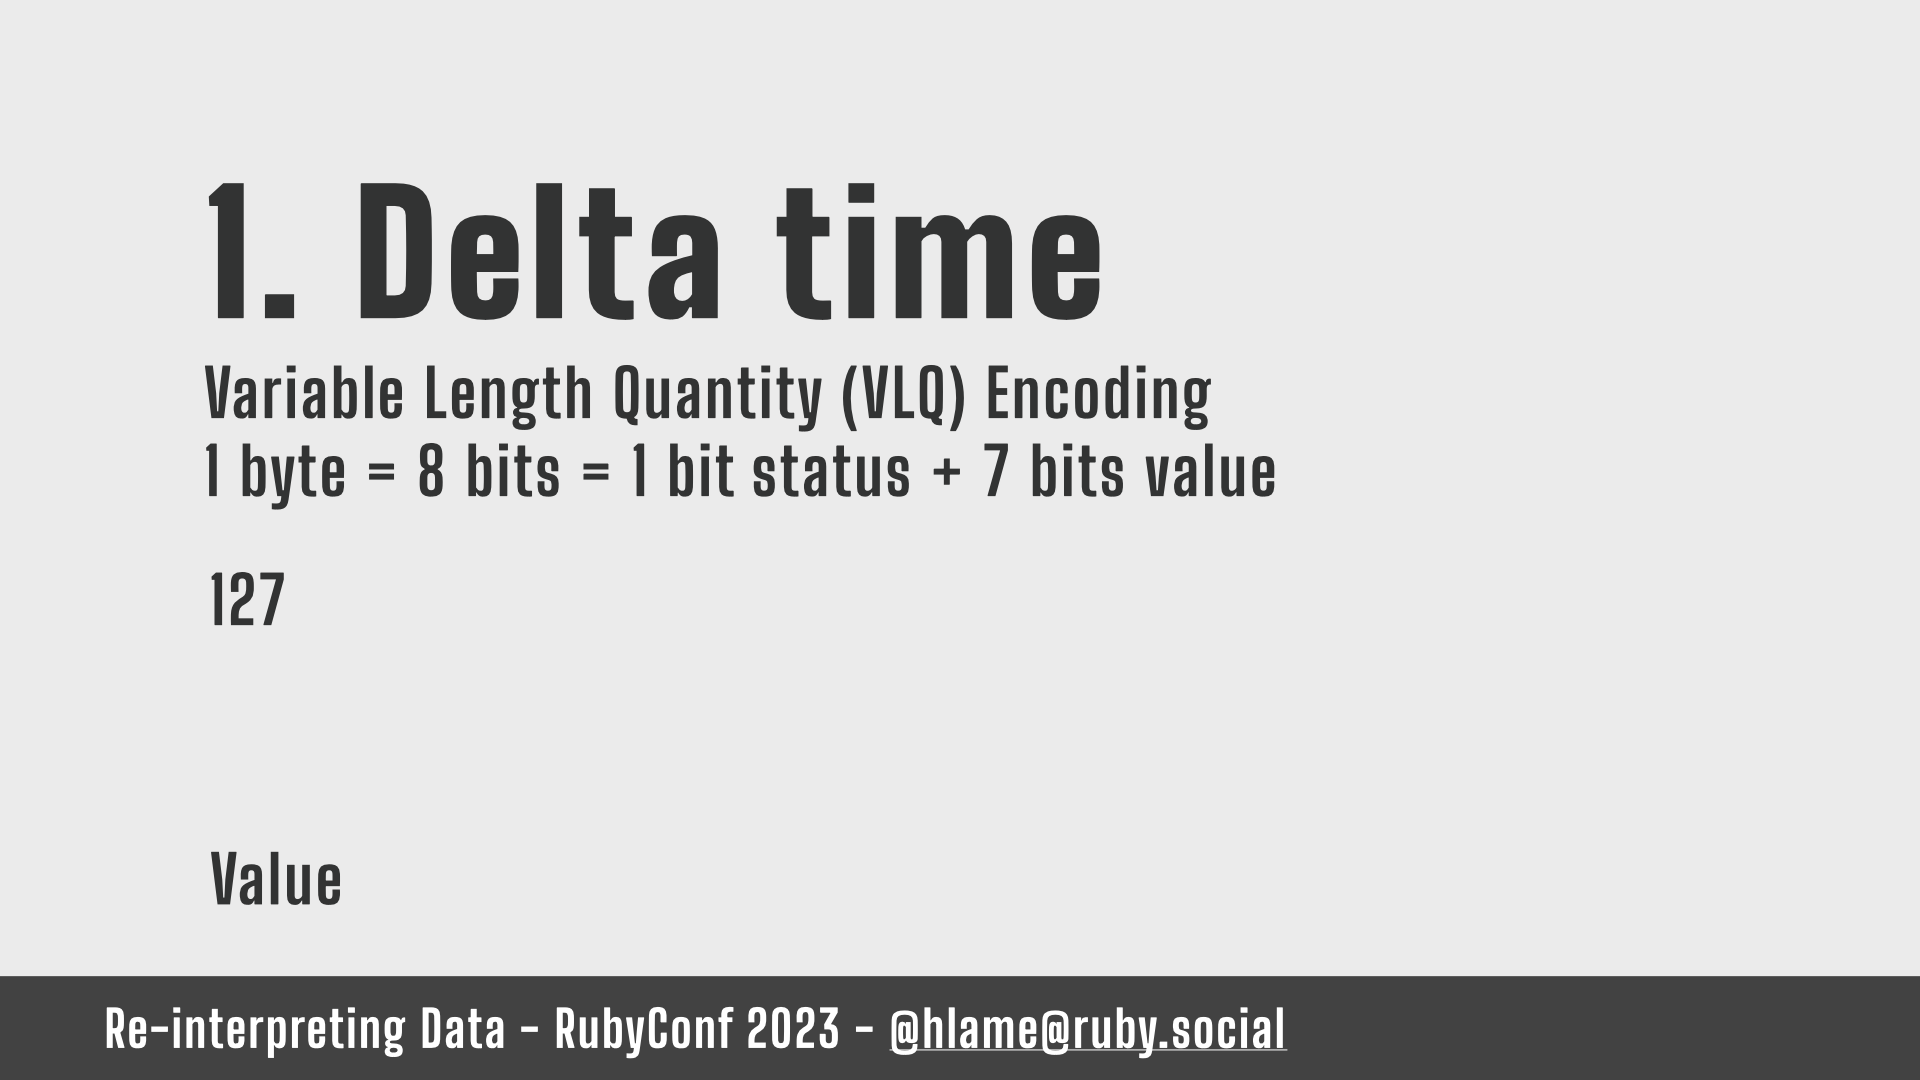
Here’s a worked example:
A value like 127…
MIDI Event structure: 1. Delta time – 127 – bit encoding
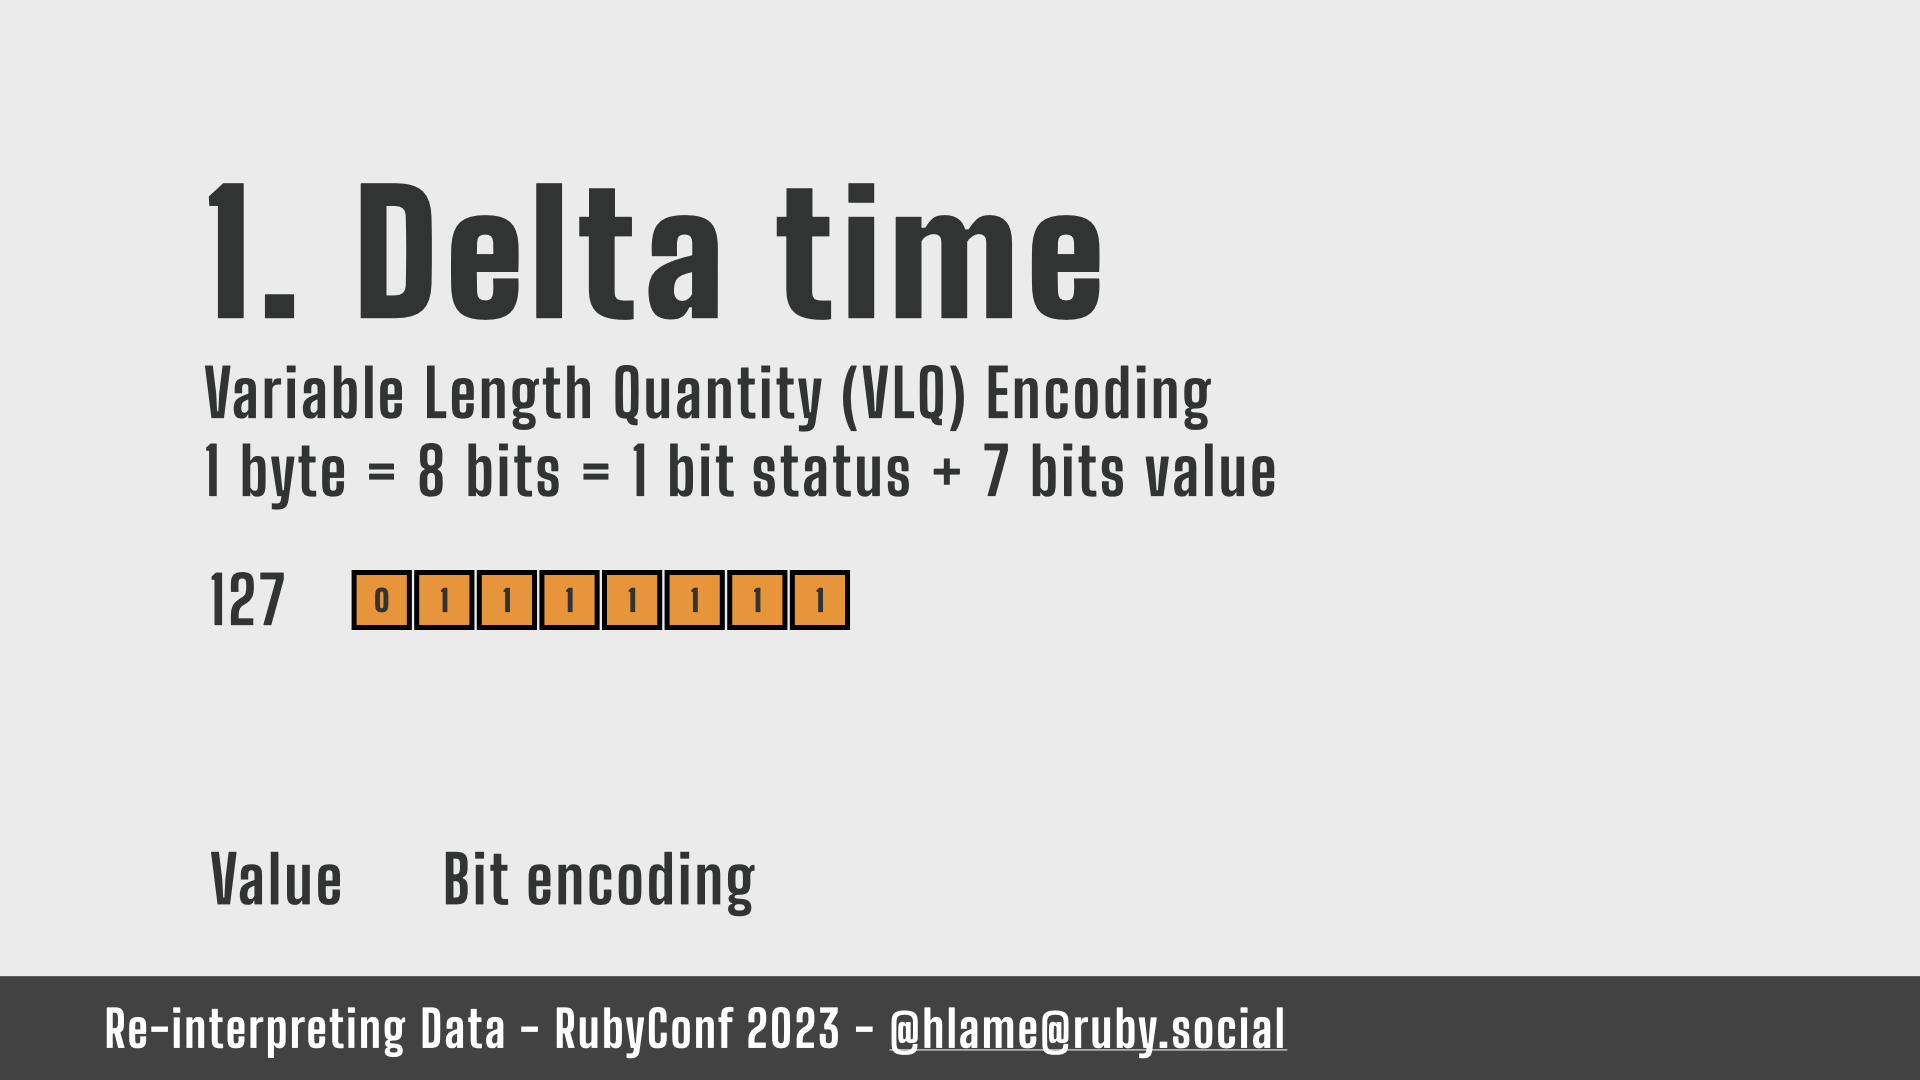
…is encoded as bits in 1 byte as a 0 followed by seven 1s.
MIDI Event structure: 1. Delta time – 127 – VLQ encoding
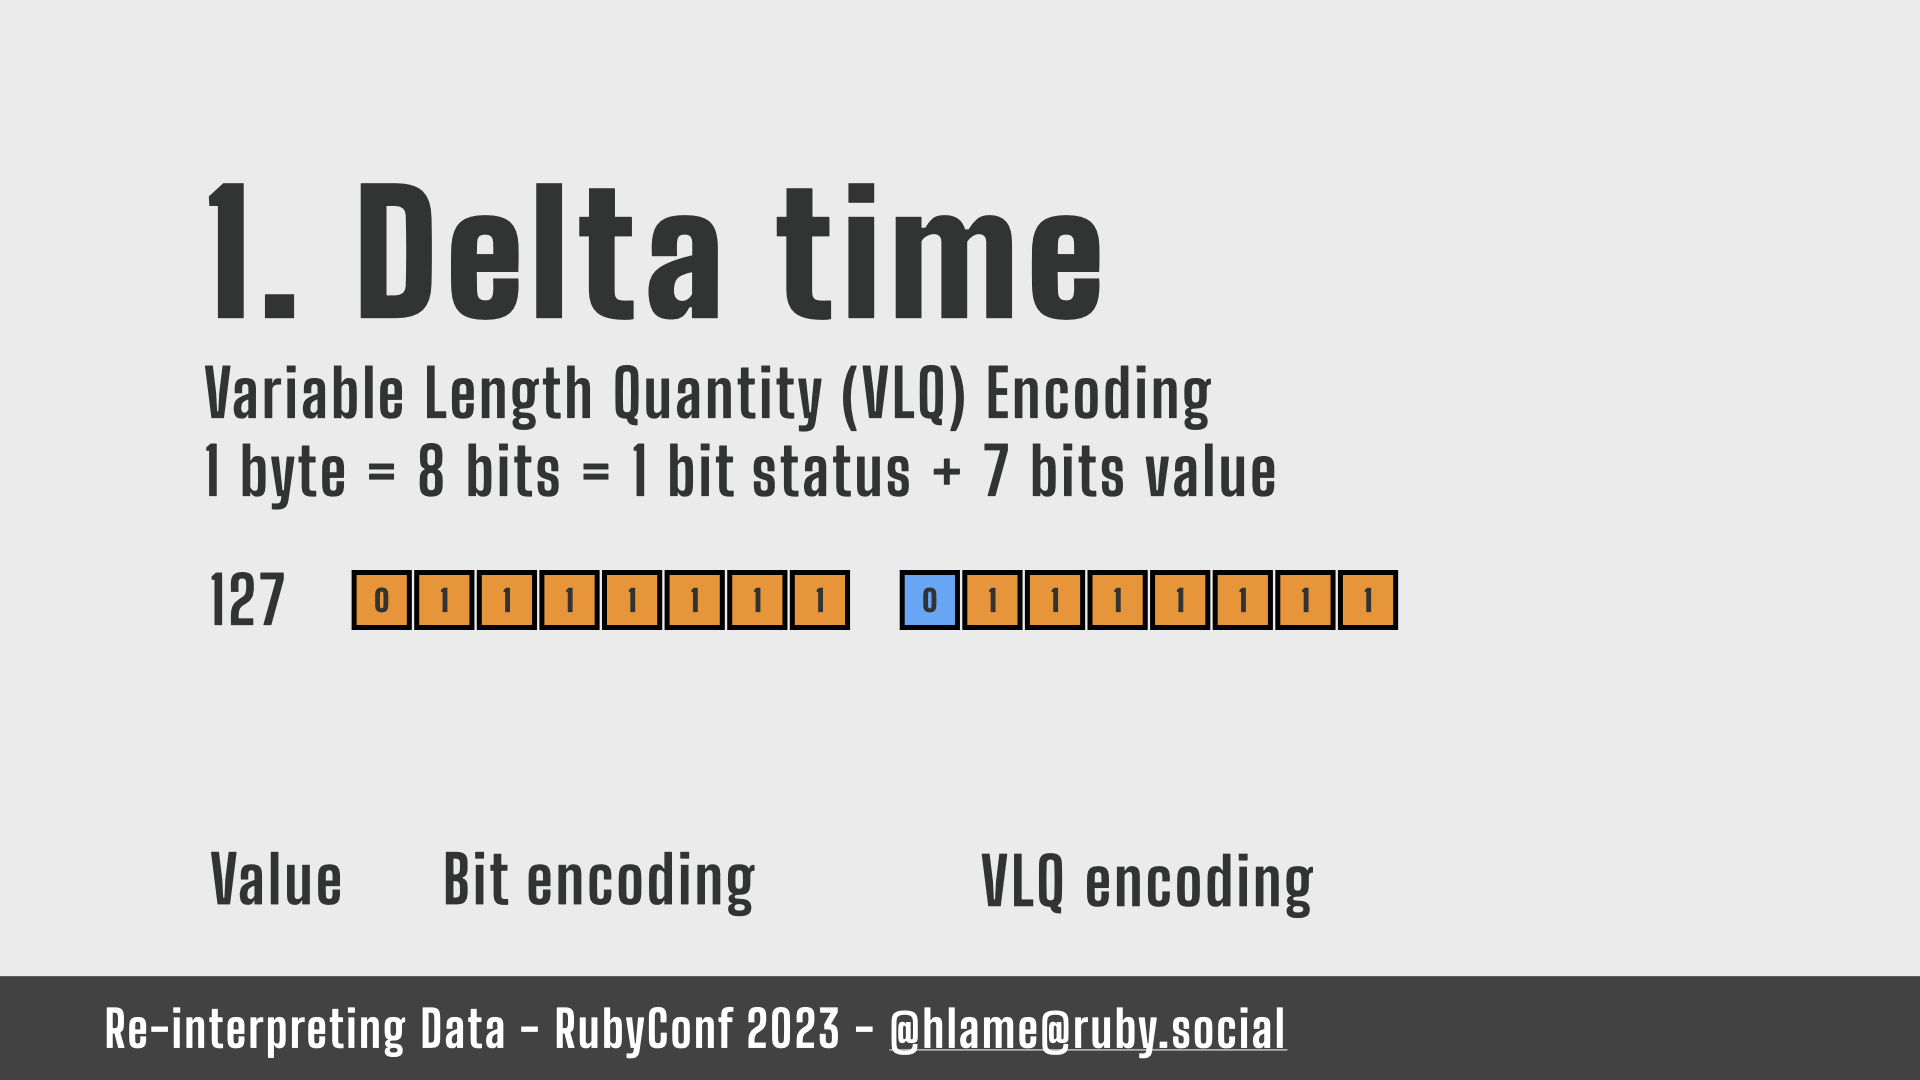
To encode in VLQ, it’s the same! But that first 0 isn’t a padding 0 we don’t need, it’s actually a status bit saying:
this value is complete, you don’t need to read another byte.
MIDI Event structure: 1. Delta time – 128
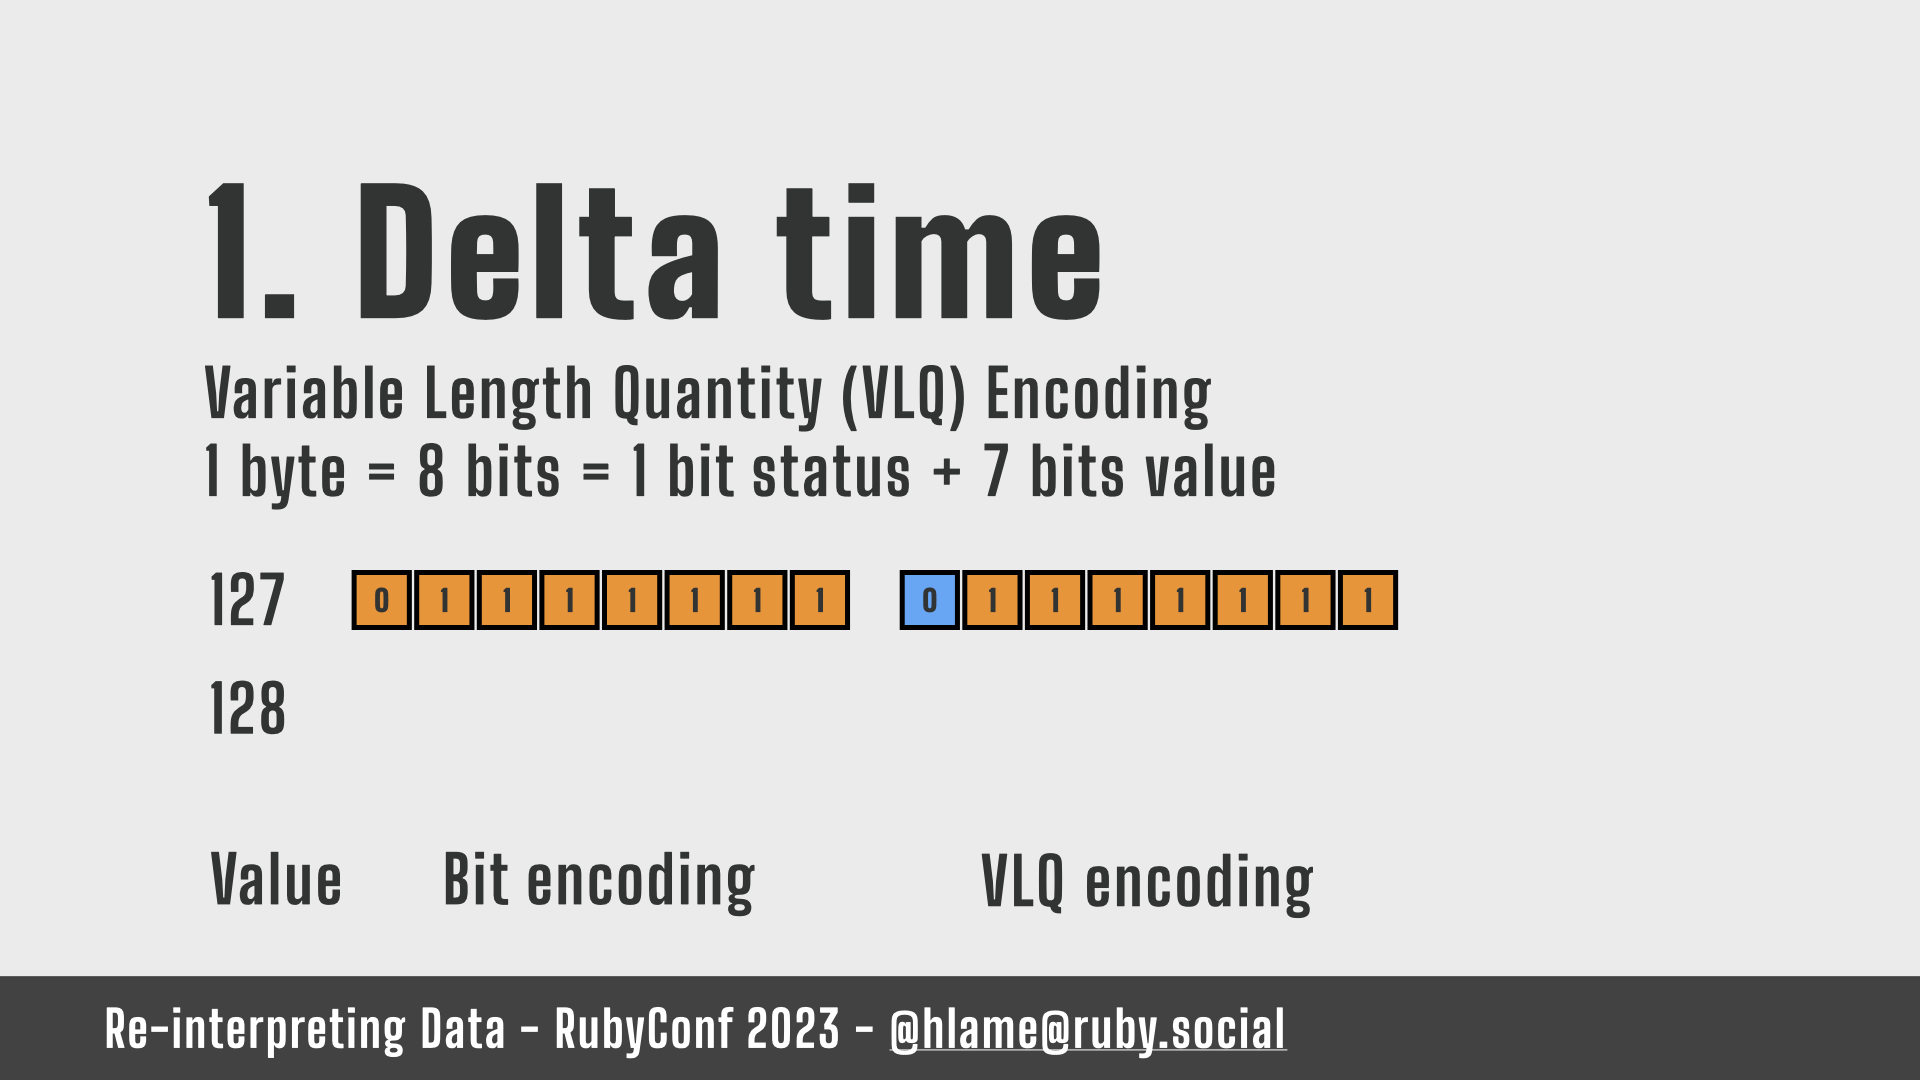
A value like 128…
MIDI Event structure: 1. Delta time – 128 – bit encoding
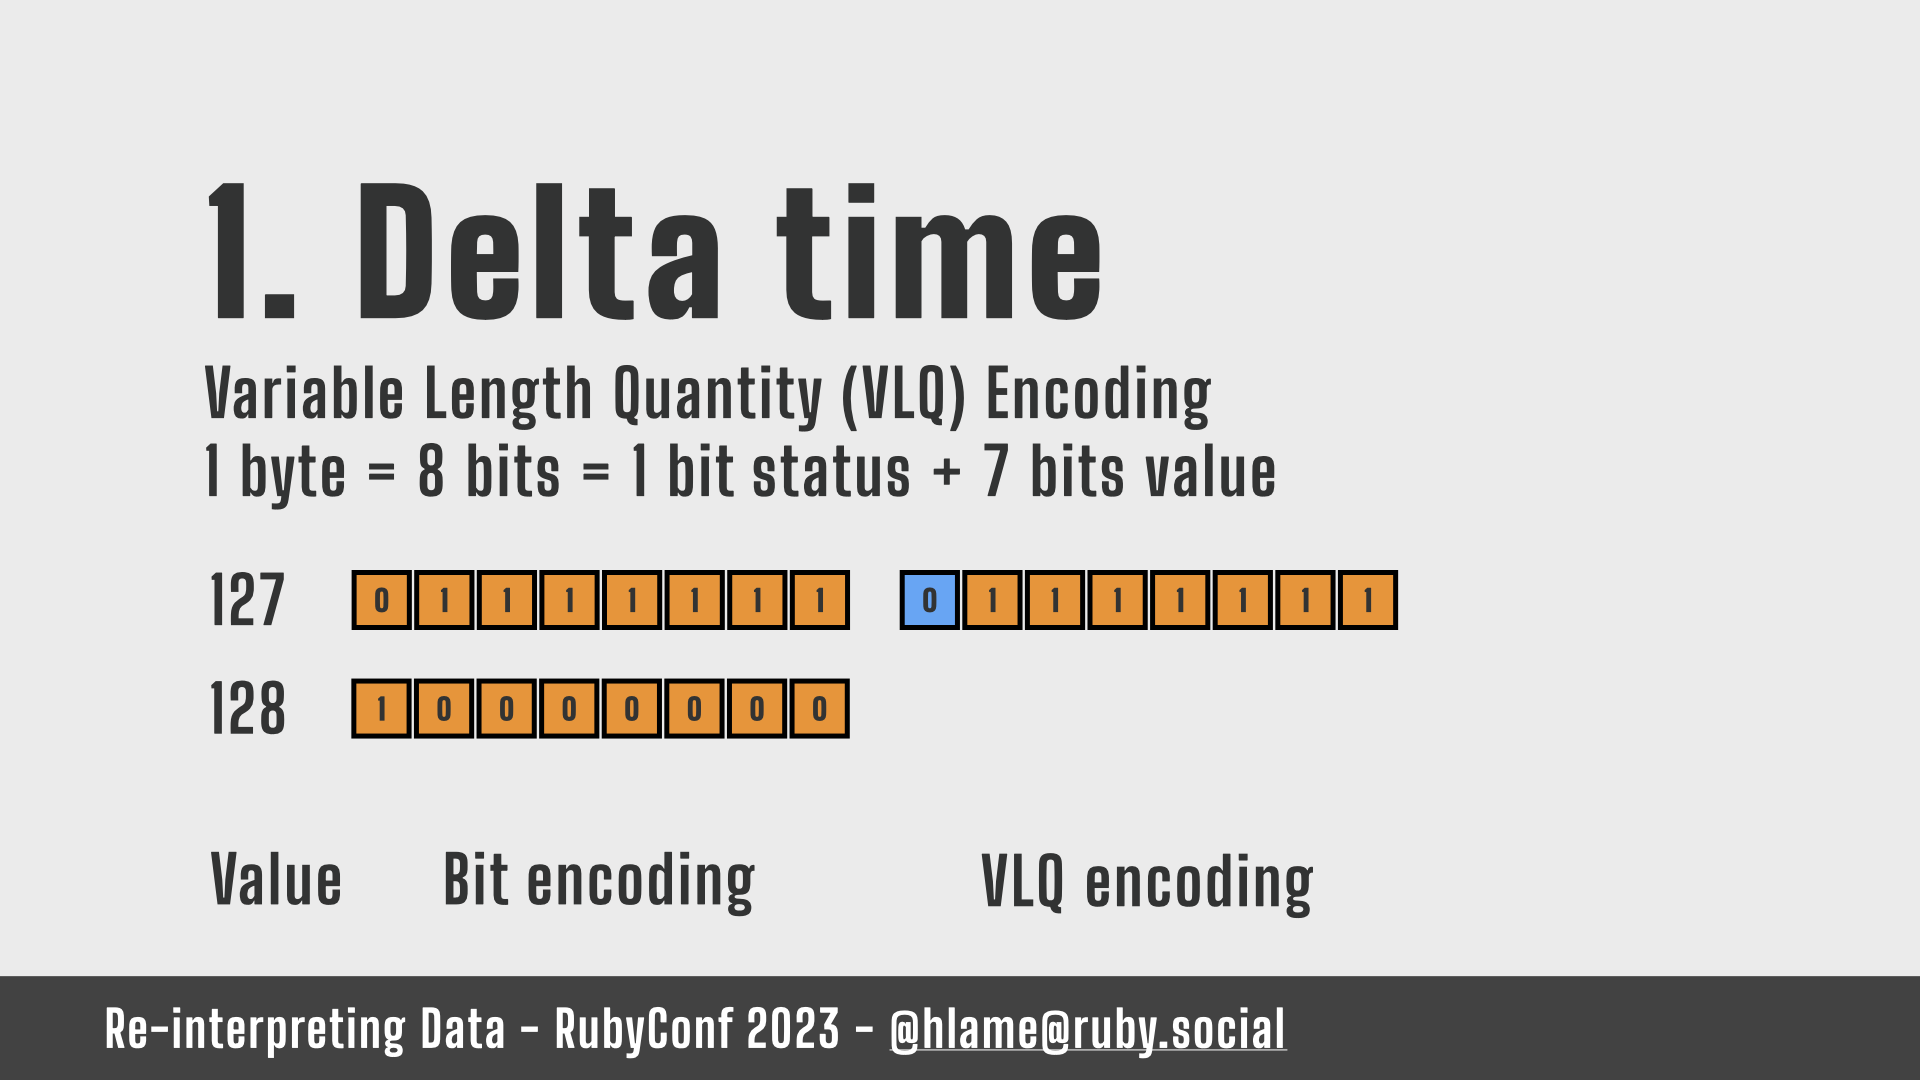
…is encoded as bits in 1 byte as a 1 followed by seven 0s.
MIDI Event structure: 1. Delta time – 128 – VLQ encoding
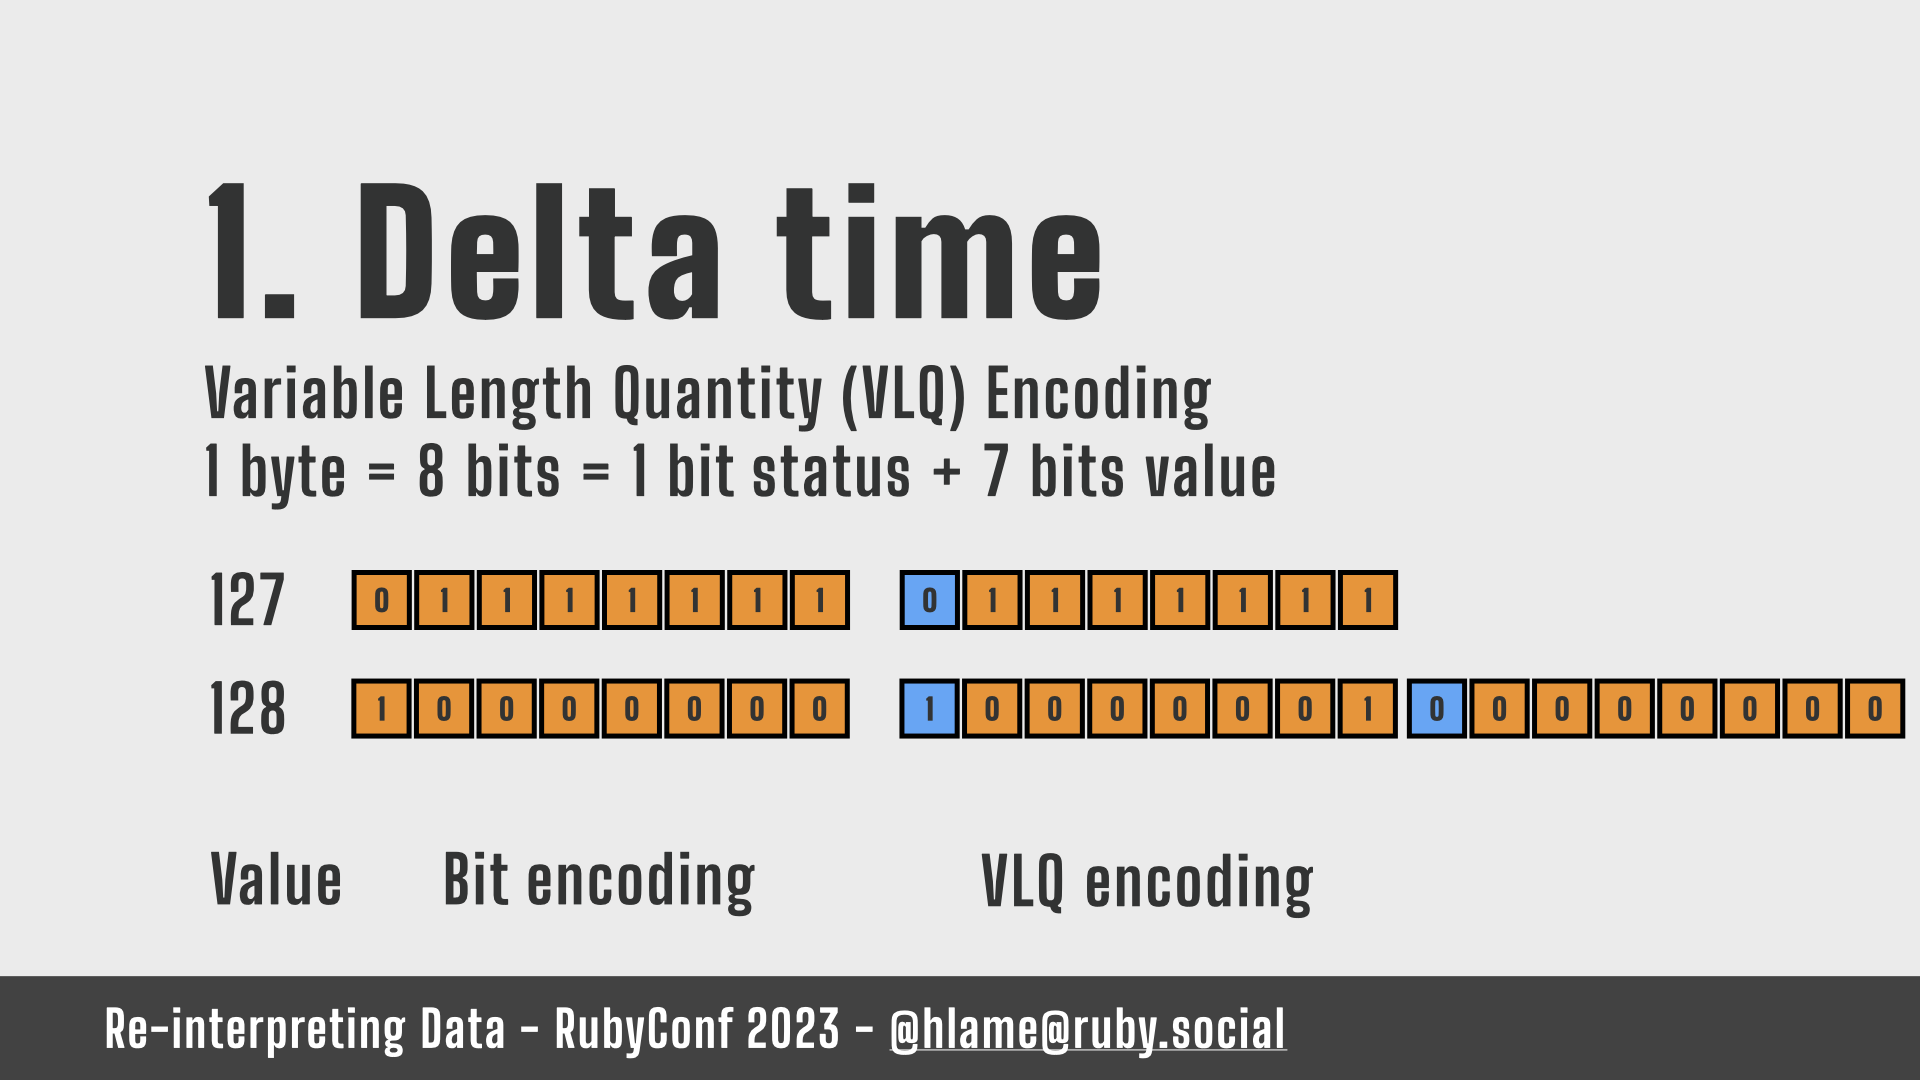
To encode in VLQ we need two bytes. The first byte is a 1, followed by six 0s then a 1. That first 1 says:
read another byte.
That second byte is eight 0s. The first 0 of which is the status bit saying:
the value is complete and you don’t have to read another byte.
So how does this turn back into a value of 128?
MIDI Event structure: 1. Delta time – 128 – VLQ decoding – no status bits
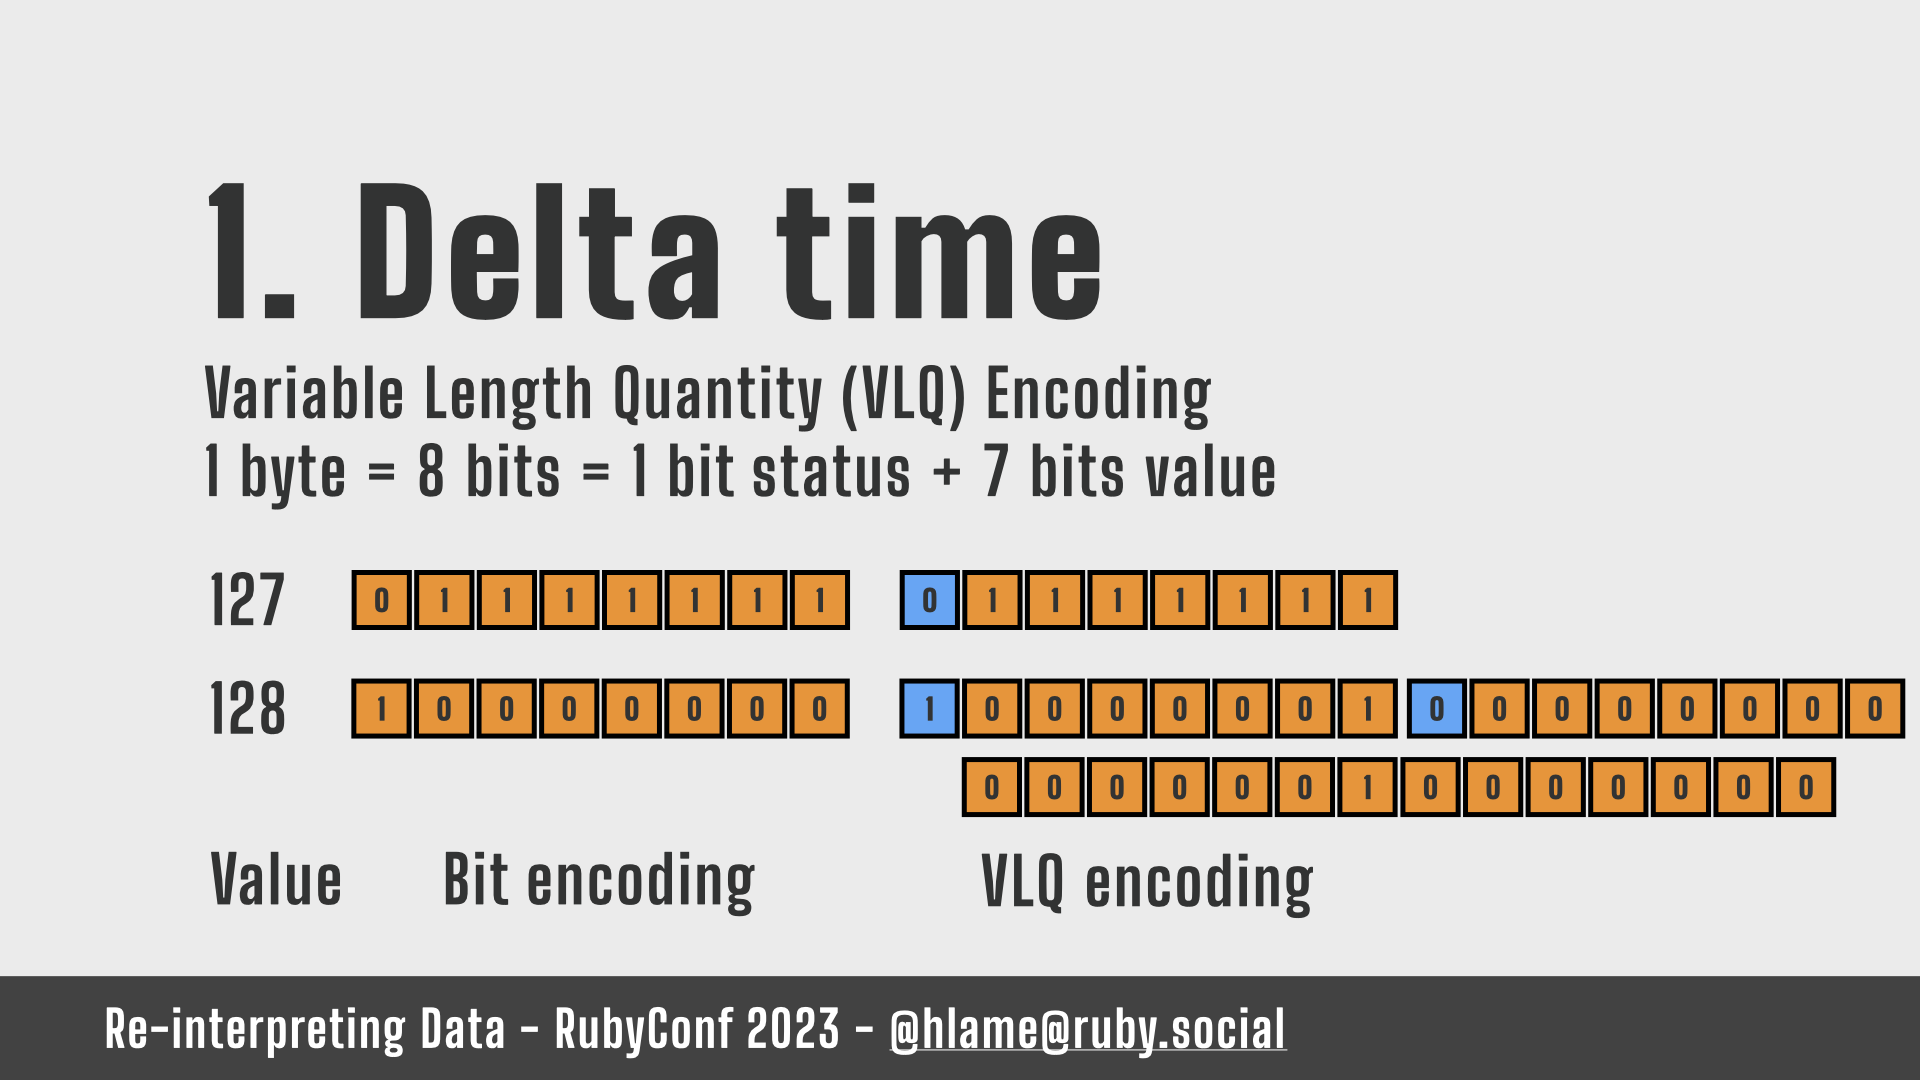
Well, we can drop the two status bits as they’re uninteresting. That gives us six 0s, a 1, then seven 0s.
MIDI Event structure: 1. Delta time – 128 – VLQ decoding – no leading zeros
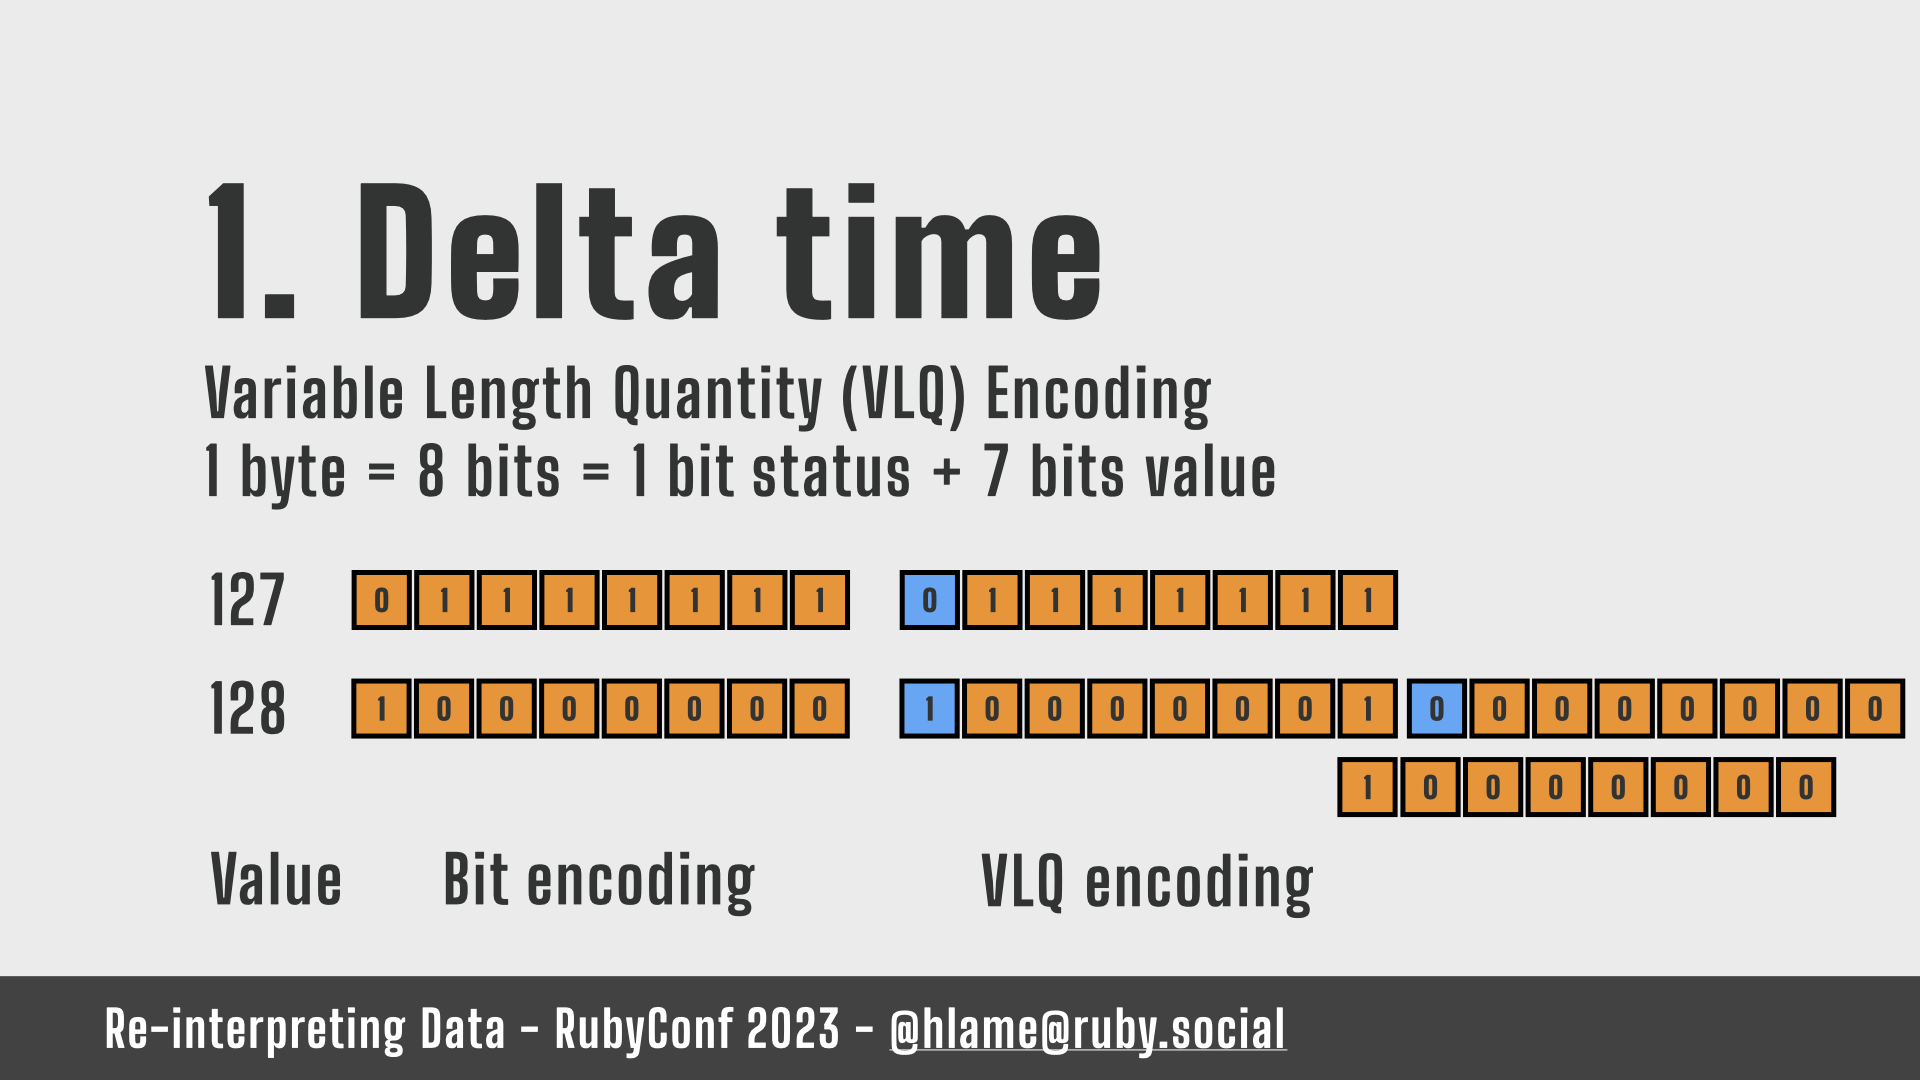
Those leading six 0s are uninteresting to us as well. And that gives us eight bits, a 1 followed by seven 0s.
MIDI Event structure: 1. Delta time – 128 – VLQ decoding – done
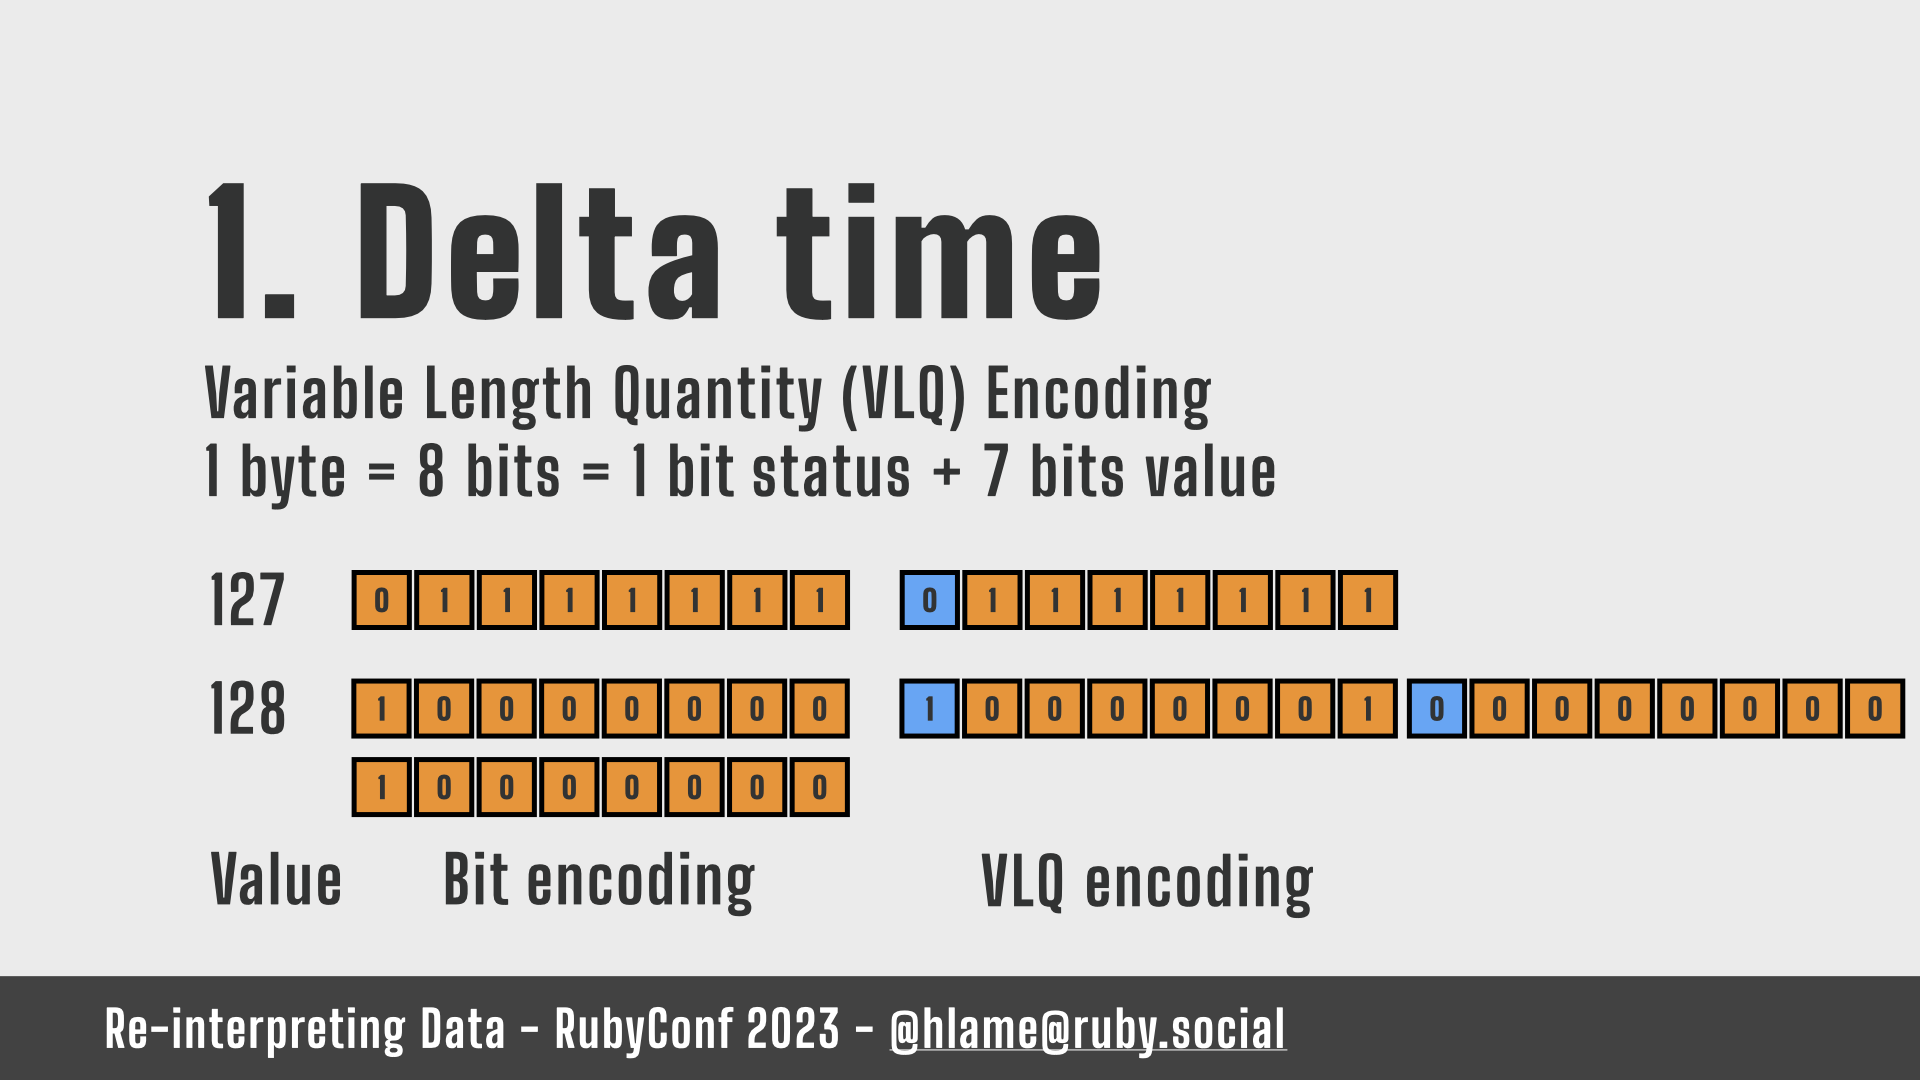
Where have we seen that before? Oh yeah, the standard bit encoding of 128.
Hurrah! So that’s Variable Length Quantity encoding.
Aside: UTF-8

As an aside: you may recognise this kind of encoding if you’ve ever dealt with UTF-8. It’s also a variable length quantity style encoding where a character is stored as 1, 2, 3 or 4 bytes. Not this exact encoding, but still, those MIDI spec designers were on to something!
MIDI Event structure: 2. Event type
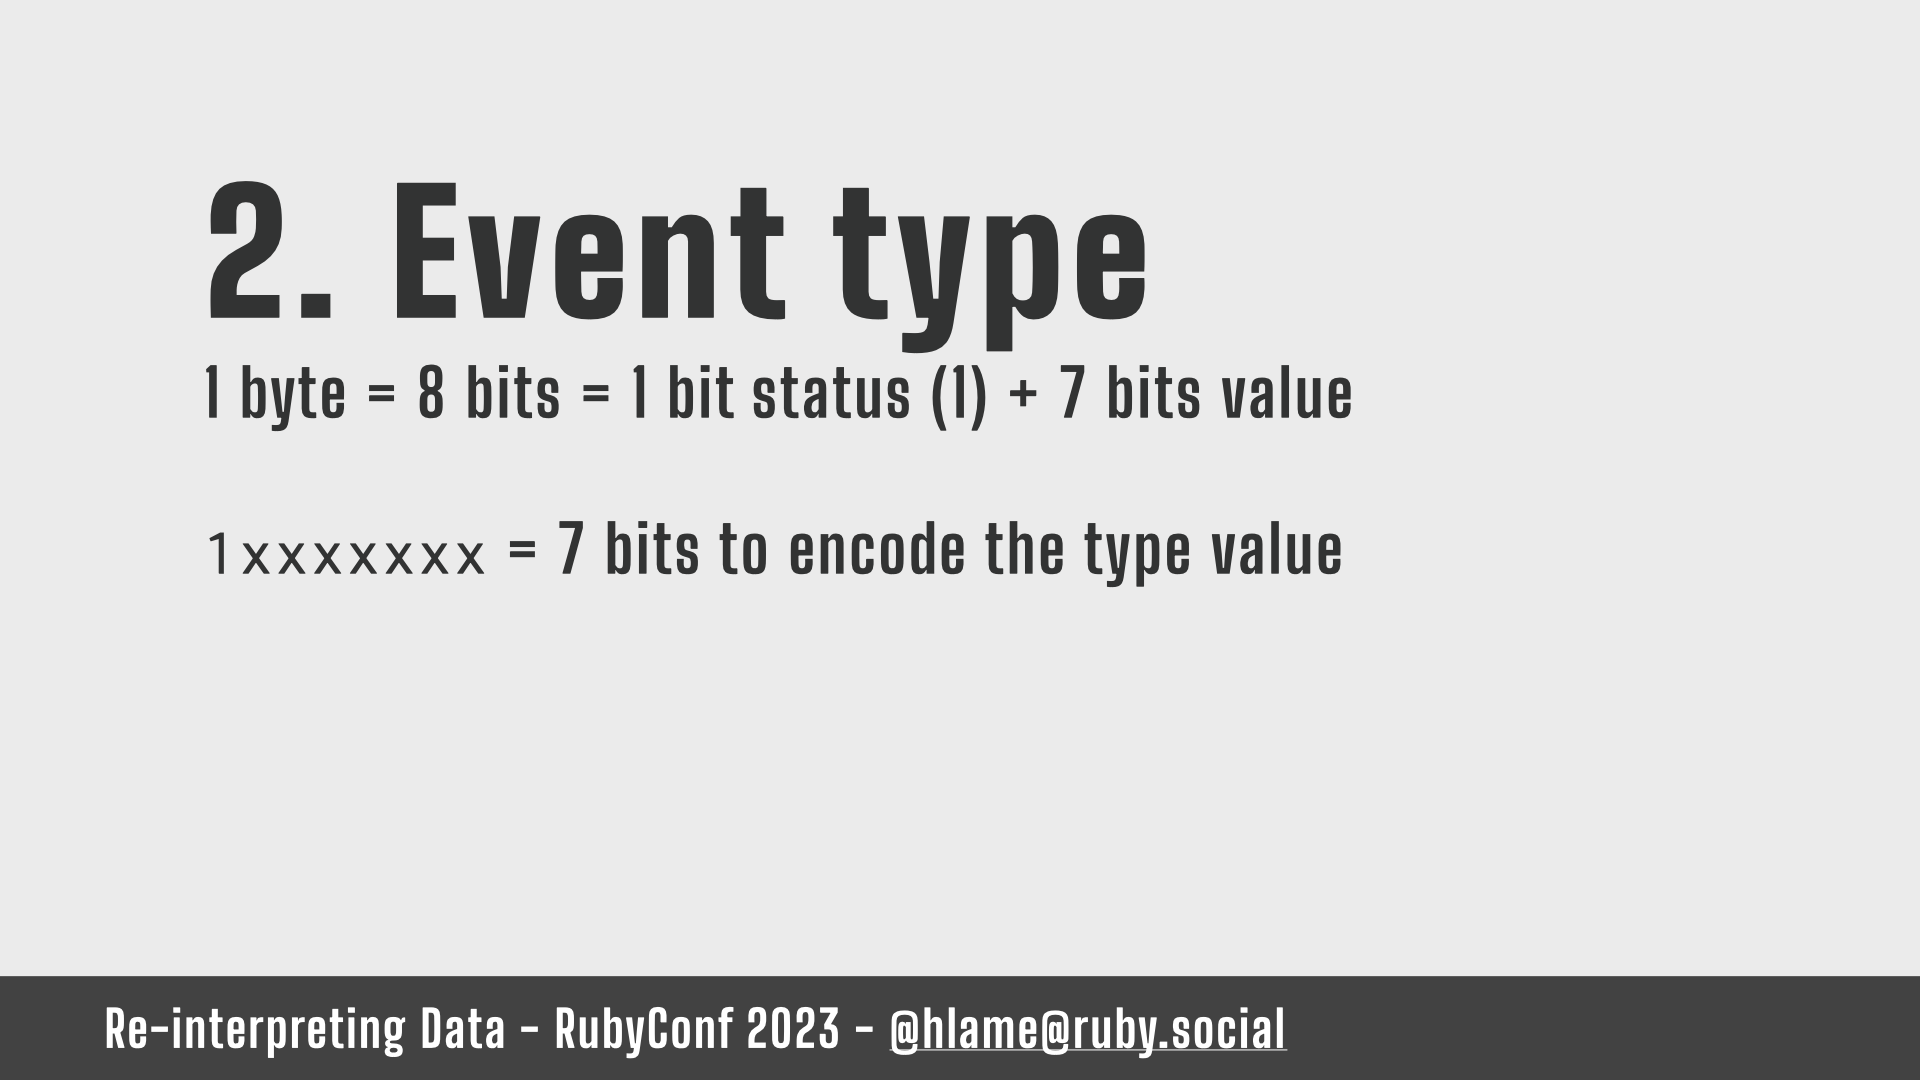
MIDI event types are stored in a single byte, but we only have 7 bits to store the type value, because the first bit must be a 1.
There are lots of event types which can be broken into 4 categories:
- MIDI things I do understand, but don’t care about like lyric or copyright information,
- MIDI things I don’t understand like ports and resetting,
- music things I don’t understand like tempo or pitch bending,
- music things I do understand and care about.
MIDI Event structure: 2. Event type – note on & off events
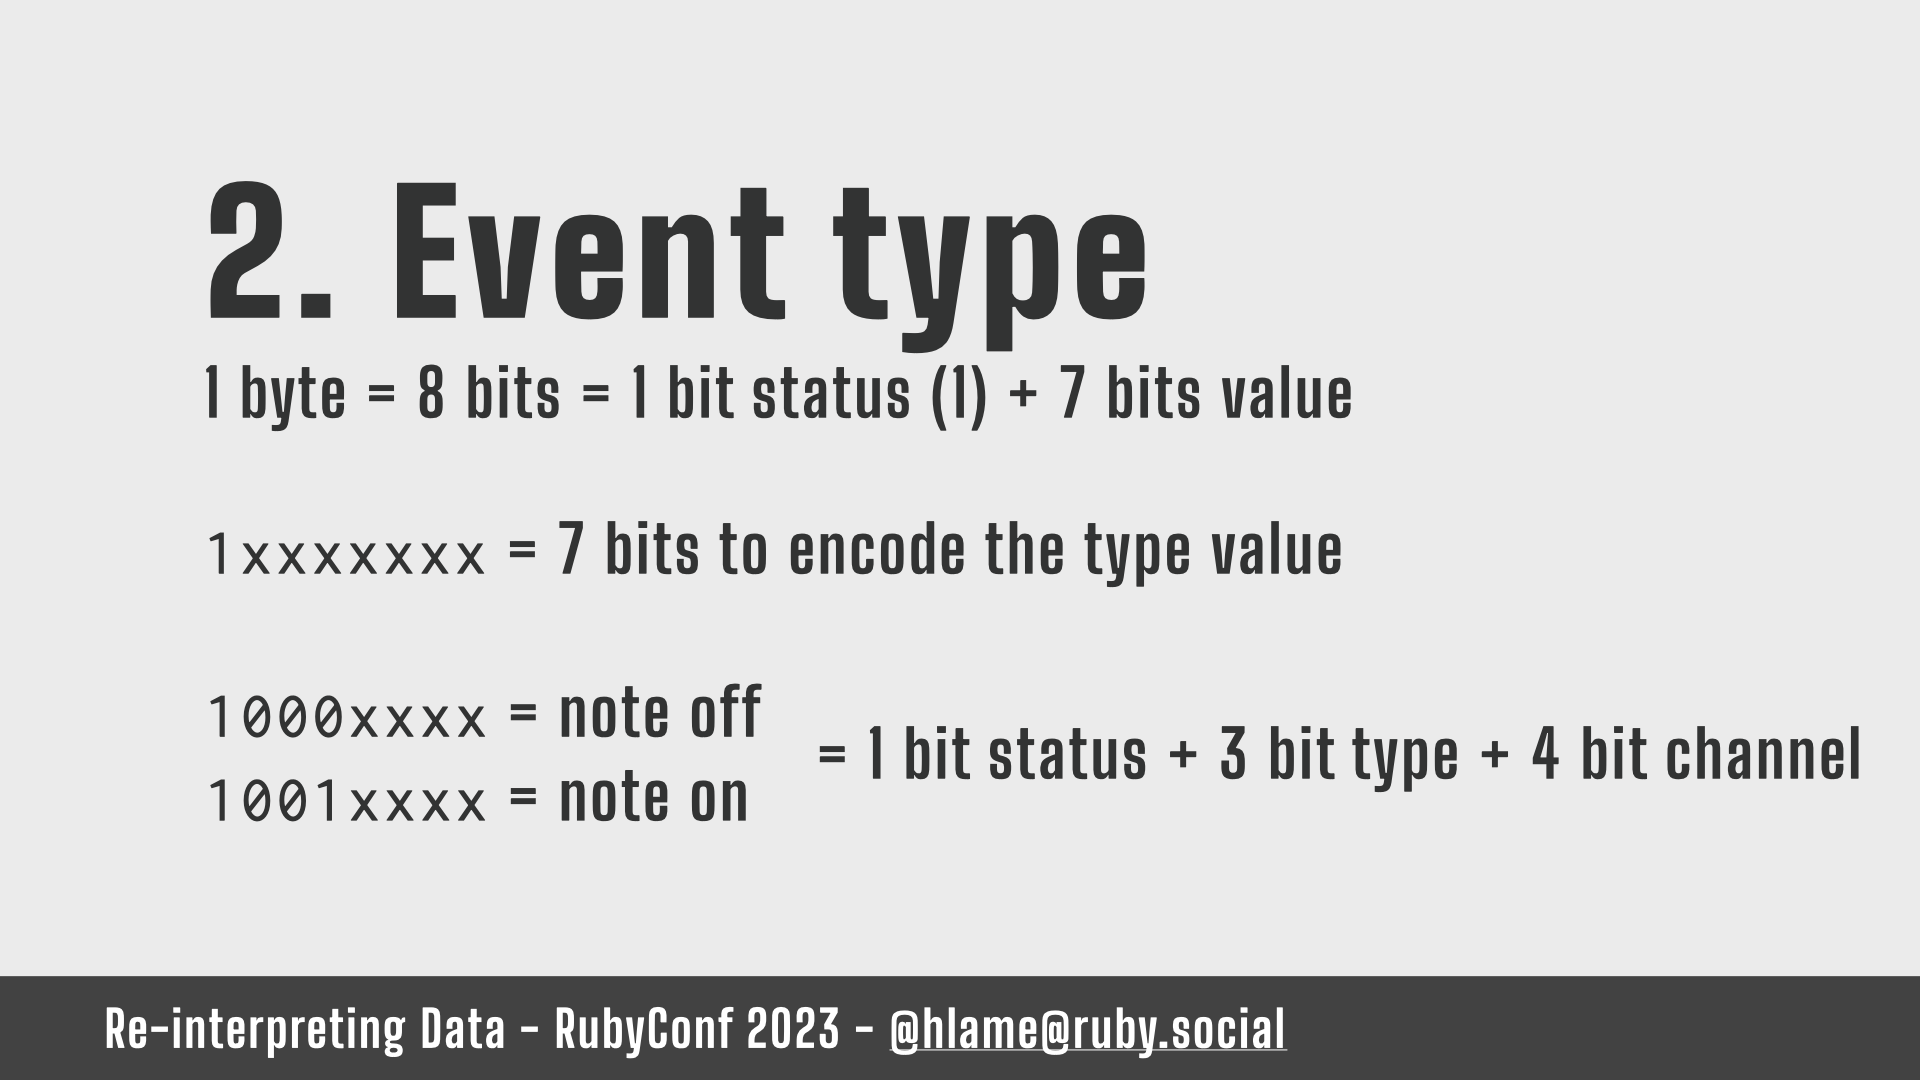
There are exactly two of these: “turn this note on” and “turn this note off”
1000xxxxfor “turn this note off”1001xxxxfor “turn this note on”
The remaining 4 bits of the type byte contain the channel number in which to play this note or stop it. MIDI has 16 channels to play sound on and a value between 0 and 15 neatly fits into a 4-bit number so that’s convenient. A channel is kind of like an instrument; it’s not really as simple as that, but for our purposes it can be.
MIDI Event structure: 3. Event data

MIDI event data is also stored in a single byte, and we also only have 7 bits to store the value, because the first bit must be a 0.
Yes! This means we can easily tell the difference between a type byte and a data byte. This is probably useful for reading files and bailing immediately on corrupt data.
Our note events both take 2 bytes of data; one for the key, and one for the velocity.
Key is literally which note to play. For example middle C, a popular note I believe, is note number 60 (not quite the middle between 0 and 127, but whatever music nerds).
Velocity is how hard the note is played. Sometimes known as attack. Think of it like a numerical value for how soft or hard you press the key on a piano, or took your hands off the key on the piano.
Other events take different data that mean different things, but all stored in one or two bytes.
Note on/off MIDI event structure
If we put it all together, what do we need to store one of our note on or off MIDI events?
We need:
- a delta time,
- a type (on or off),
- a key,
- a velocity.
That looks like this:
- a byte that starts
0, - a byte that starts
100, - and then two bytes that start
0.
Or… because delta time can be two bytes it could be a 1 byte, a 0 byte, a 1 0 0 byte and two 0 bytes.
Or… three.
Or… four.
There is no five because delta time is 1 to 4 bytes.
Hopefully you can see the problem we have to solve. It’s verrrrry unlikely that our source file is going to have its bytes arranged so that the first bits magically adhere to this structure.
Our solution is to use our source data to fill in the orange parts of these diagrams, and statically fill in the blue parts.
Generating MIDI events from source data solution
To do this we have to deal with the bits within the source file, not the bytes. We need 27 bits of data from the source file to make one MIDI event:
- 8 bits can be used to extract the delta time. Using VLQ encoding of the value this’ll be turned into either 1 or 2 bytes. I could use 28 bits as that’s the maximum allowed in a 4-byte VLQ value, but it might also mean pausing for hours between notes and that won’t be fun to listen to. I could use 7-bits so it always fits into 1 byte, but I didn’t learn about VLQ to not need to use it! So 8 bits seems like an arbitrary, but good, choice.
- 1 bit to decide between a “turn this note on” and “turn this note off” status event,
- 4 bits to say which channel the note is on,
- 7 bits for which key the note is,
- 7 bits for how hard/fast/soft the note is played/stopped.
This way we can use all the data from our source file and be sure that it’s going to be arranged correctly for making valid MIDI data.
Writing bit-scale MIDI events from source data bytes
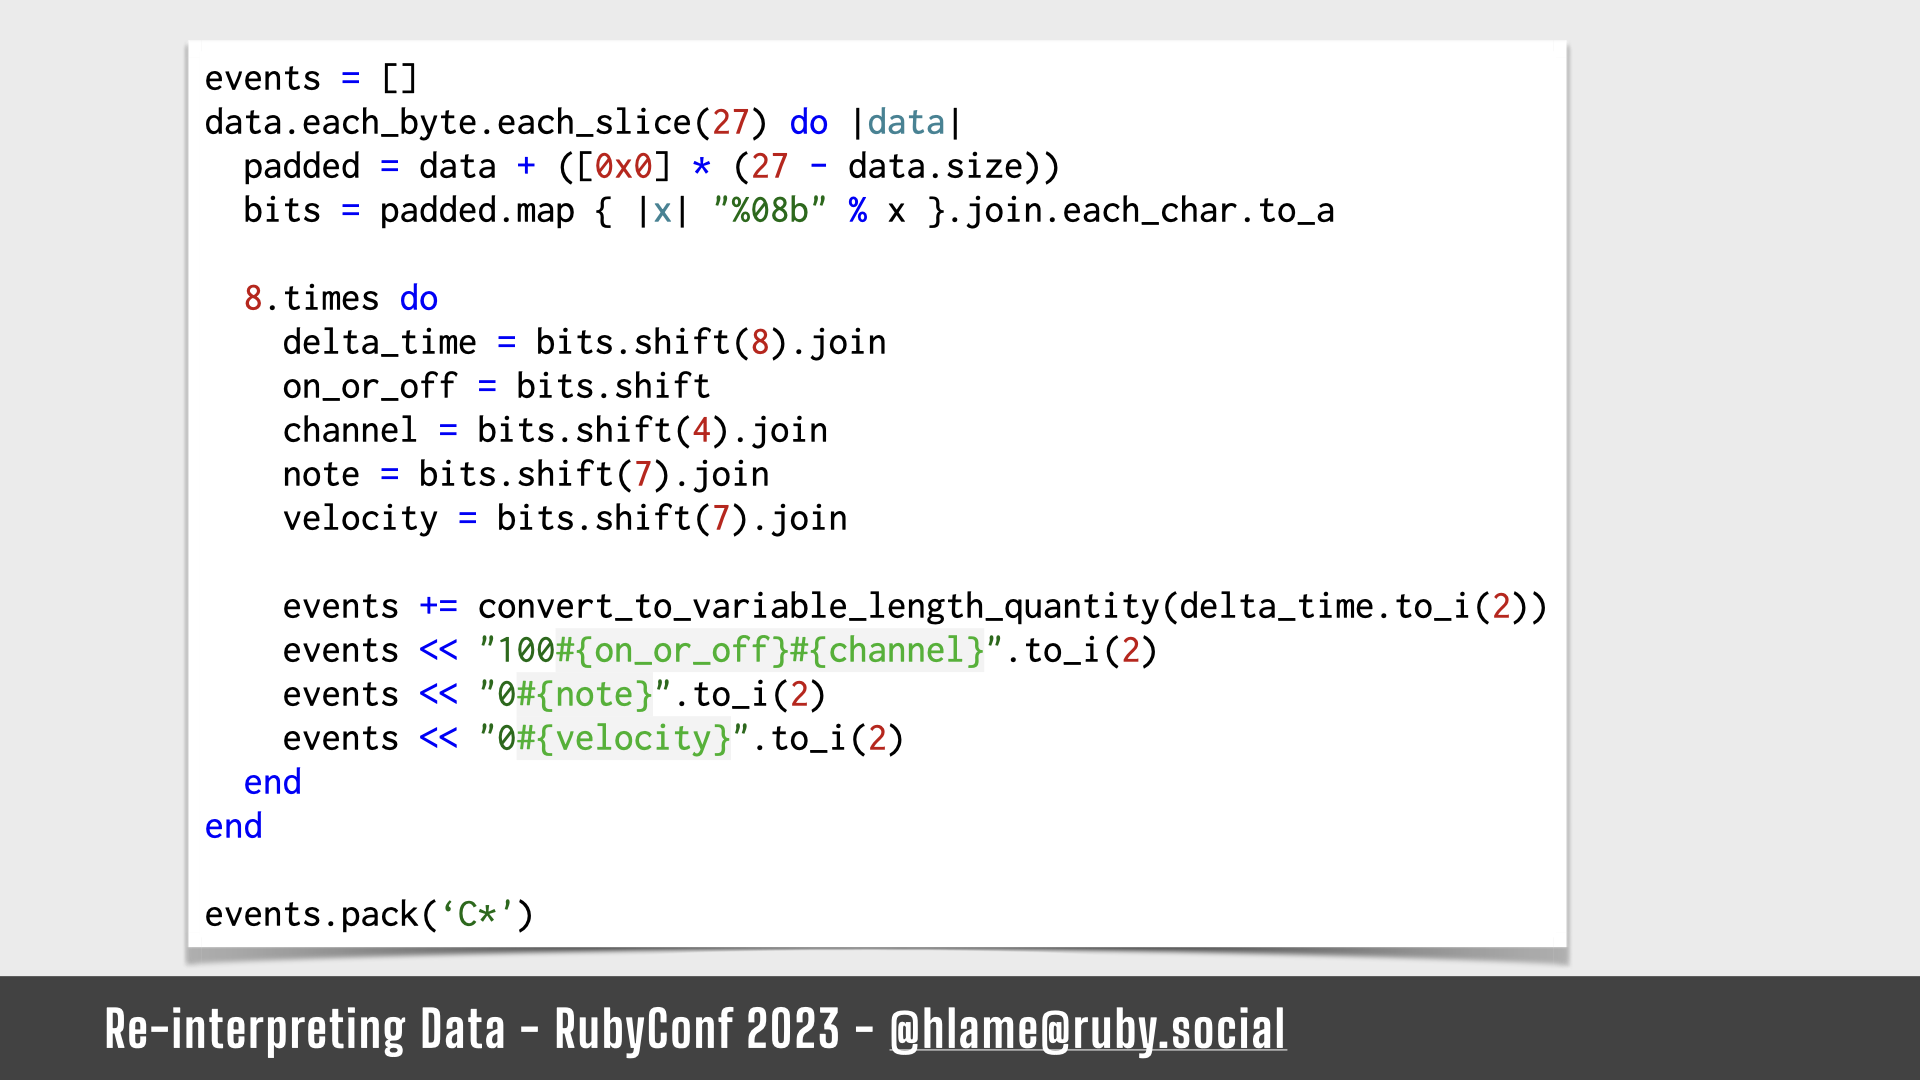
Here’s the code to do just that.
Writing bit-scale MIDI events from source data bytes: reading enough bytes
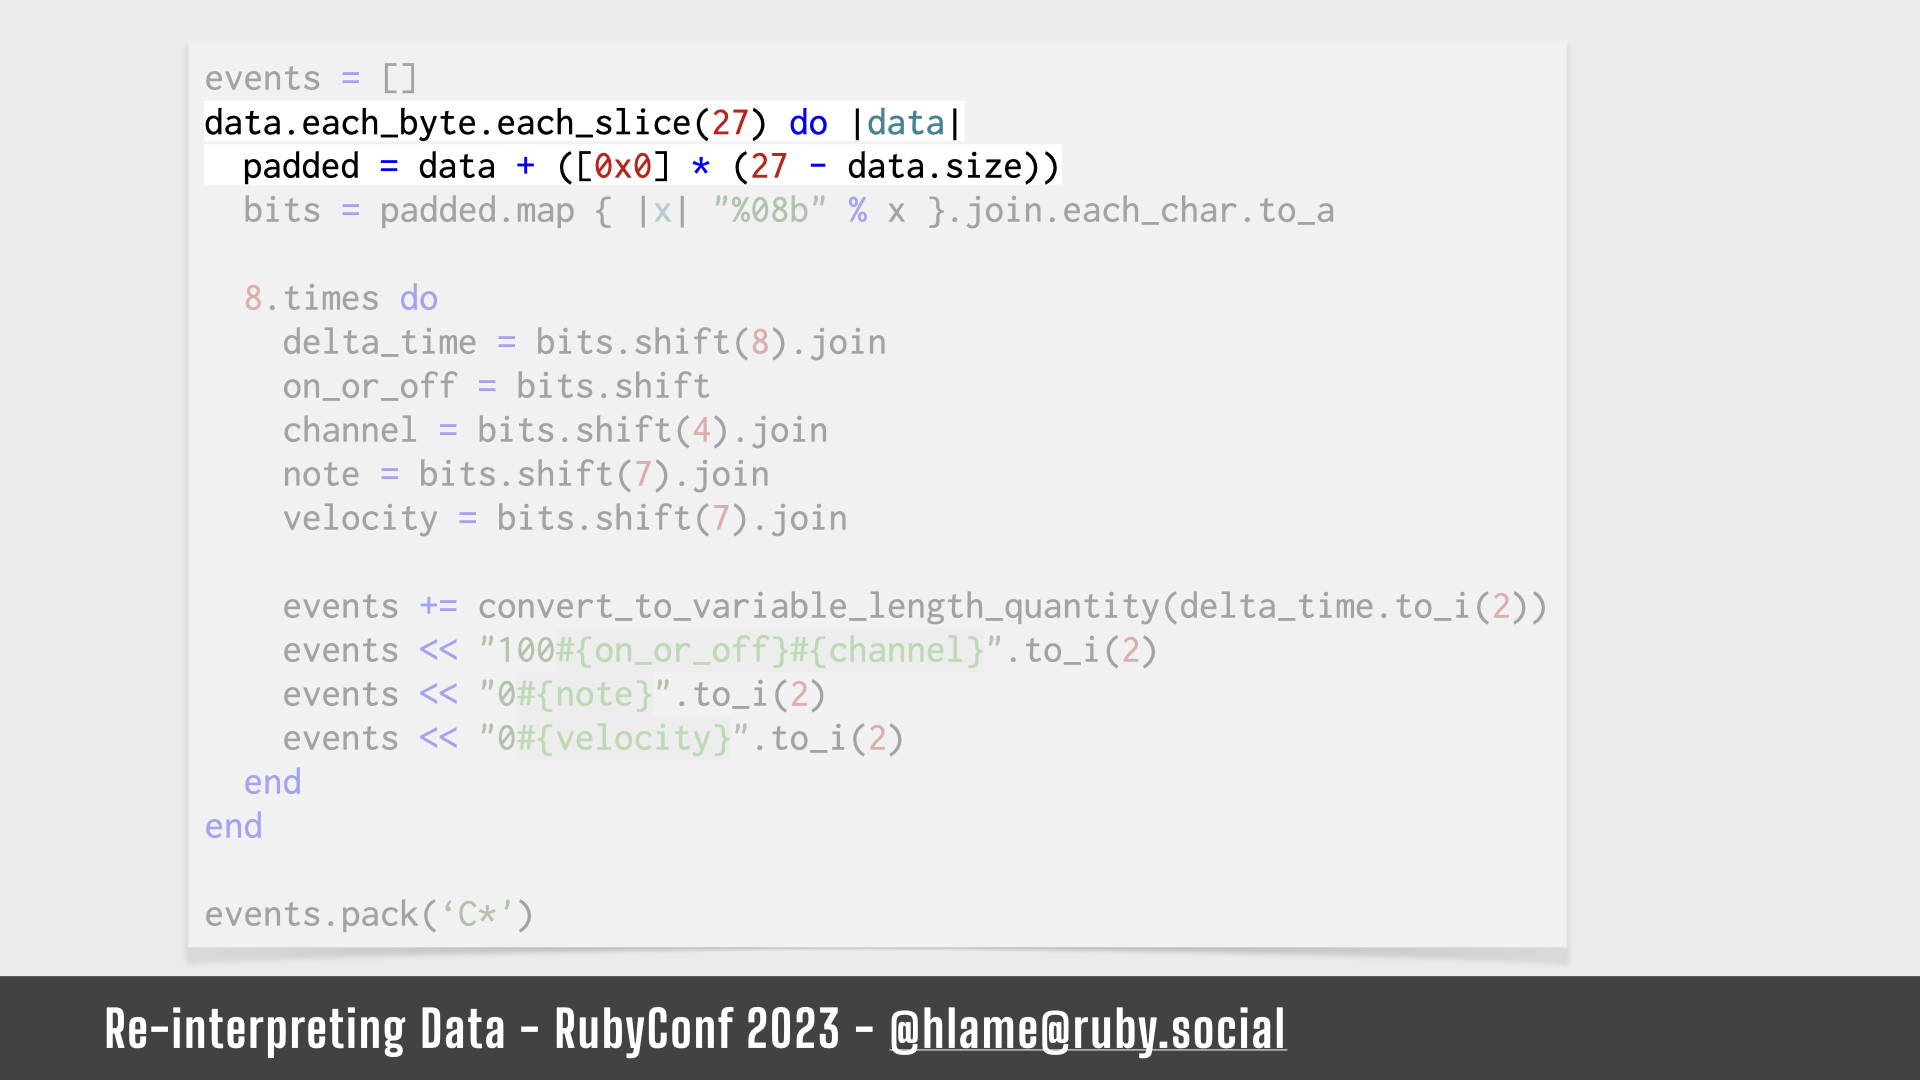
First we read 27 bytes from the source file and we pad it with zeros if there aren’t 27 bytes available (e.g. at the end of the file).
Why 27 bytes? Murray, you said we need 27 bits.
Well the problem is file reading APIs are byte-scale not bit-scale.
27 bytes is 216 bits and it turns out there’s no smaller common factor of 27 (the number of bits we want per event) and 8 (the smallest number of bits we can read at a time). So we read 27 bytes and that lets us create 8 midi events using 27 bits at a time. I told you earlier I didn’t like messing with factoring.
Writing bit-scale MIDI events from source data bytes: converting bytes to bits
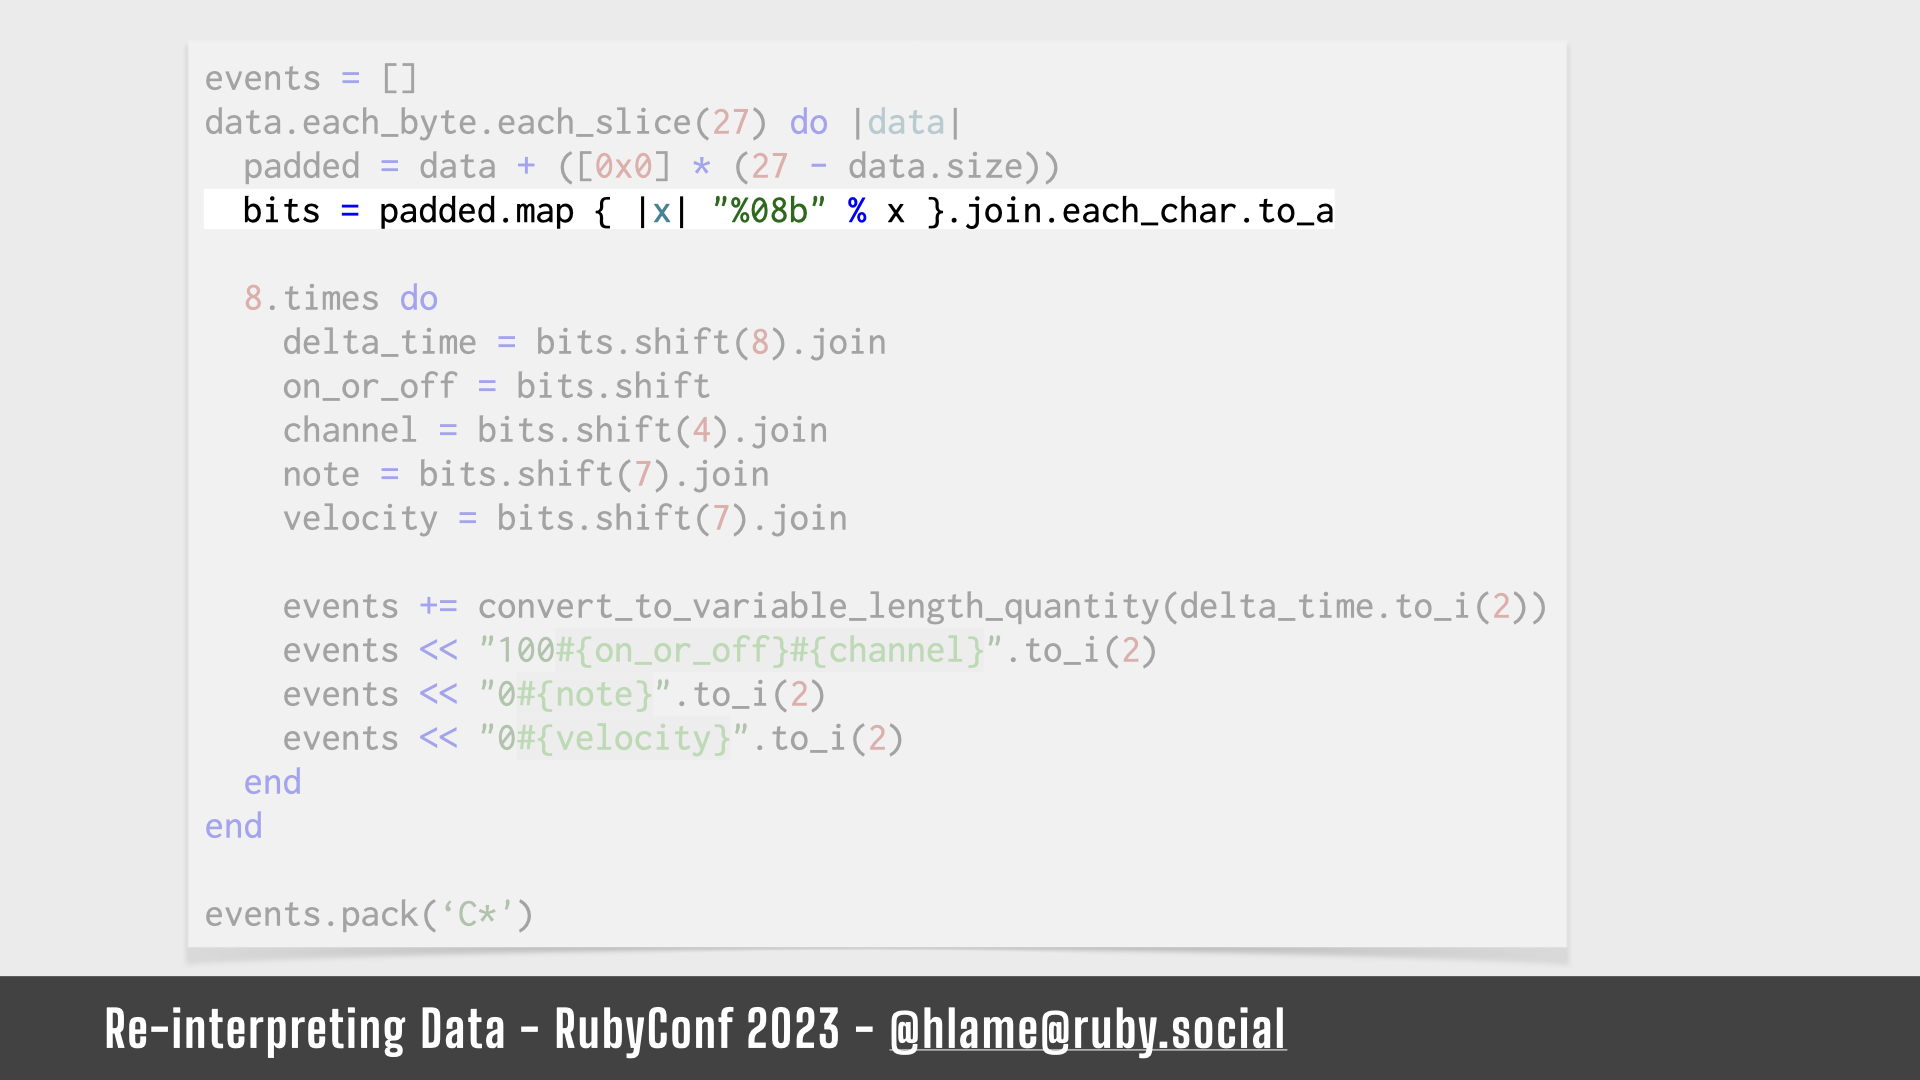
We turn those bytes into a string of their binary representation using sprintf14. The “%08b” format string says:
turn a number into a
0padded binary number of at 8 characters long
We use sprintf because although we can get the binary representation with to_s(2), it won’t give us the leading 0s we need to make sure the string is eight chars long. Then we join them all together as one long 216 character string of 1s and 0s. Finally, we turn that into an array.
Writing bit-scale MIDI events from source data bytes: extracting a single event
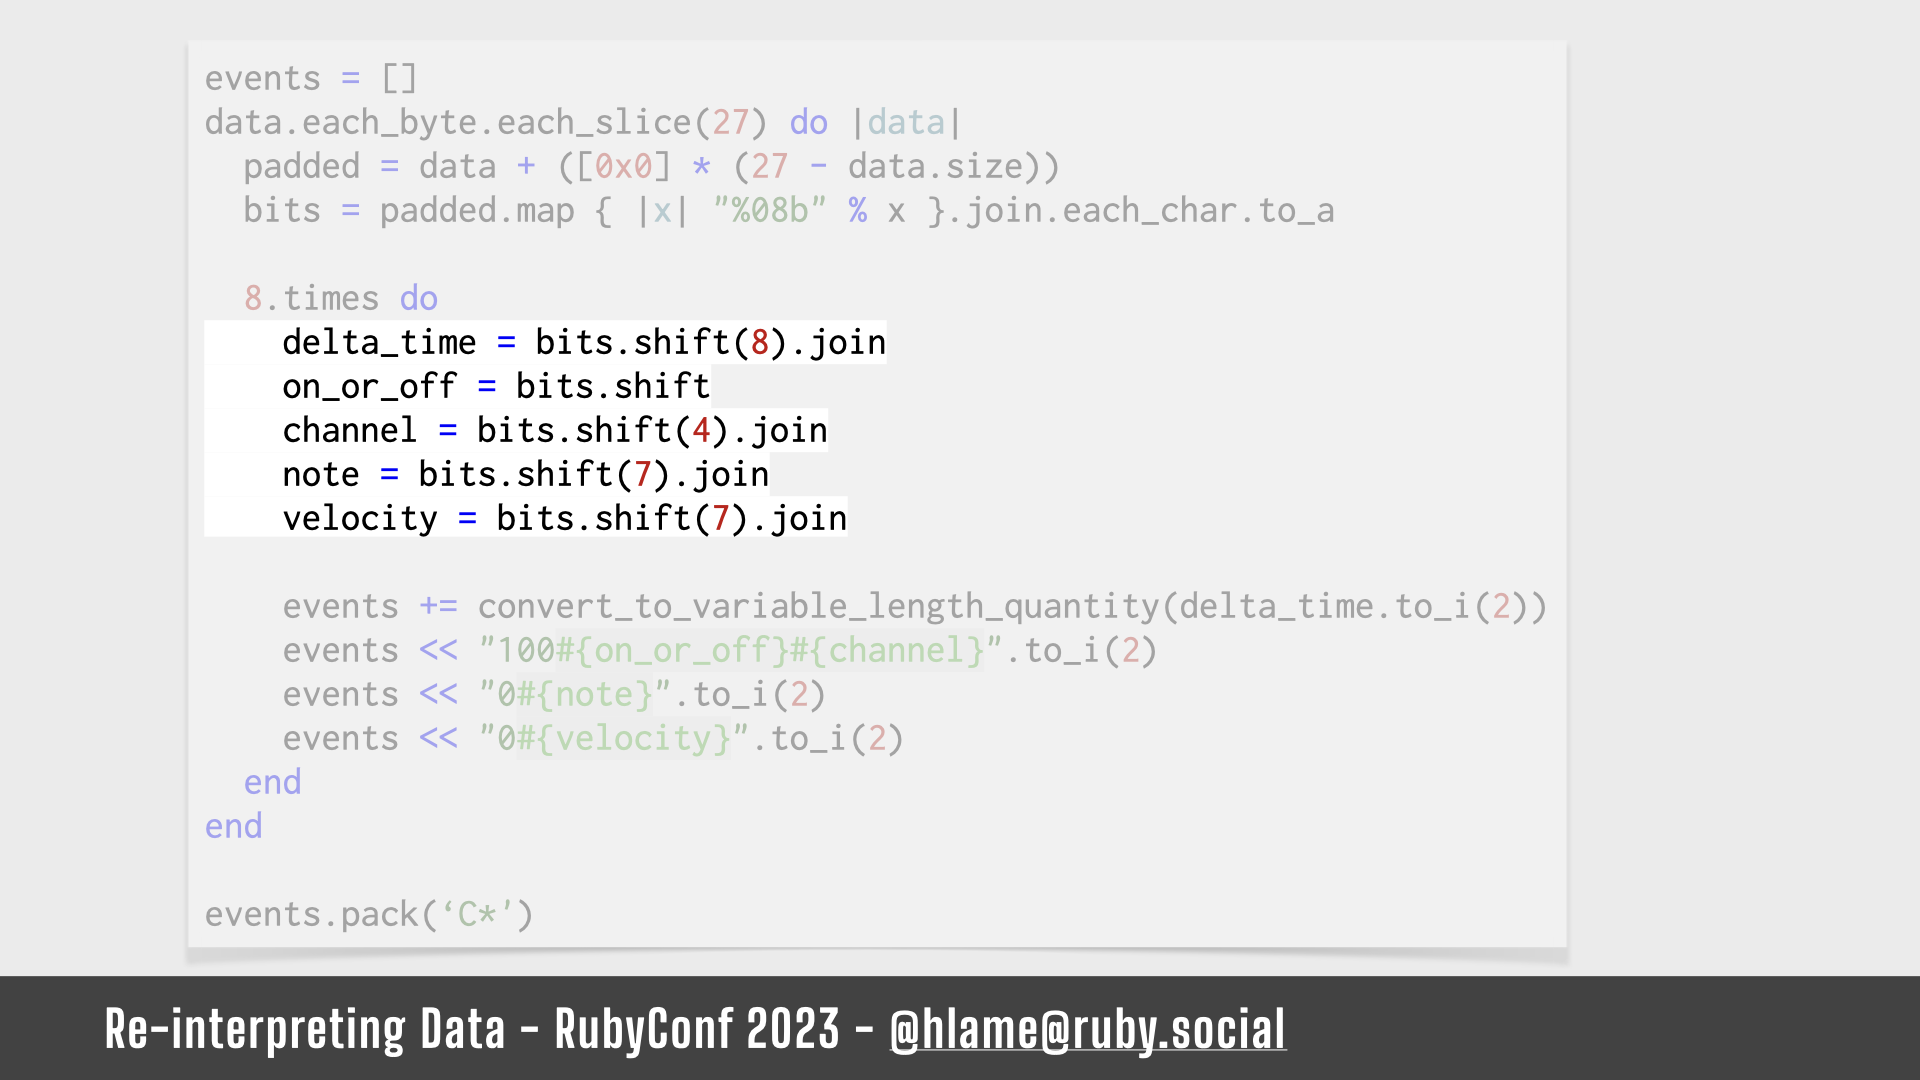
We can then loop 8 times to pull out chunks of 27 bits as we outlined above:
- 8 bits for the delta time,
- 1 bit for the on / off flag,
- 4 bits for the channel,
- 7 bits for the key,
- 7 bits for the velocity.
Writing bit-scale MIDI events from source data bytes: converting bits back into bytes
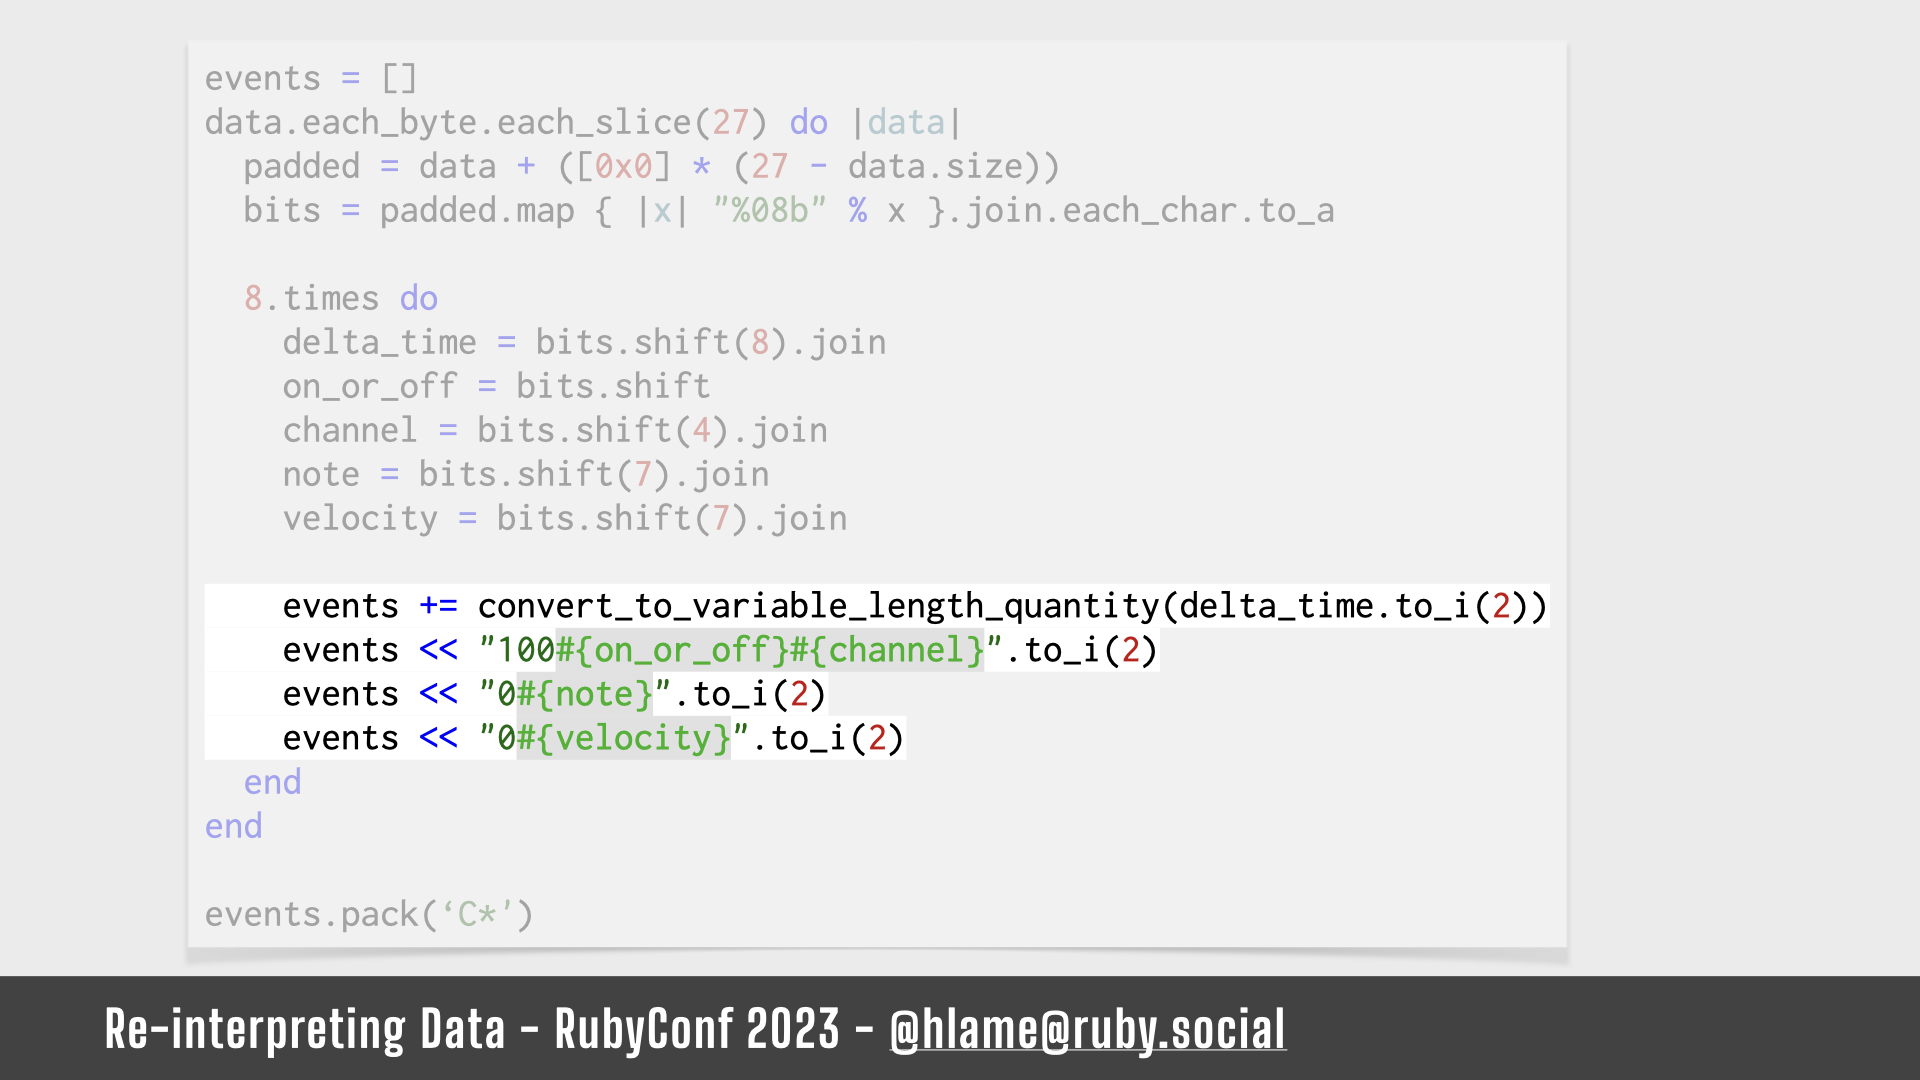
Then, we turn all those bits into the valid bytes we need with VLQ encoding for the time, and adding the static 100s and 0s at the front for the event type and data bytes. The to_i(2) says interpret this string as a binary number and convert it into a “real” number again, (binary numbers are real, Murray, what are you talking about?)15.
We put all these numbers into an array…
Writing bit-scale MIDI events from source data bytes: using Array#pack again?!
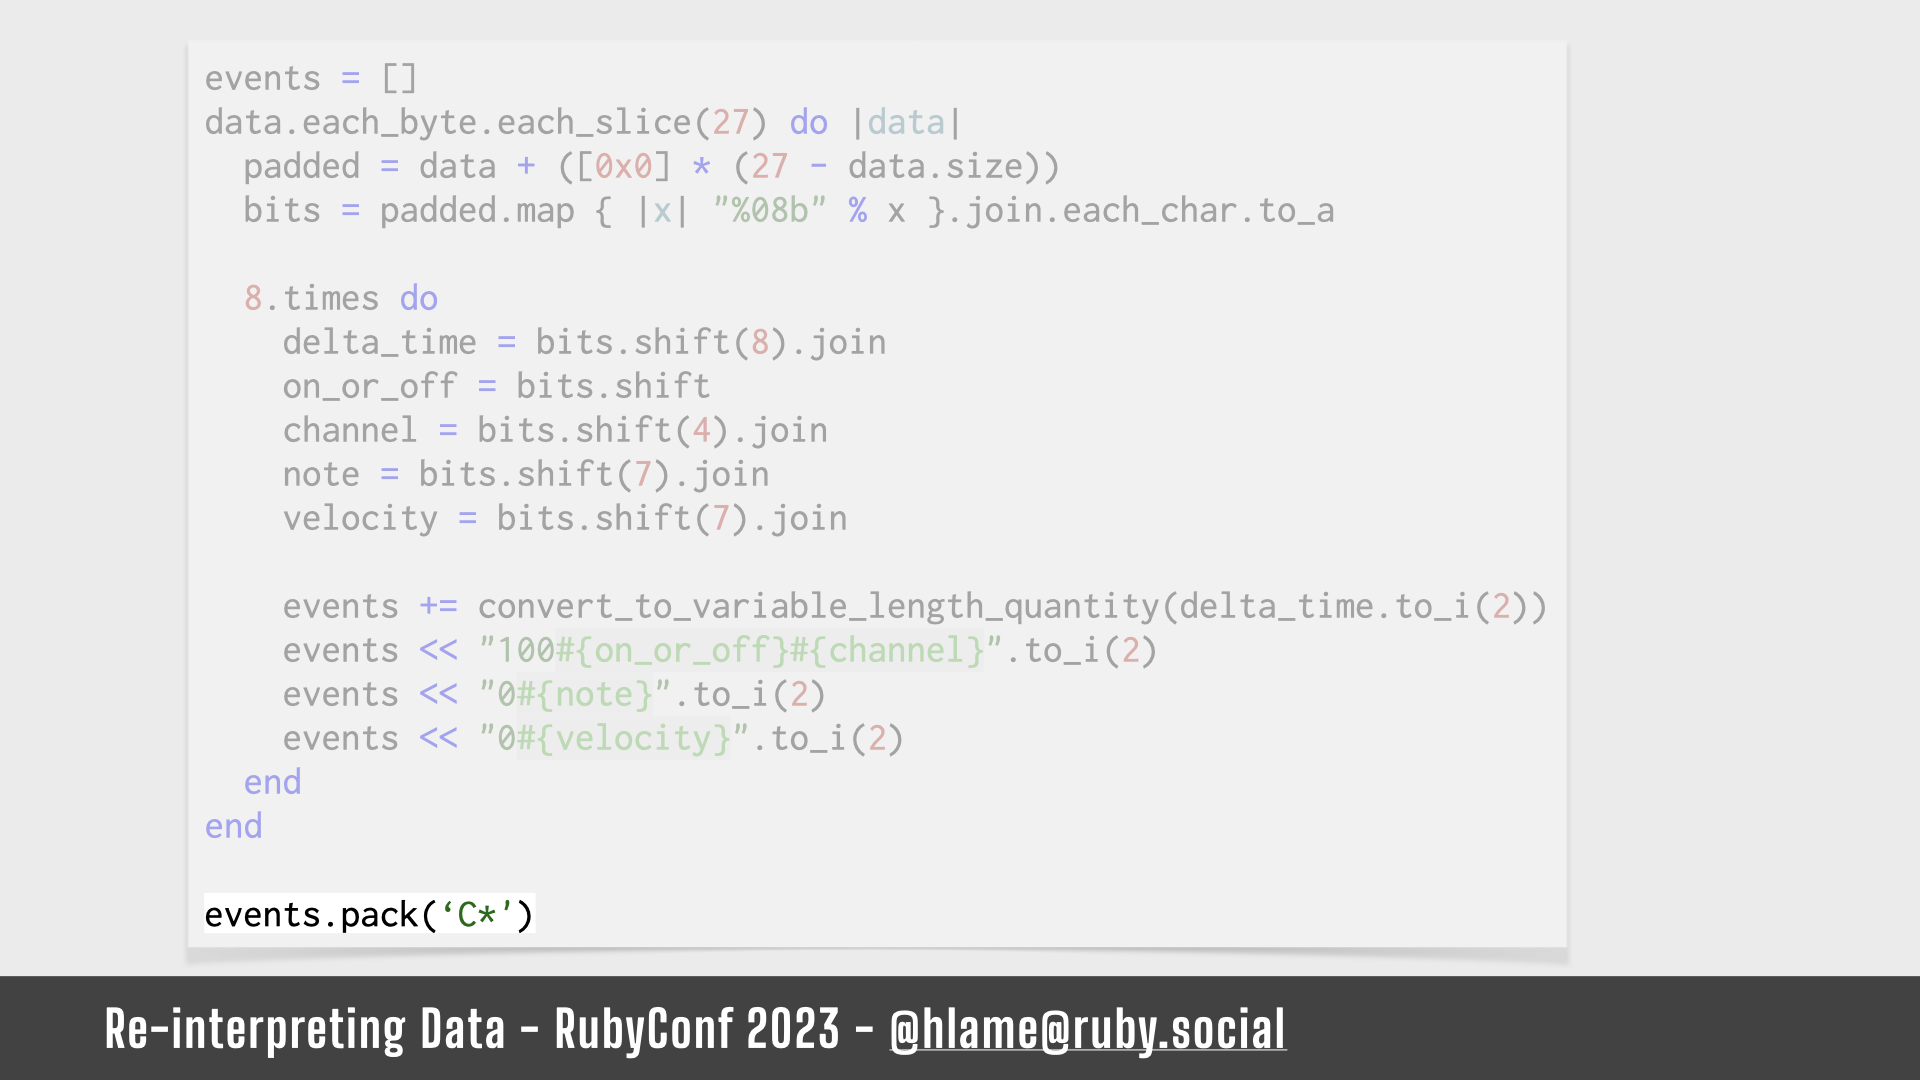
…Oh, it’s you again pack. Didn’t I say we were done?
Anyway, then we pack the whole array as 1-byte character data. And we can write that to our file.
So now we have unsophisticated, but valid, MIDI data generated from arbitrary data.
MIDI Demo

Let’s do another demo!
Demo time: MIDI (pt. 1)
You know the routine by now:
We get a generator object from stegosaurus, it’s called midriffs this time. We call make_from with the README file and we pass it to the helper function.
Demo time: MIDI (pt. 2)
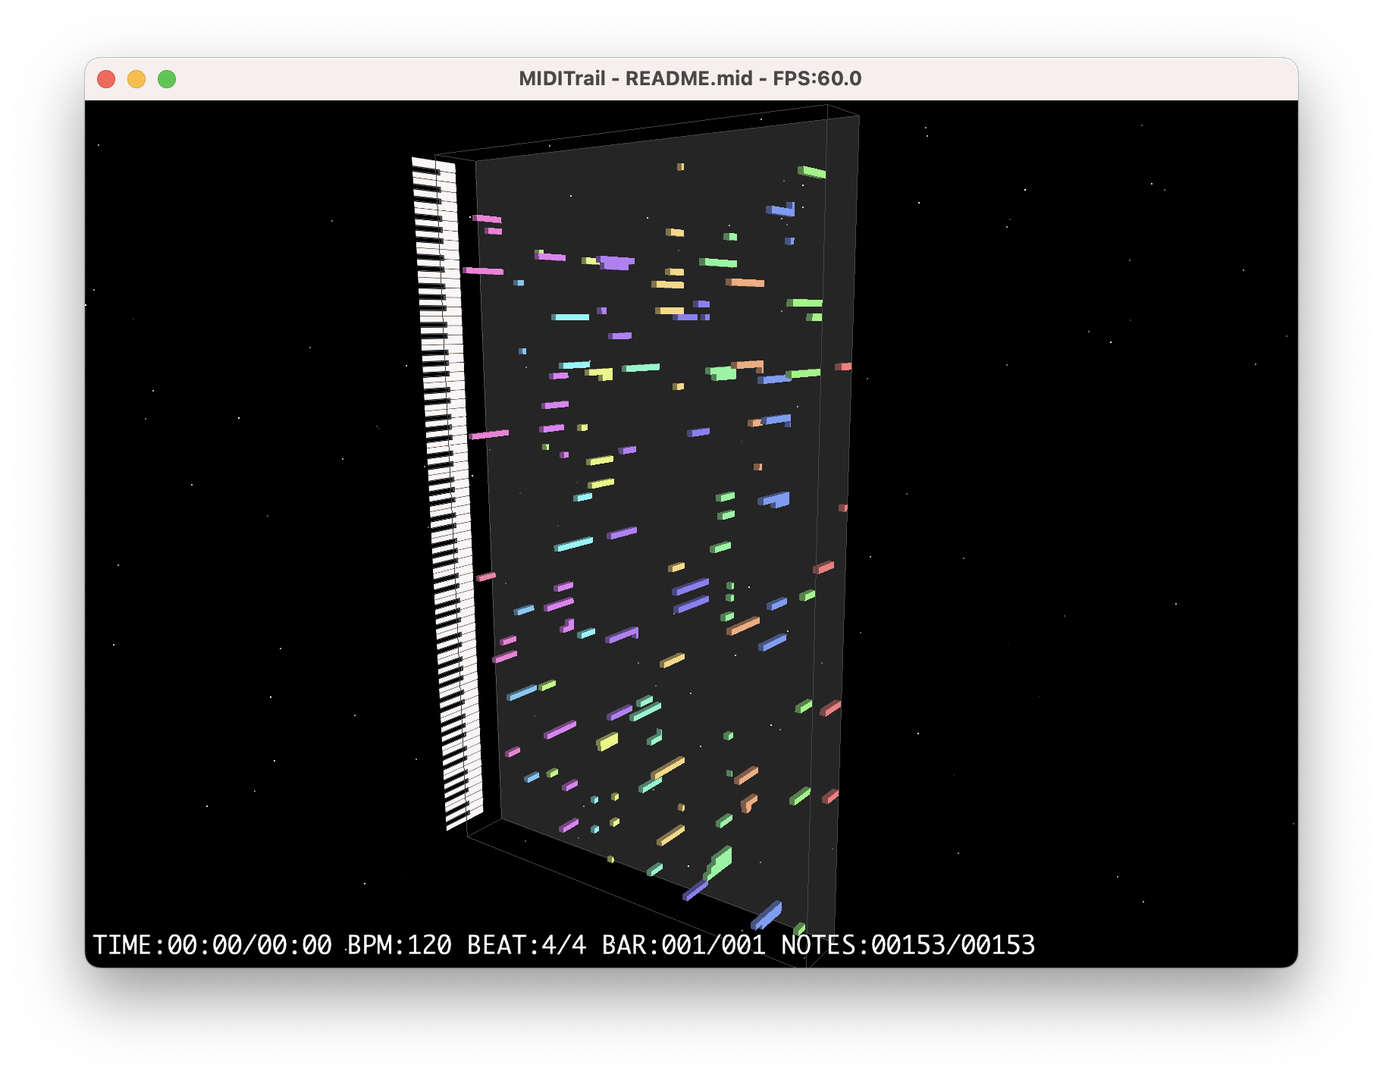
I’m opening this in an app called MIDITrail that will let me play the MIDI file, but will also show it as a keyboard travelling along a road of notes in space. Because, why not?
So, let’s listen to the orchestral score of my README:
The stegosaurus README, as a MIDI file16.
That was pretty fun wasn’t it? Bit short.
Demo time: MIDI (pt. 3)
But I know what you all want. You want Ruby the Orchestral Score!
I hope you are ready for this. It takes a while because… well… it’s not very efficient – all that bit and byte manipulation, turning them into strings and arrays takes a while…
Demo time: MIDI (pt. 4)
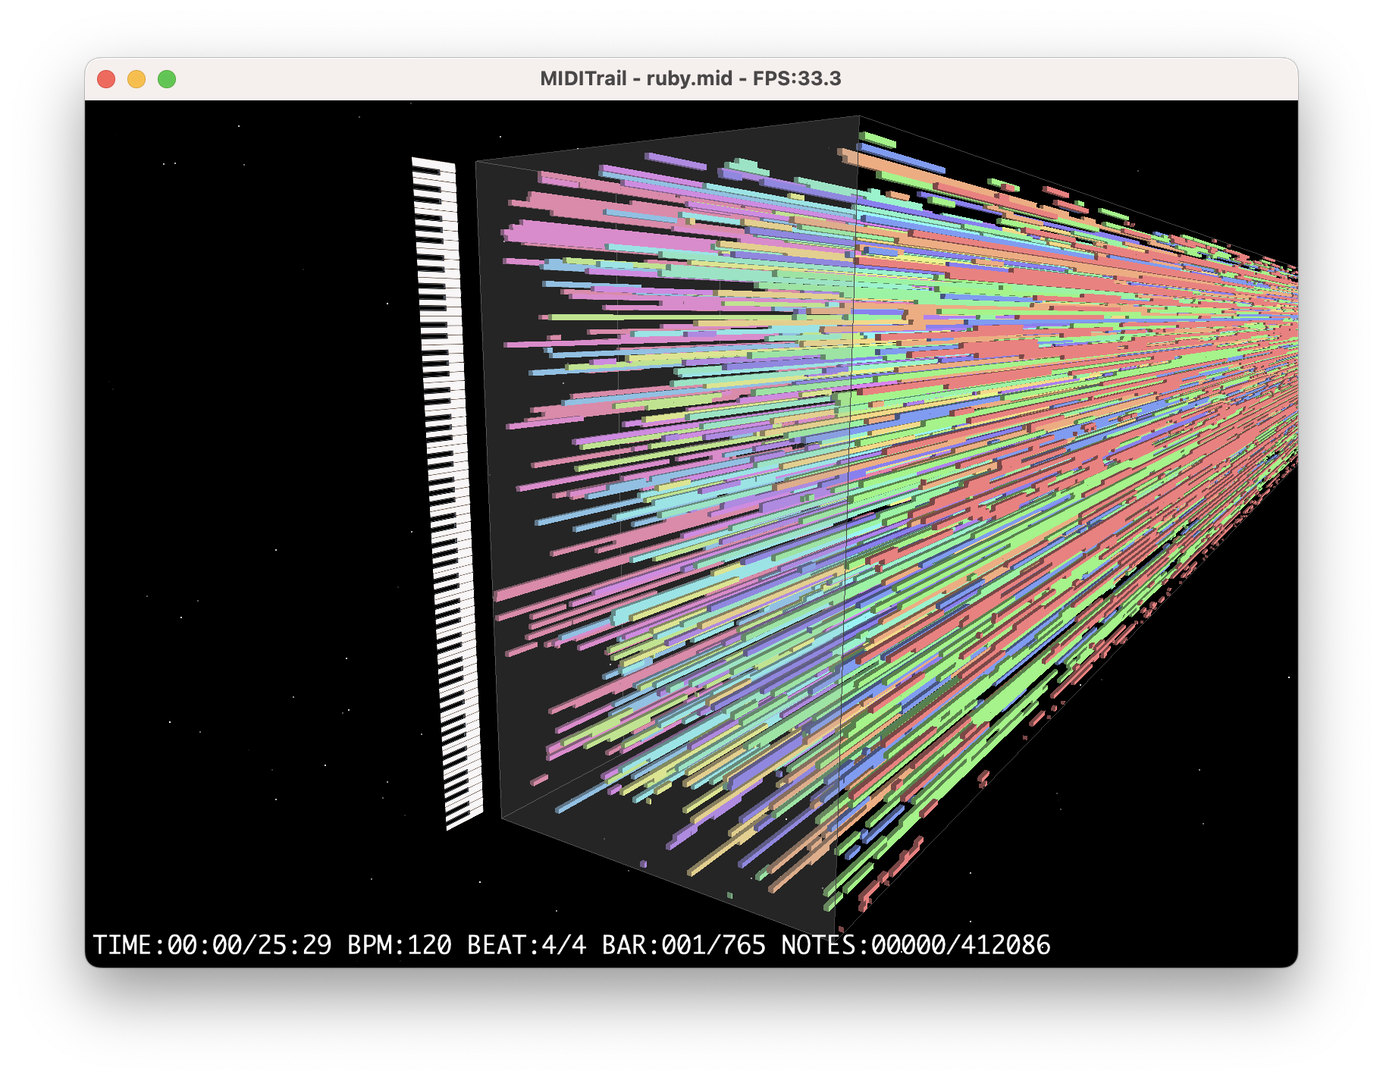
Here we go, it’s quite a lot longer than the README. Let’s pan around, and see, that’s uh, quite the space road of notes.
I am excited to present to you – Ruby 3.2.2 the orchestral score – I assume we’ll want this as the soundtrack to some parties later. Shall we listen to it?
The ruby 3.2.2 interpreter, as a MIDI file17.
[Rapturous applause]
Oh… it’s like an orchestra being kicked down the stairs! I mean, it’s better than the WAV version, right? It also goes on for like an hour or so.
Why?

Ok.
I get it.
You’re probably thinking why?
Why Ruby?

Ok, let’s start with the easy answer; why ruby?
We don’t normally do this kind of thing in a language like ruby. Bit and byte manipulation is pretty unwieldy, shouldn’t you use C?
Probably, but ruby is the language I know best, and I was able to get fast feedback by using ruby (although that didn’t stop me breaking it this morning apparently). That feels important to me when playing about with these kinds of toys and silly ideas.
That’s really my point here: pick a tool you know and are comfortable with in order to explore and learn. If, like me, you’re learning all about bit and byte manipulation and file formats, best not to also be learning about a new programming language at the same time. Of course, the flip side is that if you are learning a new programming language, you should re-implement a problem you’ve already solved and learn how to do it in the idioms and libraries of your new language.
I’ll let you into a little secret, that’s exactly what I did with this code. The first version of the WAV file generator was written in 2004 when I was a Python programmer. In 2007 I became a ruby programmer and I decided to port my little thing over to ruby to try and learn some more idioms. Although it’s a good job we glided over the BMP generator because it’s clear I didn’t learn very many ruby idioms when I did it.
Why this?

But, more existentially, why have I made this actual thing? It is, let’s face it, a pointless little toy, and why have I eaten 44 minutes of your life telling you about it?
I made it because I was curious and I thought it would be fun. We don’t often get to combine those two traits at work and that’s what I want to encourage by sharing my story.
Day-to-day coding at work can be… boring? Same-y? A friend boiled a lot of what we do down to:
putting strings in a database and taking them out again18.
I’m not saying work can’t be exciting, or challenging, or mentally stimulating – it often is! But an important part of a project like this for me is the freedom and fun of it all. I’m not making tradeoffs about user value and tech debt. I’m not following a road map or worrying about best practices. I’m just exploring something that’s interesting to me and making choices of what to build based on the whim of it.
Maybe you’re lucky and the itches you want to scratch are exactly the ones you get to scratch at work every day, but programming computers is amazing – we can make them do anything with just a few lines of letters, numbers, and too much punctuation. I refuse to believe that you have nothing outside the limited scope of your job you’d want to make a computer do! I encourage you to embrace that and go explore some idea that’s fun to you.
I’m categorically not saying you have to “hAvE a PaSsIoN fOr CoDiNg” and fill your evenings and weekends with extra coding. You can do this in your 9-5 – think about how you could embrace curiosity and fun in your day-to-day work. What are the opportunities to follow your whims? Look for those, or make the opportunities yourself. I shared the rubocop-magic_numbers gem, not just to shoe-horn a work reference in to justify them paying for the trip (thank you Cleo!) but because it was built by a colleague who wanted to play with rubocop’s AST stuff and managed to fit that into their day-to-day work in way that would be useful to the rest of us.
So, maybe you’ll learn something useful for work;
- I learned about space saving encoding techniques, and bit and byte manipulation, which could come in handy if I ever do embedded systems work.
Maybe your side-projects can spin out into a livelihood;
- I will happily come DJ at your wedding with a custom orchestral score generated from your personal data files
Maybe your side-projects will even be useful at work;
- like a new rubocop gem to encourage best practices
But, those shouldn’t be the only reason to do something.
This isn’t about work, it’s about play.
Source Code

All the code lives here if you want to play with it. It won’t hold up to a critical reading, and every time I come back to it I find some more bugs (and put more in apparently).
I said earlier I chose this name because I thought of it might be a steganography tool to allow you to hide data inside other formats. But it’s not because I wasn’t interested in writing the reconstruction routines that BMP and MIDI would require because… well, this was for fun and that didn’t interest me.
Thanks for listening, bye!

Thanks for listening, bye!19
